| nav | Example |
|---|---|
| group | SESAME SDK |
| title | iOS version |
| order | 1 |

- Sesame app on
https://apps.apple.com/app/id1532692301/
- Sesame app on
https://testflight.apple.com/join/Rok4GOFD/
-
- Change Scheme to SesameSDK, choose Any iOS Device
-
command+shift+kto clear the product folder
-
command+bto package SDK
-
- After completion, go to Xcode -> SDK project ->
Productsfolder, find SesameSDK.framework, right-click, choose Open in Finder to getSesameSDK.framework.
- After completion, go to Xcode -> SDK project ->
-
- Change Scheme to SesameWatchKitSDK, choose Any watch OS Device
-
command+shift+kto clear the product folder
-
command+bto package SDK
-
- After completion, go to Xcode -> SDK project ->
Productsfolder, find SesameWatchKitSDK.framework, right-click, choose Open in Finder to getSesameWatchKitSDK.framework.
- After completion, go to Xcode -> SDK project ->
Swift Package Manager is a tool for managing the distribution of Swift code. It integrates with the Swift build system and automatically performs the processes of downloading, compiling, and linking dependencies.
- Use Swift Package Manager to integrate SesameSDK into Xcode project:
dependencies: [
    .package(url: "https://github.com/CANDY-HOUSE/SesameSDK_iOS_with_DemoApp.git", .branch("master"))
]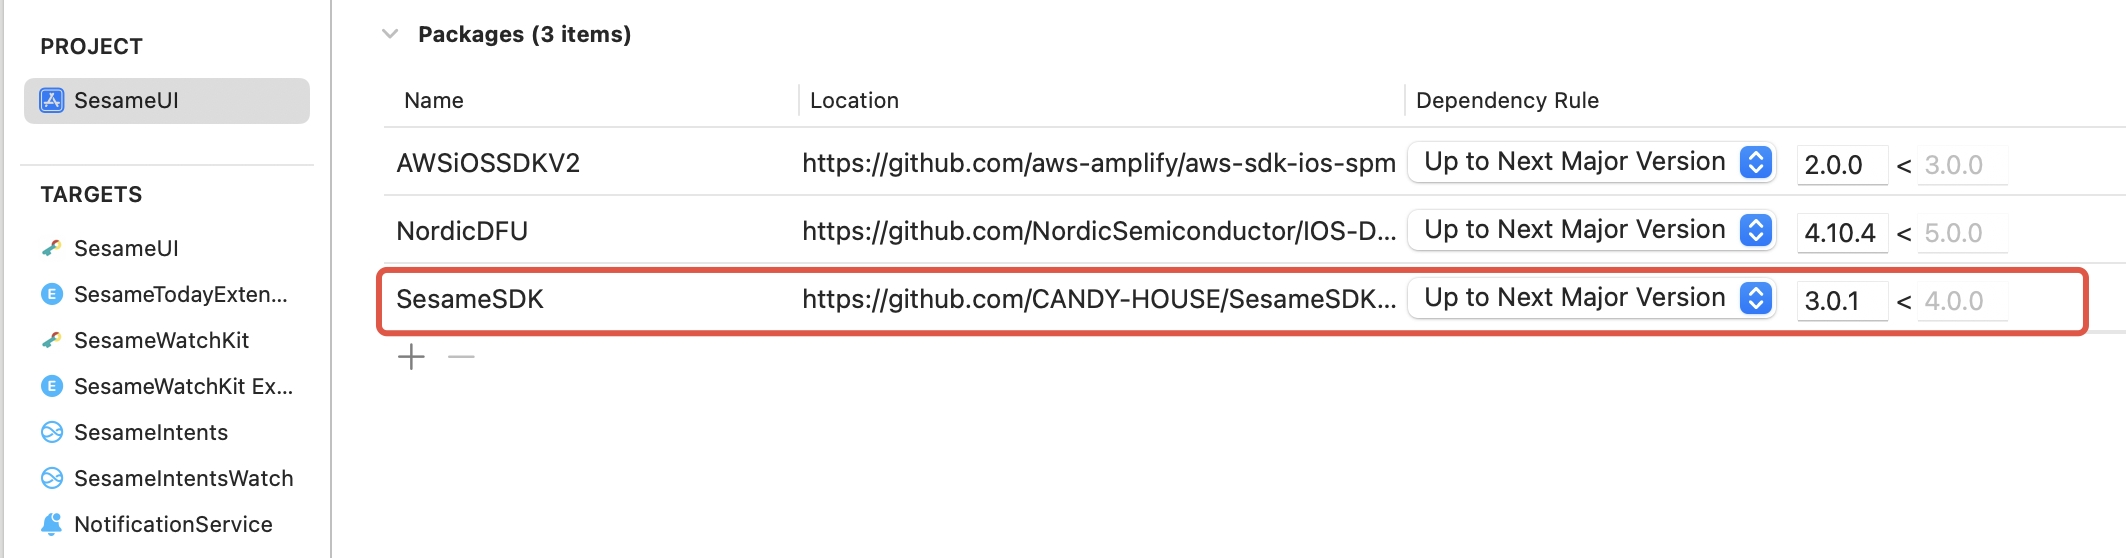
- If you don't want to use any dependency managers, you can manually integrate SesameSDK into your project.

<key> NSBluetoothAlwaysUsageDescription </key>
<string> To connect Sesame Smart Lock and lock/unlock the door. </string>
<key> NSBluetoothPeripheralUsageDescription </key>
<string>This app would like to make data available to nearby Bluetooth devices even when you're not using the app.
</string>Please start the Bluetooth scan at an appropriate time
CHBluetoothCenter.shared.enableScan { res in }Callback when Bluetooth status changes
public protocol CHBleStatusDelegate: AnyObject {
    func didScanChange(status: CHScanStatus)
}
The list of scanned Sesame devices will be returned to the caller at a frequency of once per second.
public protocol CHBleManagerDelegate: AnyObject {
    func didDiscoverUnRegisteredCHDevices(_ devices: [CHDevice])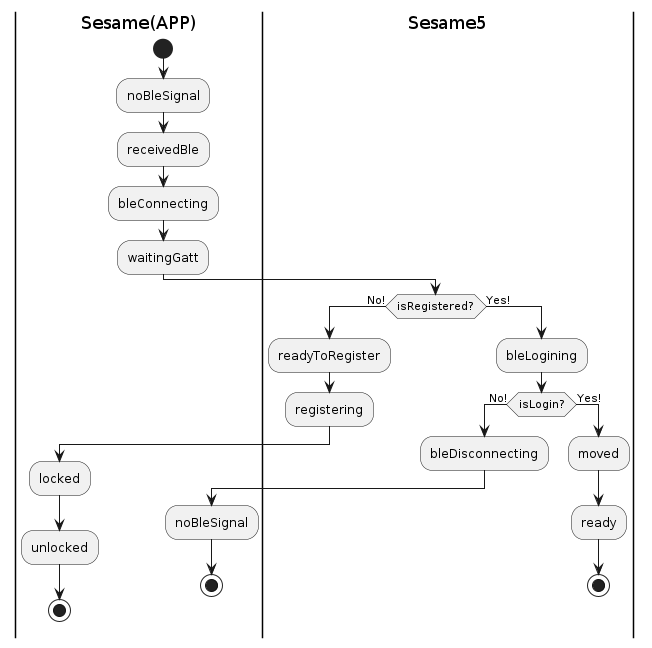
}Before establishing a connection, you should first confirm that the device status is connectable
if sesame5.deviceStatus == .receivedBle() {
    sesame5.connect() { _ in }
}
At this point, you will receive the connection status callback of the Sesame device
public protocol CHDeviceStatusDelegate: AnyObject {
    func onBleDeviceStatusChanged(device: CHDevice, status: CHDeviceStatus, shadowStatus: CHDeviceStatus?)
    func onMechStatus(device: CHDevice)
}When the connection status changes to "Ready to Register", you can register the device to complete the pairing. Registration is a necessary step to bind the device
if device.deviceStatus == .readyToRegister() {
    device.register( _ in )
}
After the registration is completed, you can get the paired devices through CHDeviceManager
var chDevices = [CHDevice]()
CHDeviceManager.shared.getCHDevices { result in
    if case let .success(devices) = result {
        chDevices = devices.data
    }
}After getting the paired devices, you can lock and unlock through the APP
    public func lock(historytag: Data?, result: @escaping (CHResult<CHEmpty>))  {
      if deviceShadowStatus != nil,
         deviceStatus.loginStatus == .unlogined {
          CHIoTManager.shared.sendCommandToWM2(.lock, self) { _ in
              result(.success(CHResultStateNetworks(input: CHEmpty())))
          }
          return
      }
      if (self.checkBle(result)) { return }
      let hisTag = Data.createOS2Histag(historytag ?? self.sesame2KeyData?.historyTag)

      sendCommand(.init(.lock,hisTag)) { responsePayload in
          if responsePayload.cmdResultCode == .success {
              result(.success(CHResultStateBLE(input: CHEmpty())))
          } else {
              result(.failure(self.errorFromResultCode(responsePayload.cmdResultCode)))
          }
      }
} public func unlock(historytag: Data?, result: @escaping (CHResult<CHEmpty>)) {
if deviceShadowStatus != nil,
deviceStatus.loginStatus == .unlogined {
CHIoTManager.shared.sendCommandToWM2(.unlock, self) { _ in
result(.success(CHResultStateNetworks(input: CHEmpty())))
}
return
}
if (self.checkBle(result)) { return }
let hisTag = Data.createOS2Histag(historytag ?? self.sesame2KeyData?.historyTag)
sendCommand(.init(.unlock,hisTag)) { responsePayload in
if responsePayload.cmdResultCode == .success {
result(.success(CHResultStateBLE(input: CHEmpty())))
} else {
result(.failure(self.errorFromResultCode(responsePayload.cmdResultCode)))
}
}
}For details of interaction between each instruction, please refer to the description of Bluetooth Protocol.
- View Details: Bluetooth Protocol
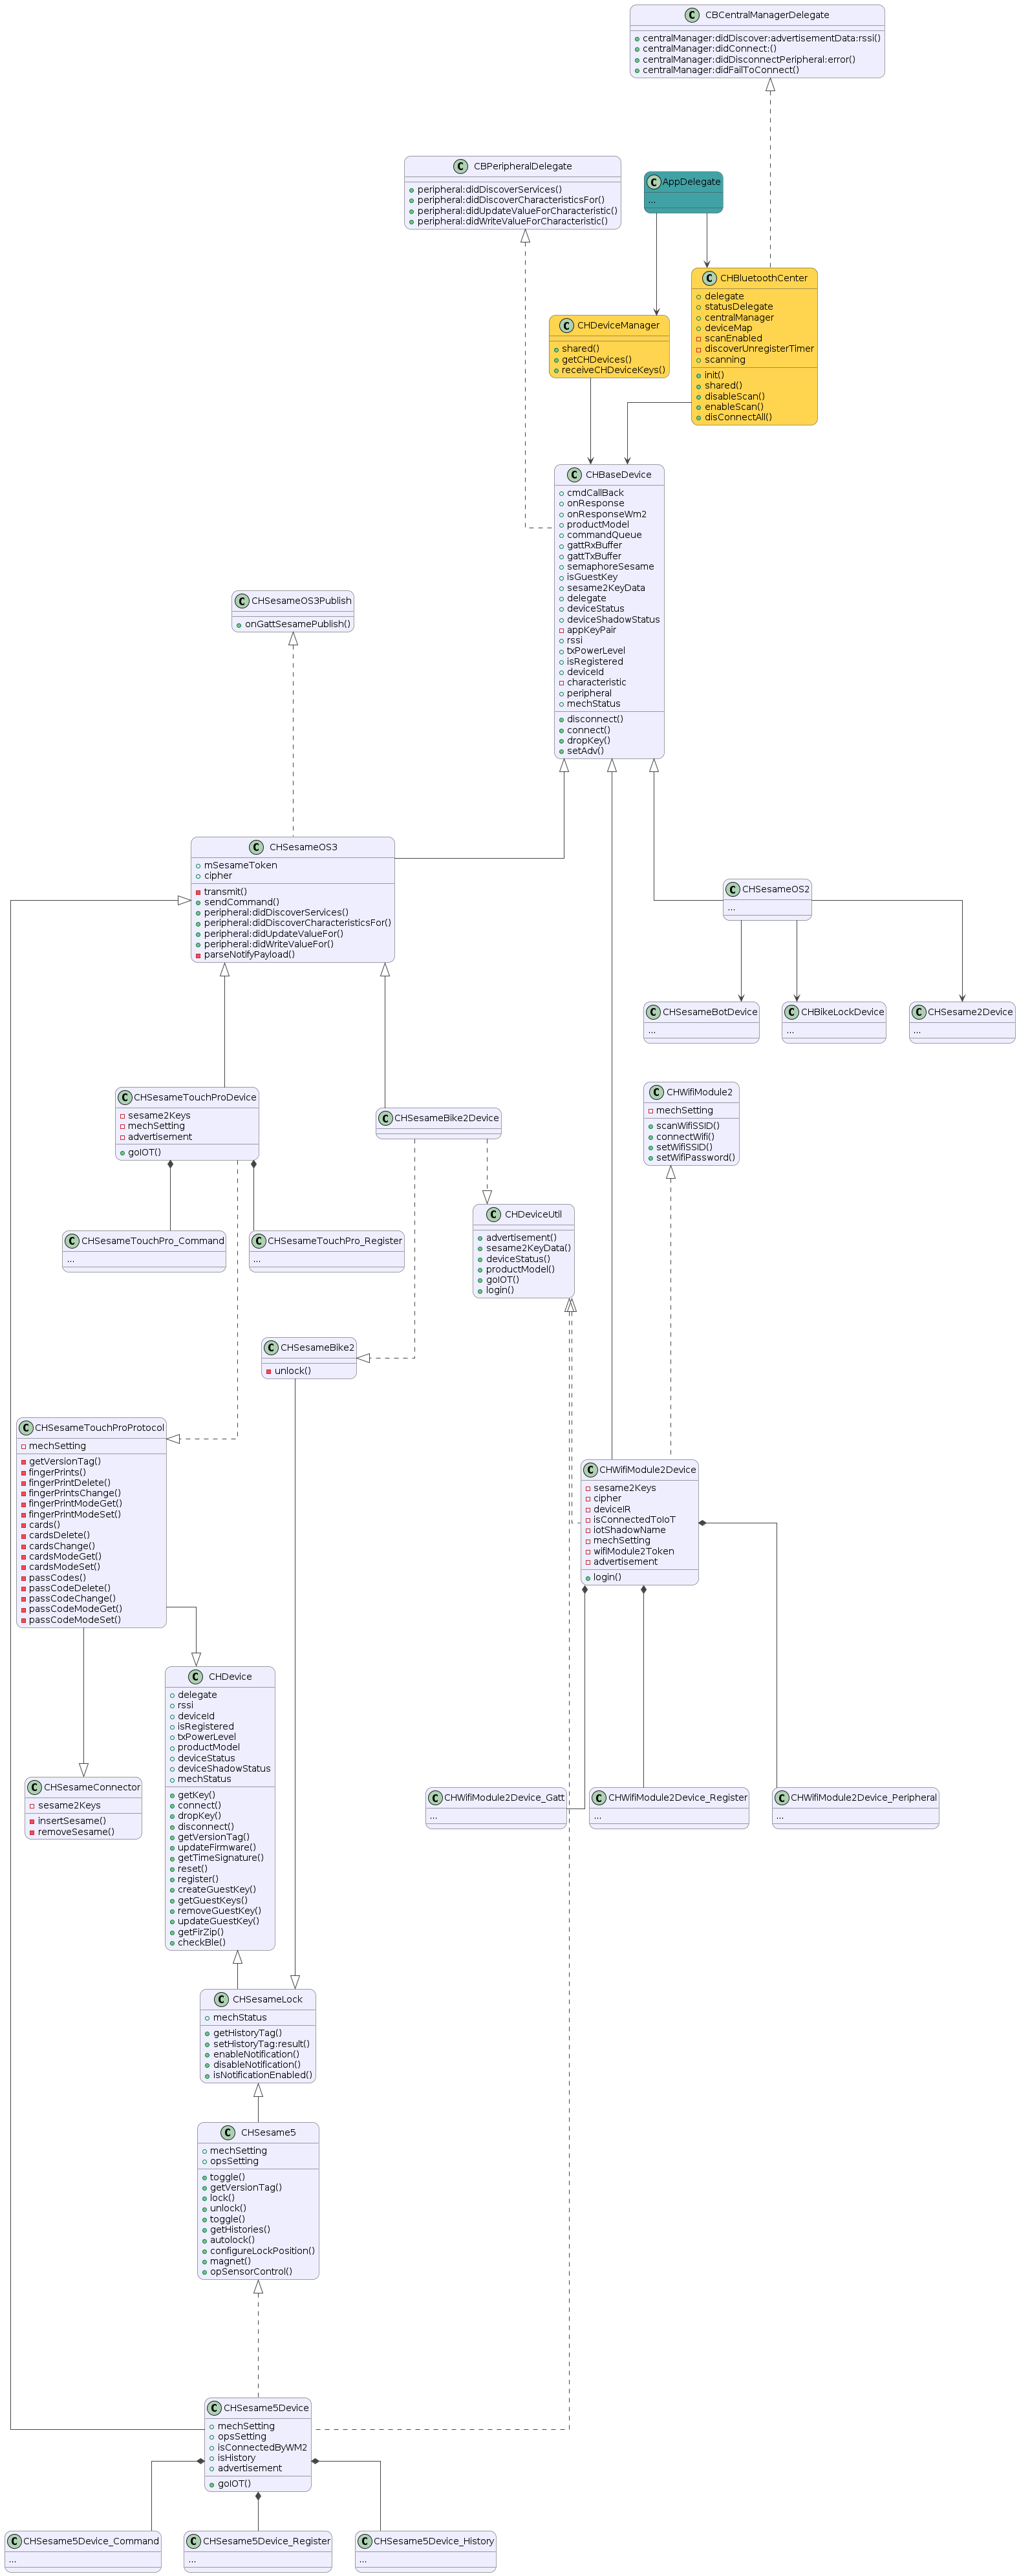
For the design details of SesameSDK, please refer to the following design diagrams and flowcharts.
-
Registration and login: Amazon Web Services
-
Bluetooth: CoreBluetooth
-
Local storage: CoreData
-
Library used: AWSMobileClientXCF
-
Siri Intents: Intents
-
Intents reference article: appintents
-
Mobile notifications: User Notifications
For details of each Class, please refer to the description of Sesame SDK Class.
- View Details: Sesame SDK Class