Your markdown. Your terminal. Your stage.
TerminalSlide turns any markdown file into a polished, keyboard-driven presentation - right inside your terminal. No PowerPoint. No Keynote. No browser tabs. No config files. Just a .md file and one command.
Built for developers, educators, and anyone who thinks in plain text.
- Quick Start
- Installation
- Writing Your First Deck
- Markdown Syntax Guide
- Presenting - Controls & Keybinds
- Themes
- Talk Timer
- Slide Overview Mode
- Editing Slides Inline
- Presenter Notes
- Exporting to PDF
- Live Reload
- Optional Front Matter
- Command Reference
- Who Is This For?
- Troubleshooting
The simplest way to get started:
pip install terminalslide
terminalslide init
terminalslide starter.md
That's it. You're presenting.
TerminalSlide requires Python 3.10 or newer.
pip install terminalslideTo confirm it installed:
terminalslide --version
# terminalslide, version 1.0.0Clone the repo and install in editable mode:
git clone https://github.com/azazahmedlipu79/terminalslide.git
cd terminalslide
python3 -m venv .venv
source .venv/bin/activate
pip install -e .
Now terminalslide is installed and any changes you make to the source will take effect immediately.
TerminalSlide reads any .md file. Slides are separated by --- on its own line.
# My First Slide

This is the opening slide. Write whatever you want here.

---

# Second Slide

- Bullet points work
- Just like in regular markdown

---

# Third Slide

A plain paragraph is fine too.
Save it as talk.md and run:
terminalslide talk.mdYou'll see:
Loaded 3 slides from talk.md
Then the presentation opens fullscreen.
No YAML front matter required. No config file. No project folder. If the file exists and has content, TerminalSlide will present it.
Everything you already write in markdown works. Here's what TerminalSlide specifically supports:
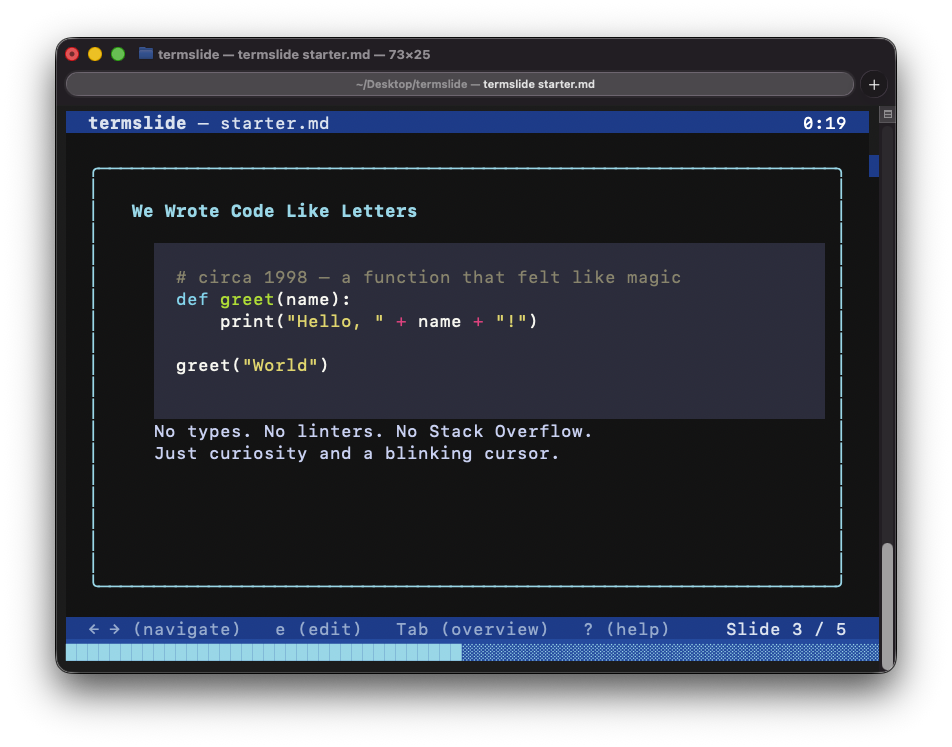
The first # heading on a slide becomes the title, displayed large and bold at the top.
# This Becomes the Slide Title

Everything below this is the body content.- First bullet
- Second bullet
- Third bulletNested bullets work with standard indentation.
1. First step
2. Second step
3. Third stepThis is **bold text** and this is *italic text*.Wrap code in triple backticks with the language name. TerminalSlide highlights it automatically.
```python
def greet(name: str) -> str:
    return f"Hello, {name}!"
``````javascript
const greet = (name) => `Hello, ${name}!`;
```Supported languages include: Python, JavaScript, TypeScript, Rust, Go, Bash, SQL, JSON, YAML, HTML, CSS, and many more (powered by Pygments).
---A --- on its own line starts a new slide. That's the only rule.
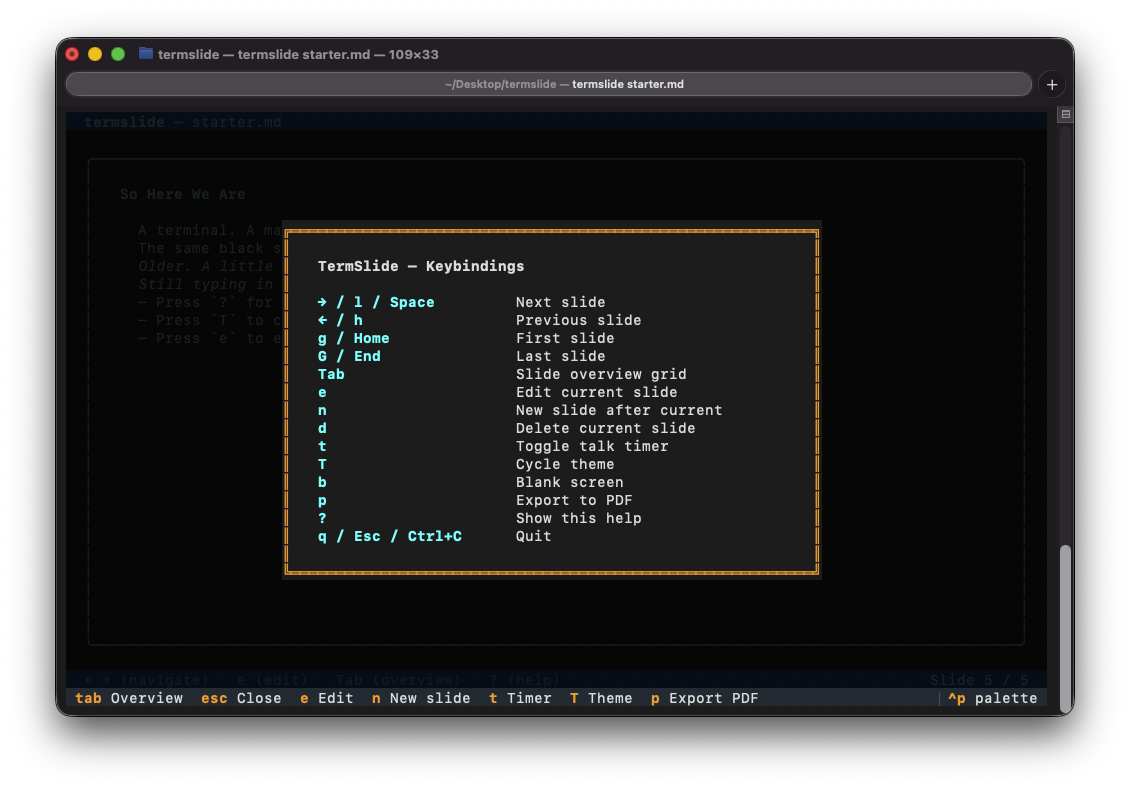
Once you open a file, TerminalSlide is fully keyboard-driven.
| Key | What it does |
|---|---|
→ or l or Space |
Next slide |
← or h |
Previous slide |
g or Home |
Jump to first slide |
G or End |
Jump to last slide |
Tab |
Open slide overview grid |
e |
Edit the current slide |
n |
Add a new blank slide after this one |
d |
Delete the current slide (asks to confirm) |
t |
Start / pause the talk timer |
T |
Cycle to the next visual theme |
b |
Blank the screen (press any key to return) |
p |
Export the deck to PDF |
? |
Show the keybind help overlay |
q or Esc or Ctrl+C |
Quit (autosaves any edits first) |
┌─────────────────────────────────────────────────────────┐
│ terminalslide - talk.md                          0:00       │
├─────────────────────────────────────────────────────────┤
│                                                         │
│   Your Slide Title                                      │
│                                                         │
│   • First bullet point                                  │
│   • Second bullet point                                 │
│                                                         │
├─────────────────────────────────────────────────────────┤
│ ← → navigate   e edit   Tab overview   ? help Slide 2/7 │
│████████████░░░░░░░░░░░░░░░░░░░░░░░░░░░░░░░░░░░░░░░░░░░│
└─────────────────────────────────────────────────────────┘
- Top bar - filename on the left, timer on the right (when active)
- Content area - your slide, vertically centered
- Bottom bar - navigation hints and current slide number
- Progress bar - fills as you move through the deck
TerminalSlide ships with three themes. Press T during a presentation to cycle between them live.
| Theme | Description |
|---|---|
dark |
Dark charcoal background, white text, cyan accents. Default. |
light |
Off-white background, dark text, navy blue accents. |
minimal |
Pure black, grey text, white accents. Maximum focus. |
The active theme also applies to your PDF export.
Add a theme: line to your front matter:
---
theme: light
---Press t to start a count-up timer shown in the top-right corner of the screen.
- Press
tagain to pause it. - Press
twhile it's running to resume. - Hold
tfor about a second to reset it to zero.
When you first press t, TerminalSlide will ask:
Set target duration (min):
Type a number (e.g. 20 for a 20-minute talk) and press Enter. Leave it blank to just count up with no limit.
Once a target is set:
- Timer stays white while you have plenty of time
- Turns amber when you've used 80% of your time
- Turns red when you've hit your limit
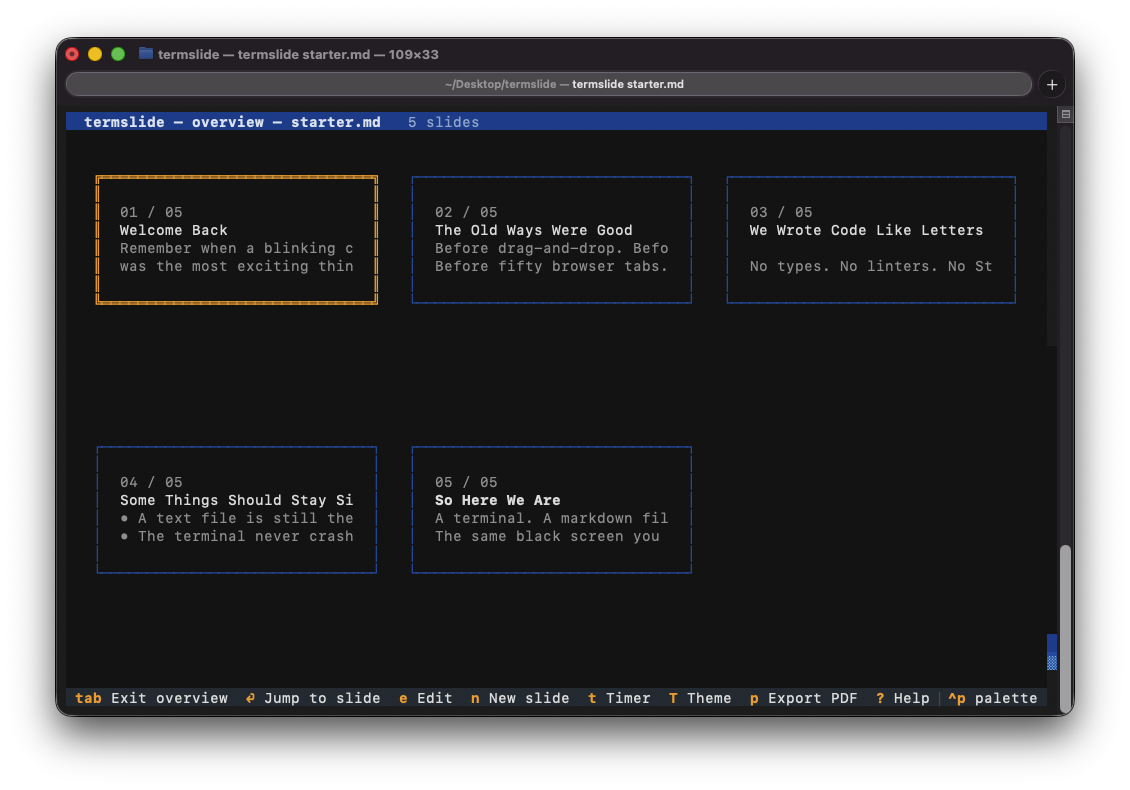
Press Tab at any time to enter the overview grid. You'll see all your slides as small cards.
┌──────────────────────────────────────────────────────┐
│ terminalslide - overview - talk.md           7 slides    │
├──────────────┬──────────────┬──────────────┬─────────┤
│ 1            │ 2            │ 3            │ 4 ●     │
│ Introduction │ The Problem  │ Our Solution │ Results │
├──────────────┴──────────────┴──────────────┴─────────┤
│ Arrow keys to move   Enter to jump   Tab/Esc to exit  │
└──────────────────────────────────────────────────────┘
- The ● dot marks your current slide
- Arrow keys to move through the grid
- Enter to jump to the highlighted slide
- Tab or Esc to go back without changing slide
Great for navigating a long deck quickly during a Q&A.
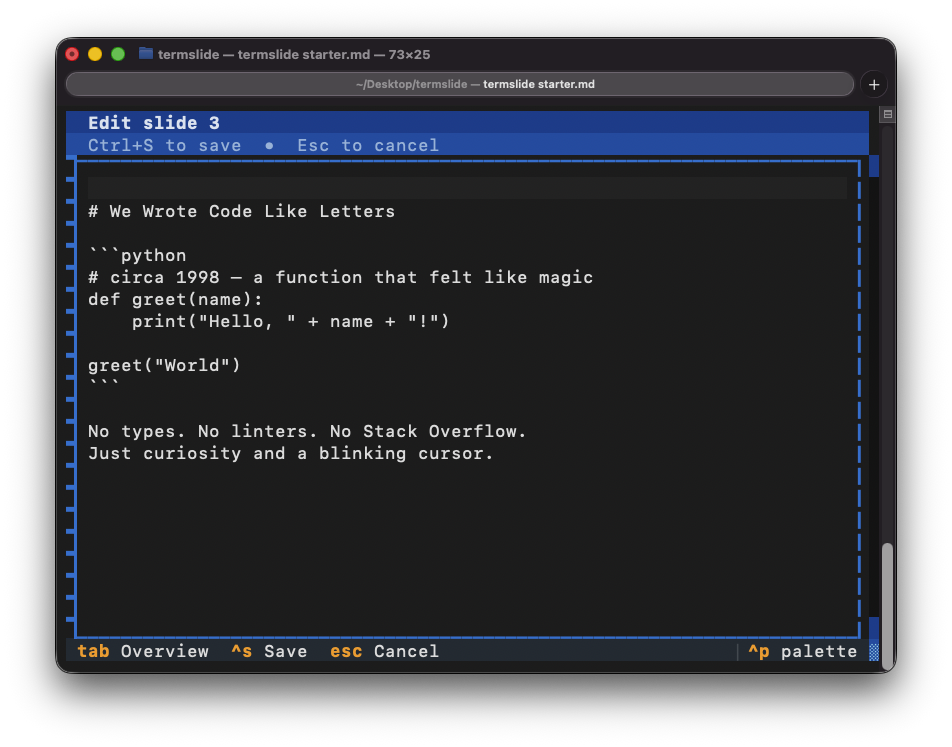
Press e on any slide to edit it without leaving the presentation.
A text editor opens right inside the terminal with the slide's raw markdown. Make your changes, then:
- Ctrl+S - save and return to the slide (changes apply instantly)
- Esc - cancel and go back without saving
Changes are saved back to your original .md file automatically. TerminalSlide also autosaves every 30 seconds and on quit, so you never lose anything.
Press n to insert a new blank slide immediately after the current one. It opens in the editor so you can fill it in right away.
Press d to delete the current slide. TerminalSlide will ask:
Delete slide 4? [y/N]
Press y to confirm or n (or Esc) to cancel. You can't delete the last remaining slide.
Add a note to any slide that's only visible to you - not during the presentation, not in the PDF (unless you want it).
# Your Slide Title

- First point
- Second point

> note: Pause here and ask the audience what they think.
Notes are shown when you edit the slide. They're stripped from present mode and PDF output by default.
Press p at any point during your presentation. TerminalSlide generates a PDF where:
- Each slide is one page
- The theme (colors, fonts) carries over from the terminal view
- Code blocks appear with monospace font and a background box
- Slide numbers appear bottom-right
- The front matter
author,title, anddateappear in the footer
The PDF is saved next to your markdown file with the same name:
talk.md → talk.pdf
You'll see a confirmation in the footer:
PDF saved: talk.pdf
While TerminalSlide is running, you can edit your .md file in any external editor - Vim, VS Code, Obsidian, Nano, anything. TerminalSlide watches the file for changes.
The moment you save:
- The deck reloads automatically
- Your current slide position is preserved
- A message flashes briefly:
Reloaded - 7 slides
This means you can have your editor open on one monitor and the live presentation on another, updating in real time as you write.
You can add a YAML header at the very top of your file to configure metadata. It's completely optional - everything works without it.
---
title: Python Crash Course
author: Your Name
theme: dark
date: 2026-03-27
---

# First Slide

...| Field | Effect |
|---|---|
title |
Used in the PDF footer |
author |
Used in the PDF footer |
theme |
Sets the default theme (dark, light, or minimal) |
date |
Used in the PDF footer |
The front matter block is not shown as a slide - it's metadata only.
# Open a markdown file as a presentation
terminalslide talk.md

# List all slide titles in a file (short or long form)
terminalslide -r talk.md
terminalslide --read talk.md

# List all .md files under the current directory
terminalslide --list

# Generate a starter template
terminalslide init

# Print the version
terminalslide --version

# Print help
terminalslide --helpGenerates a starter.md file in your current directory with example slides, code blocks, bullets, presenter notes, and front matter - so you can explore the full syntax immediately.
If starter.md already exists, it asks before overwriting:
starter.md already exists. Overwrite? [y/N]
Developers - Your README is already a talk. Your docs are already slides. Run terminalslide notes.md and present without reformatting a single line.
Technical tutors - Code examples are syntax-highlighted, --- separators become slides. No new tools to learn. Just teach.
Conference speakers - Live timer, overview grid, and a themed PDF export. Everything a talk needs, nothing you don't.
Note-takers & writers - If you write markdown with --- between sections, those notes are already a presentation. Export to PDF and hand them out.
terminalslide: command not found
Your virtual environment isn't active. Run source .venv/bin/activate first.
'talk.md' doesn't exist. Create it? [Y/n]
If you run terminalslide talk.md and the file doesn't exist, TerminalSlide asks whether to create it. Press Enter (or y) and it walks you through four quick prompts - title, author, theme, and date - all with sensible defaults. Just press Enter on each one to accept. The file is created with your front matter and two starter slides, then opens immediately. Press n at the first prompt to cancel without creating anything.
Error: 'talk.md' is empty.
The file exists but has no content.
Warning: file does not have a .md extension.
This is just a warning - TerminalSlide will still open the file. Works fine for .txt files etc.
PDF export failed: reportlab is not installed
Run pip install reportlab in your environment.
Live reload not working
This requires the watchdog package. Run pip install watchdog. If it's installed and still not working, a message appears in the terminal's stderr - check there for details.
The display looks broken / characters are wrong Make sure your terminal supports Unicode and has a modern font (e.g. JetBrains Mono, Fira Code, or any Nerd Font). Most modern terminals work fine.
Read the story behind this project: I Turned My Terminal Into a Presentation Tool
TerminalSlide is open source and MIT licensed. Built with Textual, Rich, and a love for the terminal.