Sample MD SAL Solution
In order to provide information on what you will need to do in order to create your own MD-SAL application, it may be easiest to demonstrate those steps through examination of the building of an actual application, one we call "Whitelist".
Note: In this page we will refer to the Whitelist "solution", which is the whole thing we are creating. It is made up of two separate MD-SAL applications, one called Netuser and one called Whitelist. We will make it clear whether we are referring to the broader Whitelist solution, or the specific component of that solution called the Whitelist application.
First a bit of background. The idea of the Whitelist sample solution is to provide a mechanism for allowing certain types of traffic, and disallowing all others. Hence the idea of a "Whitelist".
Our application is extremely basic - it simply takes two lists, "netuser" and "whitelist", each of which is a list of IP addresses. The solution allows communication between those two sets of IP addresses. Our Whitelist solution is actually the two individual applications: Whitelist and Netuser. The solution operates on a real network of Openflow-supporting devices. And it makes use of other MD-SAL applications - Brocade's "Path Explorer" (renamed to "Topology Manager" in Brocade SDN Controller 2.0) in this case - thus demonstrating some of the power of building applications in an MD-SAL environment.
Here is a picture of the solution, to get us started:
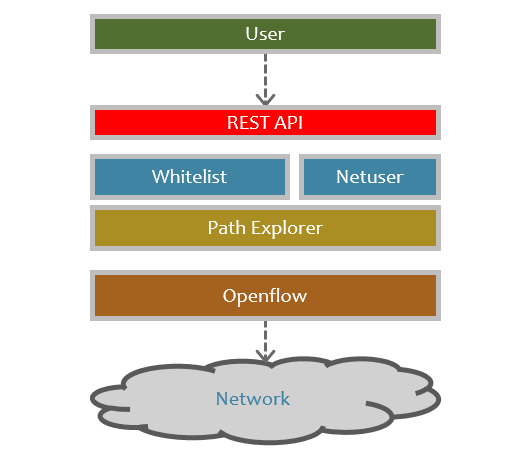
The image above shows the components that make up the solution. Starting in the middle, there are two applications we have developed: Whitelist and Netuser. We will describe how these applications are built in the following sections, but the general functionality they provide is what is described here:
- Netuser: A list of IP addresses, considered as the user systems or servers that wish to get access to the network.
- Whitelist: A list of IP address destinations, representing the allowed IP addresses which systems from the Netuser list are allowed to access.
Looking above the Whitelist and Netuser applications, there is the REST API. This API is auto-generated for us by the MD-SAL tools that are referenced when we built our archetype for these two applications. A user (or an external application) can make changes to our Netuser and Whitelist data, using this REST API. It is important to note that this REST API comes absolutely for free, and is auto-generated for us by the MD-SAL build process.
Thus, this REST API will operate on the model objects associated with our Whitelist and Netuser MD-SAL applications. Users can get and set information from those model objects without any code written by us.
Looking below our Whitelist and Netuser applications, the Path Explorer (an additional Brocade application) provides a layer for communicating with the devices in the network using Openflow. The Path Explorer implements the following functionality:
- We provide a source IP and destination IP address.
- We optionally specify one or more "waypoints", which are switches through which we desire our "path" to pass.
- Path Explorer determines the best path between those two IP addresses, and provisions switches along the path with Openflow flow entries to enable traffic between the IP addresses we provided.
Model-based communication occurs when one module or application modifies data in the model, and another module or application listens for those changes, and takes action based on the contents of the change.
The following diagram shows how this communication takes place when a user modifies either the Whitelist or Netuser data, by adding or removing IP addresses.
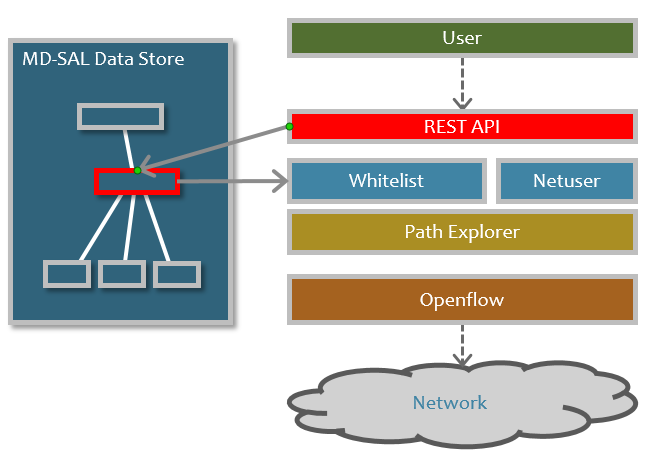
In the figure, the User makes changes to the model using the REST API. This is done without the intervention of our applications. However, the Whitelist application is listening for changes to the Whitelist or Netuser model objects in the MD-SAL data store. When a change occurs, the Whitelist application receives notification and takes the appropriate action - this is the code we provide.
In a similar manner, when the Whitelist application decides to create a flow between a Netuser IP address and a Whitelist IP address, it creates a "Path" and adds it to the Path Explorer model in the MD-SAL data store. In a similar manner to what was described above for Whitelist, the Path Explorer is listening for changes to Path objects in its MD-SAL data store. When a change occurs, the Path Explorer receives notification and creates the Openflow flows to provision that path. This is shown in the figure below:
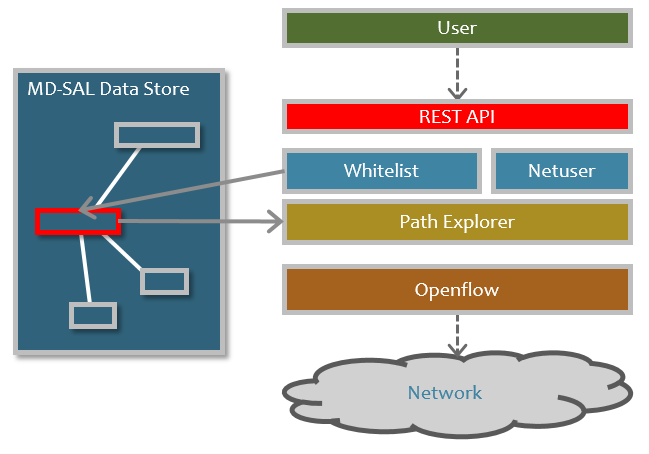
To summarize, our application components are not communicating directly with each other, or via a Java message service, but rather by modifying the model, and allowing model listeners to receive notifications of changes and to take appropriate action.
Now that we have a general idea of the Whitelist solution, we can explore how it is built.
Note: For detailed information on the following steps, please see the wiki page on Creating MD-SAL Applications.
The first step in creating our solution is to create our two applications, Whitelist and Netuser, using Brocade's Maven archetype. In order to accomplish this we will need to do the following:
-
Repository: Install Nexus on your system, and configure the appropriate proxy repositories and proxy group. Your Brocade representative can assist with this process. If using a standard Opendaylight archetype, you will not need to use this local Nexus repository. Rather you will use whatever procedures are specified for the archetype you choose.
-
Archetype: When you build your applications, you will run the archetype:generate goal in Maven, and specify the appropriate locations for the archetype's group ID and artifact ID. During the build process, you will be asked for your application's group ID and artifact ID, as well as the application name (e.g. "WhitelistApp").
-
Namespace: Many archetypes do not personalize the namespace located in the YANG model for your application. You will need to modify this, especially since you are creating two applications, and having two applications with the same namespace will cause undesirable things to happen to OpenDaylight.
These are the initial steps for building your MD-SAL application. Once complete, you should have two independent applications that are ready for the customization required to implement your desired functionality.
Before we dig into the code, we need to set up the YANG models for our two applications. Remember that our Netuser and Whitelist application data consists in each case of lists of IP addresses. Our YANG models will reflect this fact.
Note: That this is an abbreviated version of the file:
module WhitelistApp {

    namespace "brocade:whitelist";
    import ietf-inet-types { prefix "inet"; revision-date 2010-09-24; }

    container whitelist {

        list whitelist-entry {

            key "ip-addr";
            leaf ip-addr {
                type inet:ipv4-address;
                description "ipv4 address of an allowed destination";
            }
        }
    }
}
Details of YANG files are described elsewhere, including the page mentioned earlier (Creating MD-SAL Applications). Suffice to say that this example of the whitelist model shows the container whitelist, the list of whitelist_entry entries, and the leaf node ip-addr, which together constitute the Whitelist model definition.
Now that we have created our application and have defined our models, we are ready to begin looking at the actual code. Before we begin, here are a couple notes regarding Java naming conventions:
Note: A quick comment about Java naming conventions. Capitalization is important in Java. By convention, Java Classes start with a capital letter, e.g. WhitelistEntry. Java member variables start with a small letter, e.g. whitelistEntry. So you will often see code as above, listing the class name, WhitelistEntry, followed by the variable we are declaring, whitelistEntry. If it starts with a capital letter, it is a class name; if it starts with a small letter, it is a most often a variable or a method.
Note: Method names start with a small letter, e.g. onDataChanged(...). Notice that methods always have parentheses after them ('(' and ')'), which distinguishes them from variables.
Now that your basic application structure, including your rudimentary models for Whitelist and Netuser, has been created, it is time to see about initializing your application itself. The code that you are responsible for is located in your "provider" project if you have built it with the Brocade archetype.
Within your provider project, your application needs to initialize itself and its connection to the controller. This initialization will take place in your application's "ProviderModule" class, where the is either WhitelistApp or NetuserApp. Within that class you will need to override the createInstance method, as shown in the code snippet below, which is from the Whitelist application. As you can see, the name of the application is WhitelistApp.
public class WhitelistAppProviderModule extends ... {

    @Override
    public java.lang.AutoCloseable createInstance() {

        final WhitelistAppProvider provider = new WhitelistAppProvider();

        provider.setDataBroker( getDataBrokerDependency() );
        provider.setNotificationService( getNotificationServiceDependency() );
        provider.setRpcRegistry( getRpcRegistryDependency() );

        ...
    }

}
The following are the important items to note in the code above:
- Override createInstance: We override the createInstance method to do our own special initialization.
- Create our provider: We create an instance of our "provider", which is the class that holds all of our actual implementation code for the Whitelist application. In our case, this provider is called WhitelistAppProvider.
- Save important references: Within createInstance we call methods in our provider object to store off references to the Data Broker, to the Notification Service, and to the RPC Registry.
Note: This java file - WhitelistAppProviderModule.java - is actually located in an auto-generated package within the provider project. This is the one exception to the rule - an auto-generated Java file that you will modify, primarily for this createInstance code.
Now that we have considered application initialization, we can move on to the next task in our application: registering listeners for changes to our data models.
Our Whitelist solution will want to listen for changes to the data model for both Whitelist and Netuser objects. We have chosen to implement all of our listeners within the Whitelist application. This simplifies the code and combines all relevant functionality into one Java file.
In order to register our listeners for these model objects, we need to create Instance Identifiers for our Whitelist and Netuser models. An Instance Identifier is similar to an Object ID in SNMP - it is a path through the entire MD-SAL YANG data model (a tree structure), which ends at our specific model, as shown in the following diagram:
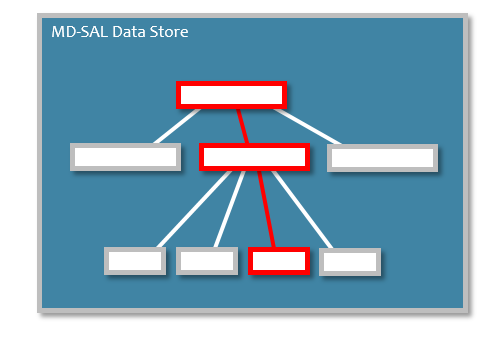
In the figure above, the red highlighting shows the path through the tree which ends at our desired model object. Each rectangle in the picture signifies a specific model object identifier. This sequence of identifiers is what uniquely identifies our specific model instance, and it is called the Instance Identifier (IID).
The code for creating an Instance Identifier looks intimidating but is actually quite straightforward. You only need to use the Instance Identifier builder as below, specifying the class name of your model object.
private static final InstanceIdentifier<Whitelist> WHITELIST_IID = InstanceIdentifier.builder(Whitelist.class).build();
private static final InstanceIdentifier<Netuser>   NETUSER_IID   = InstanceIdentifier.builder(Netuser.class).build();
These constant values WHITELIST_IID and NETUSER_IID will be used when we register our listeners, which is done in the code below. This code is also intimidating, but the good news is that as with many things in Java, once you have learned the general pattern, you can just use it and not worry about it any more.
Here is the code to create our Whitelist and Netuser data change listeners:
ListenerRegistration<DataChangeListener> whitelistDataChangeListener =
			dataBroker.registerDataChangeListener( LogicalDatastoreType.CONFIGURATION, WHITELIST_IID, this, DataChangeScope.SUBTREE );
ListenerRegistration<DataChangeListener> netuserDataChangeListener =
			dataBroker.registerDataChangeListener( LogicalDatastoreType.CONFIGURATION, NETUSER_IID, this, DataChangeScope.SUBTREE );
The code above is a bit cumbersome like many items in MD-SAL, but simple enough if you understand what it is doing and let it be. Here are descriptions of what is going on in the code above:
- ListenerRegistration: We are creating objects of type ListenerRegistration. We won't use these objects elsewhere except when closing down our application, so you needn't be concerned with them.
- DataBroker: We are registering data change listeners using the registerDataChangeListener method of the dataBroker. Recall that we saved the reference to the DataBroker at initialization time.
- InstanceIdentifier: We must specify the precise model object for which we wish to listen to changes - in this case it will be for each of the Instance Identifiers we created earlier, WHITELIST_IID and NETUSER_IID.
- SUBTREE: We are specifying the scope for which we want to listen to changes in the YANG data tree, which is our node plus all its children, also known as SUBTREE.
Now that we have registered our listeners for changes to Whitelist and Netuser objects, how do we receive notifications when one of them has been changed? We receive these notifications in our onDataChanged method, which (as with all our code) is part of our provider class.
The following method within our WhitelistAppProvider class shows how data changes are received:
@Override
public void onDataChanged( AsyncDataChangeEvent<InstanceIdentifier<?>, DataObject> dataChangeEvent ) {
    ....
}
We receive notifications via the onDataChanged method, which is invoked by the controller whenever there is a change to our Whitelist or Netuser objects in the MD-SAL data store. When this method is called, we are passed an AsyncDataChangeEvent, which holds information about the specific change that has occurred.
Next we examine what to do with that change event data.
It is not necessary to understand all the details (or Java idioms) related to the parameter that is passed when your onDataChanged method is called - just understand that you can use that object you have received (dataChangeEvent in our case) to examine what your model used to look like, and what it looks like now. In this way, you can understand whether something has been deleted, added, modified, etc.
For example, in order to understand the change that has occurred, you can call a couple of methods to get the original subtree, and to get the updated subtree, as shown in the code below:
DataObject origSubTree    = dataChangeEvent.getOriginalSubtree();
DataObject updatedSubTree = dataChangeEvent.getUpdatedSubtree();
This is pretty straightforward - we take the dataChangeEvent we have been given, and call the getOriginalSubtree() method to get the subtree as it was before this change event, and call the getUpdatedSubtree() method to get the subtree as it now exists in its updated form.
When calling these methods, we are given Java objects of DataObject, which is a YANG data type. The good news is that you can use your received data change objects like normal Java classes. For example, consider the following code:
if (      updatedSubTree instanceof Whitelist) { handleWhitelistDataChanged( dataChangeEvent ); }
else if ( updatedSubTree instanceof Netuser)   { handleNetuserDataChanged(   dataChangeEvent ); }
In the example above, we ask Java to tell us if the data object we have been given is of the type Whitelist, or of the type Netuser. Based on that information we take the appropriate action. So at this point we are indeed just dealing with familiar Java objects.
Going a step further, when we want to actually use the data from the data change event, we can do something like this:
Map<InstanceIdentifier<?>, DataObject> createdObjectMap = dataChangeEvent.getCreatedData();
We now have a Java Map of the new data in our part of the YANG data tree. As you can see from the definition of the Map, this method returns data of type DataObject. When we want to use that piece of data, we retrieve it from the Map using normal Java mechanisms:
DataObject dataObject = createdObjectMap.get( objectKey );
Now for safety we check to make sure the object is what we expect, then we cast it into the actual object itself - in the example below, a WhitelistEntry:
if( dataObject instanceof WhitelistEntry ) {

    WhitelistEntry whitelistEntry = (WhitelistEntry) dataObject;
    ...
}
Note: We have been using Java classes such as Whitelist and WhitelistEntry. You may be asking, "Where did these classes come from?" These classes come directly from our YANG model definition. The container "whitelist" became the Java class "Whitelist". The items in the list, called "whitelist-entry", became the Java class "WhitelistEntry". Notice that the tools which auto-generate code from our YANG model use camel-case for class names, and strip away special characters.
At this point, we have a piece of data, whitelistEntry, which is of type WhitelistEntry, which we can use like any plain old Java object. From this point forward, our code will take the data from the Netuser list of IP addresses, and the Whitelist list of IP addresses, and will use Path Explorer to create paths to allow communication between nodes on the two lists.
At this point in our knowledge of building MD-SAL applications, we know enough to be dangerous. To review, we have learned about:
- Application Creation: We have seen how to create an application using the archetype.
- Model: We have seen what a real-world model for building a networking application might look like.
- Application Initialization: We have seen how to initialize the application by overriding createInstance in our application's provider module code.
- Registering Listeners: We have seen how to register our application for listening to data change events for our Whitelist and Netuser model objects.
- Receiving Events: We have seen how to receive the events that occur when our model objects are changed by users or applications in any way.
- Handling Event Data: We have seen how to take the data from the change event, cast it into a normal Java object format, and take appropriate actions.
With the ability to accomplish these tasks, as an MD-SAL developer you will be ready to create whatever special application functionality that is required for your particular solution. Looking at what is left for the Whitelist solution, the following code has been added to the Whitelist application.
- Create Paths: For each Netuser and Whitelist entry pair, create two paths, one in each direction, using Path Explorer model object definitions.
- Submit Path Changes: For each of these paths, submit a write transaction to the Data Broker, to cause these path model changes to be executed.
Once we have done this, our part is done. We are leveraging other MD-SAL functionality - the Path Explorer - to actually use topological information and to create Openflow flow entries on all switches along the path between the Netuser and Whitelist IP addresses.
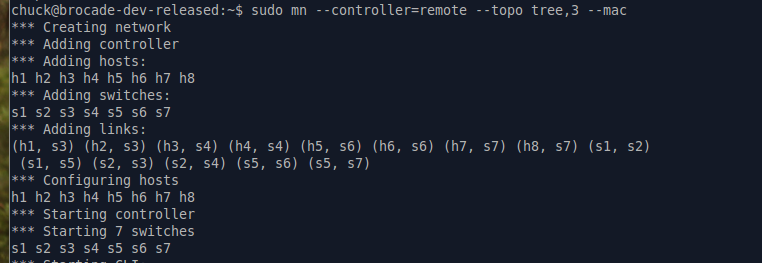
The following screen shots show Whitelist in action. First is Mininet starting, with seven switches (three layers) in a tree structure.
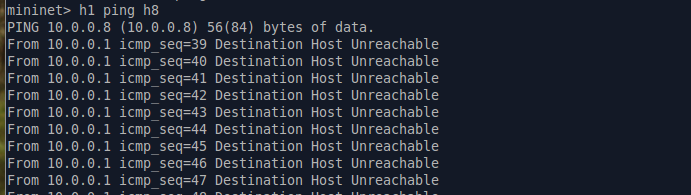
The next figure shows Mininet again, with host 1 (h1) pinging host 8 (h8). As can be seen, all pings fail.
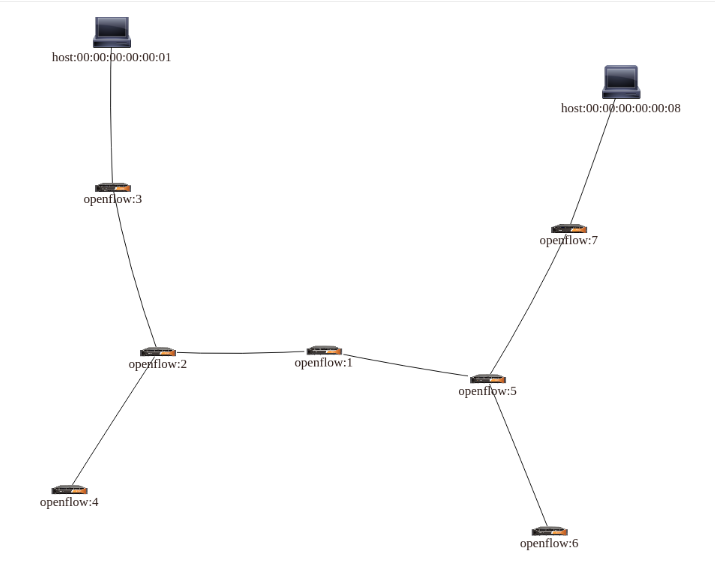
Here is a screenshot of the Brocade Vyatta Controller GUI, showing the switches and hosts.
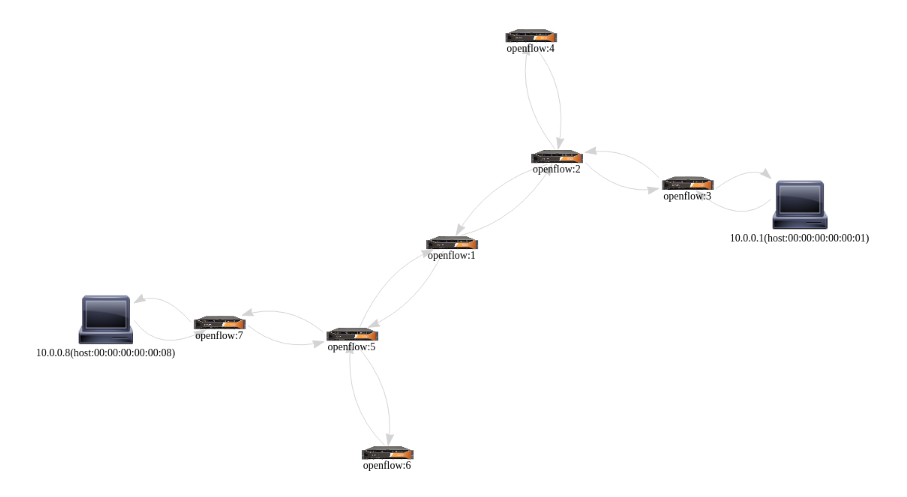
Here is a screenshot of the Path Explorer GUI, showing the same thing.
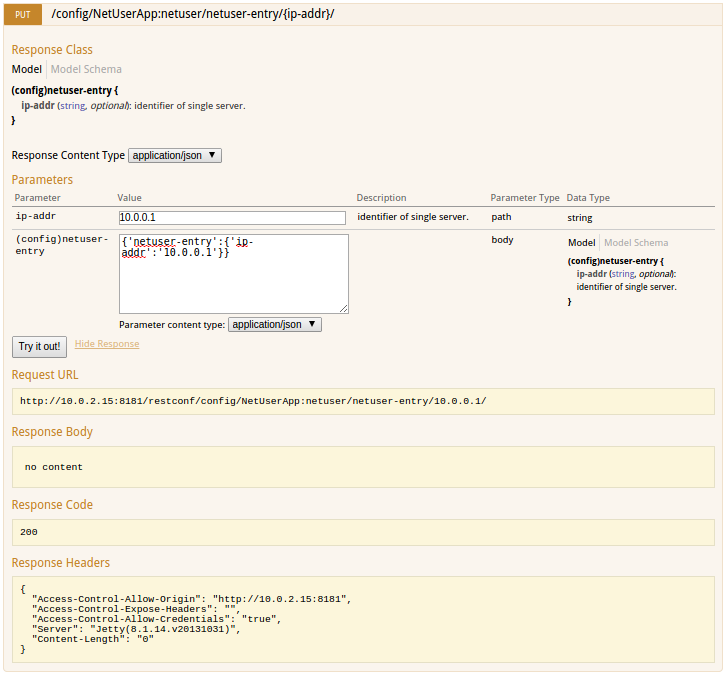
Here is a screenshot of setting a Netuser IP address. Remember: we did absolutely nothing to create this REST GUI for setting Netuser model objects, or Whitelist model objects. This API and the setting of the model comes with MD-SAL completely for free.
Here is the complementary screenshot showing the setting of a Whitelist IP address.
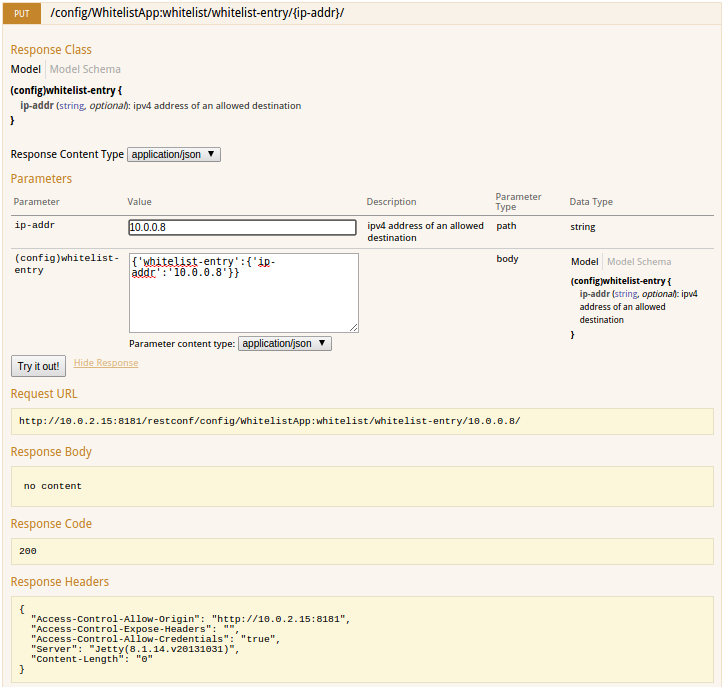
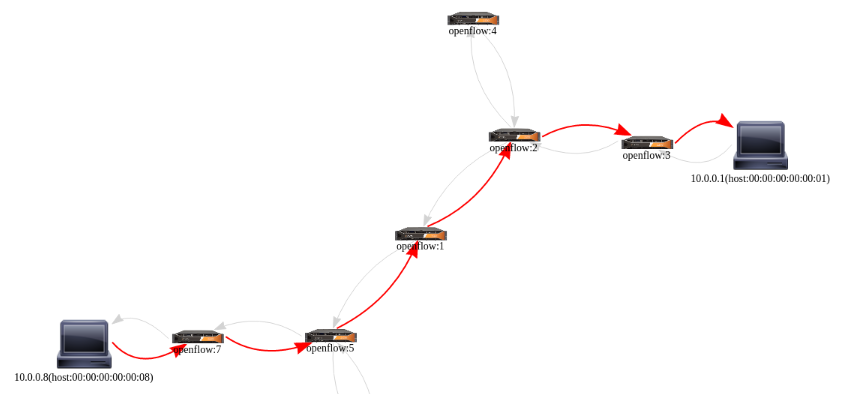
Remember that as a result of setting the Whitelist, our application automatically created new Path objects in the model. The Path Explorer will automatically create the Openflow paths between the hosts we have specified (host 1, 10.0.0.1, and host 8, 10.0.0.8).
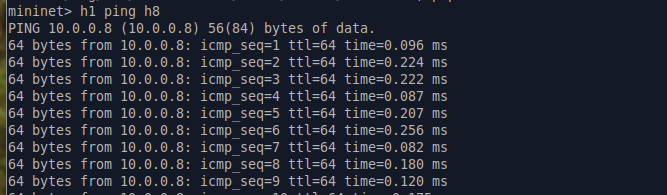
Here is a screenshot of the working ping between hosts h1 and h8 in Mininet.
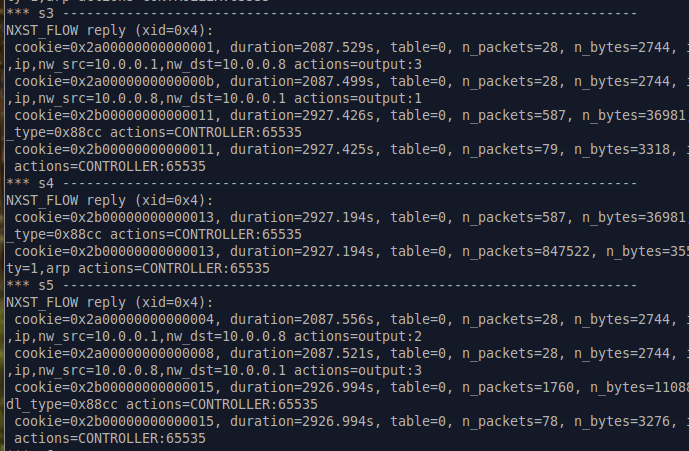
Here is a dump of the flows that the Path Explorer created when our MD-SAL application made changes to the Path model objects.
Here is the Path Explorer GUI, showing the path between host 1 and host 8.
We have shown, at a high level, the process of creating our Whitelist solution, which includes two MD-SAL applications (Whitelist and Netuser), and which leverages the Brocade Path Explorer application. We explained how the solution will utilize model-based communication in order to communicate between layers (User-to-Whitelist and Whitelist-to-PathExplorer).
We discussed the steps required: building the applications, modifying your model, initializing the applications, registering for data change events, and eventually handling the data we receive.
We then showed the Whitelist solution in action - an actual networking MD-SAL solution that implements the fundamental aspects of MD-SAL in a real environment. We used Mininet but this application can be used with any Openflow-supporting switches.
Hopefully this has given you a picture of MD-SAL application development in a real-world networking environment. Look for this and other code to be posted at this GitHub site in the near future.