





Note: For the best viewing experience, read this documentation on GitHub.
A Home Assistant admin panel for configuring Telink BLE thermometers running PVVX/ATC custom firmware (LYWSD03MMC, MHO-C401, CGG1, and similar A4:C1:38:* devices). Scan, read and write every device setting straight over your existing ESPHome Bluetooth proxies (with active connections) or a local Bluetooth adapter, with no extra hardware, no cloud, no separate app.
This is a panel-only integration: it adds one sidebar entry and creates no entities, sensors or polling. Your thermometers keep advertising to the regular Bluetooth/BTHome integration exactly as before — Telink Manager only connects on demand when you read or write a device.
This configures thermometers — it does not flash firmware. Reading and writing settings uses the PVVX configuration protocol, so your devices must be running PVVX firmware (the widely used firmware in the ATC_MiThermometer family). The original atc1441 firmware uses a different configuration interface and is not supported for read/write here. To convert a stock Xiaomi thermometer, or one still on the original ATC firmware, flash it first with the PVVX web flasher; then this panel can read and write its settings.
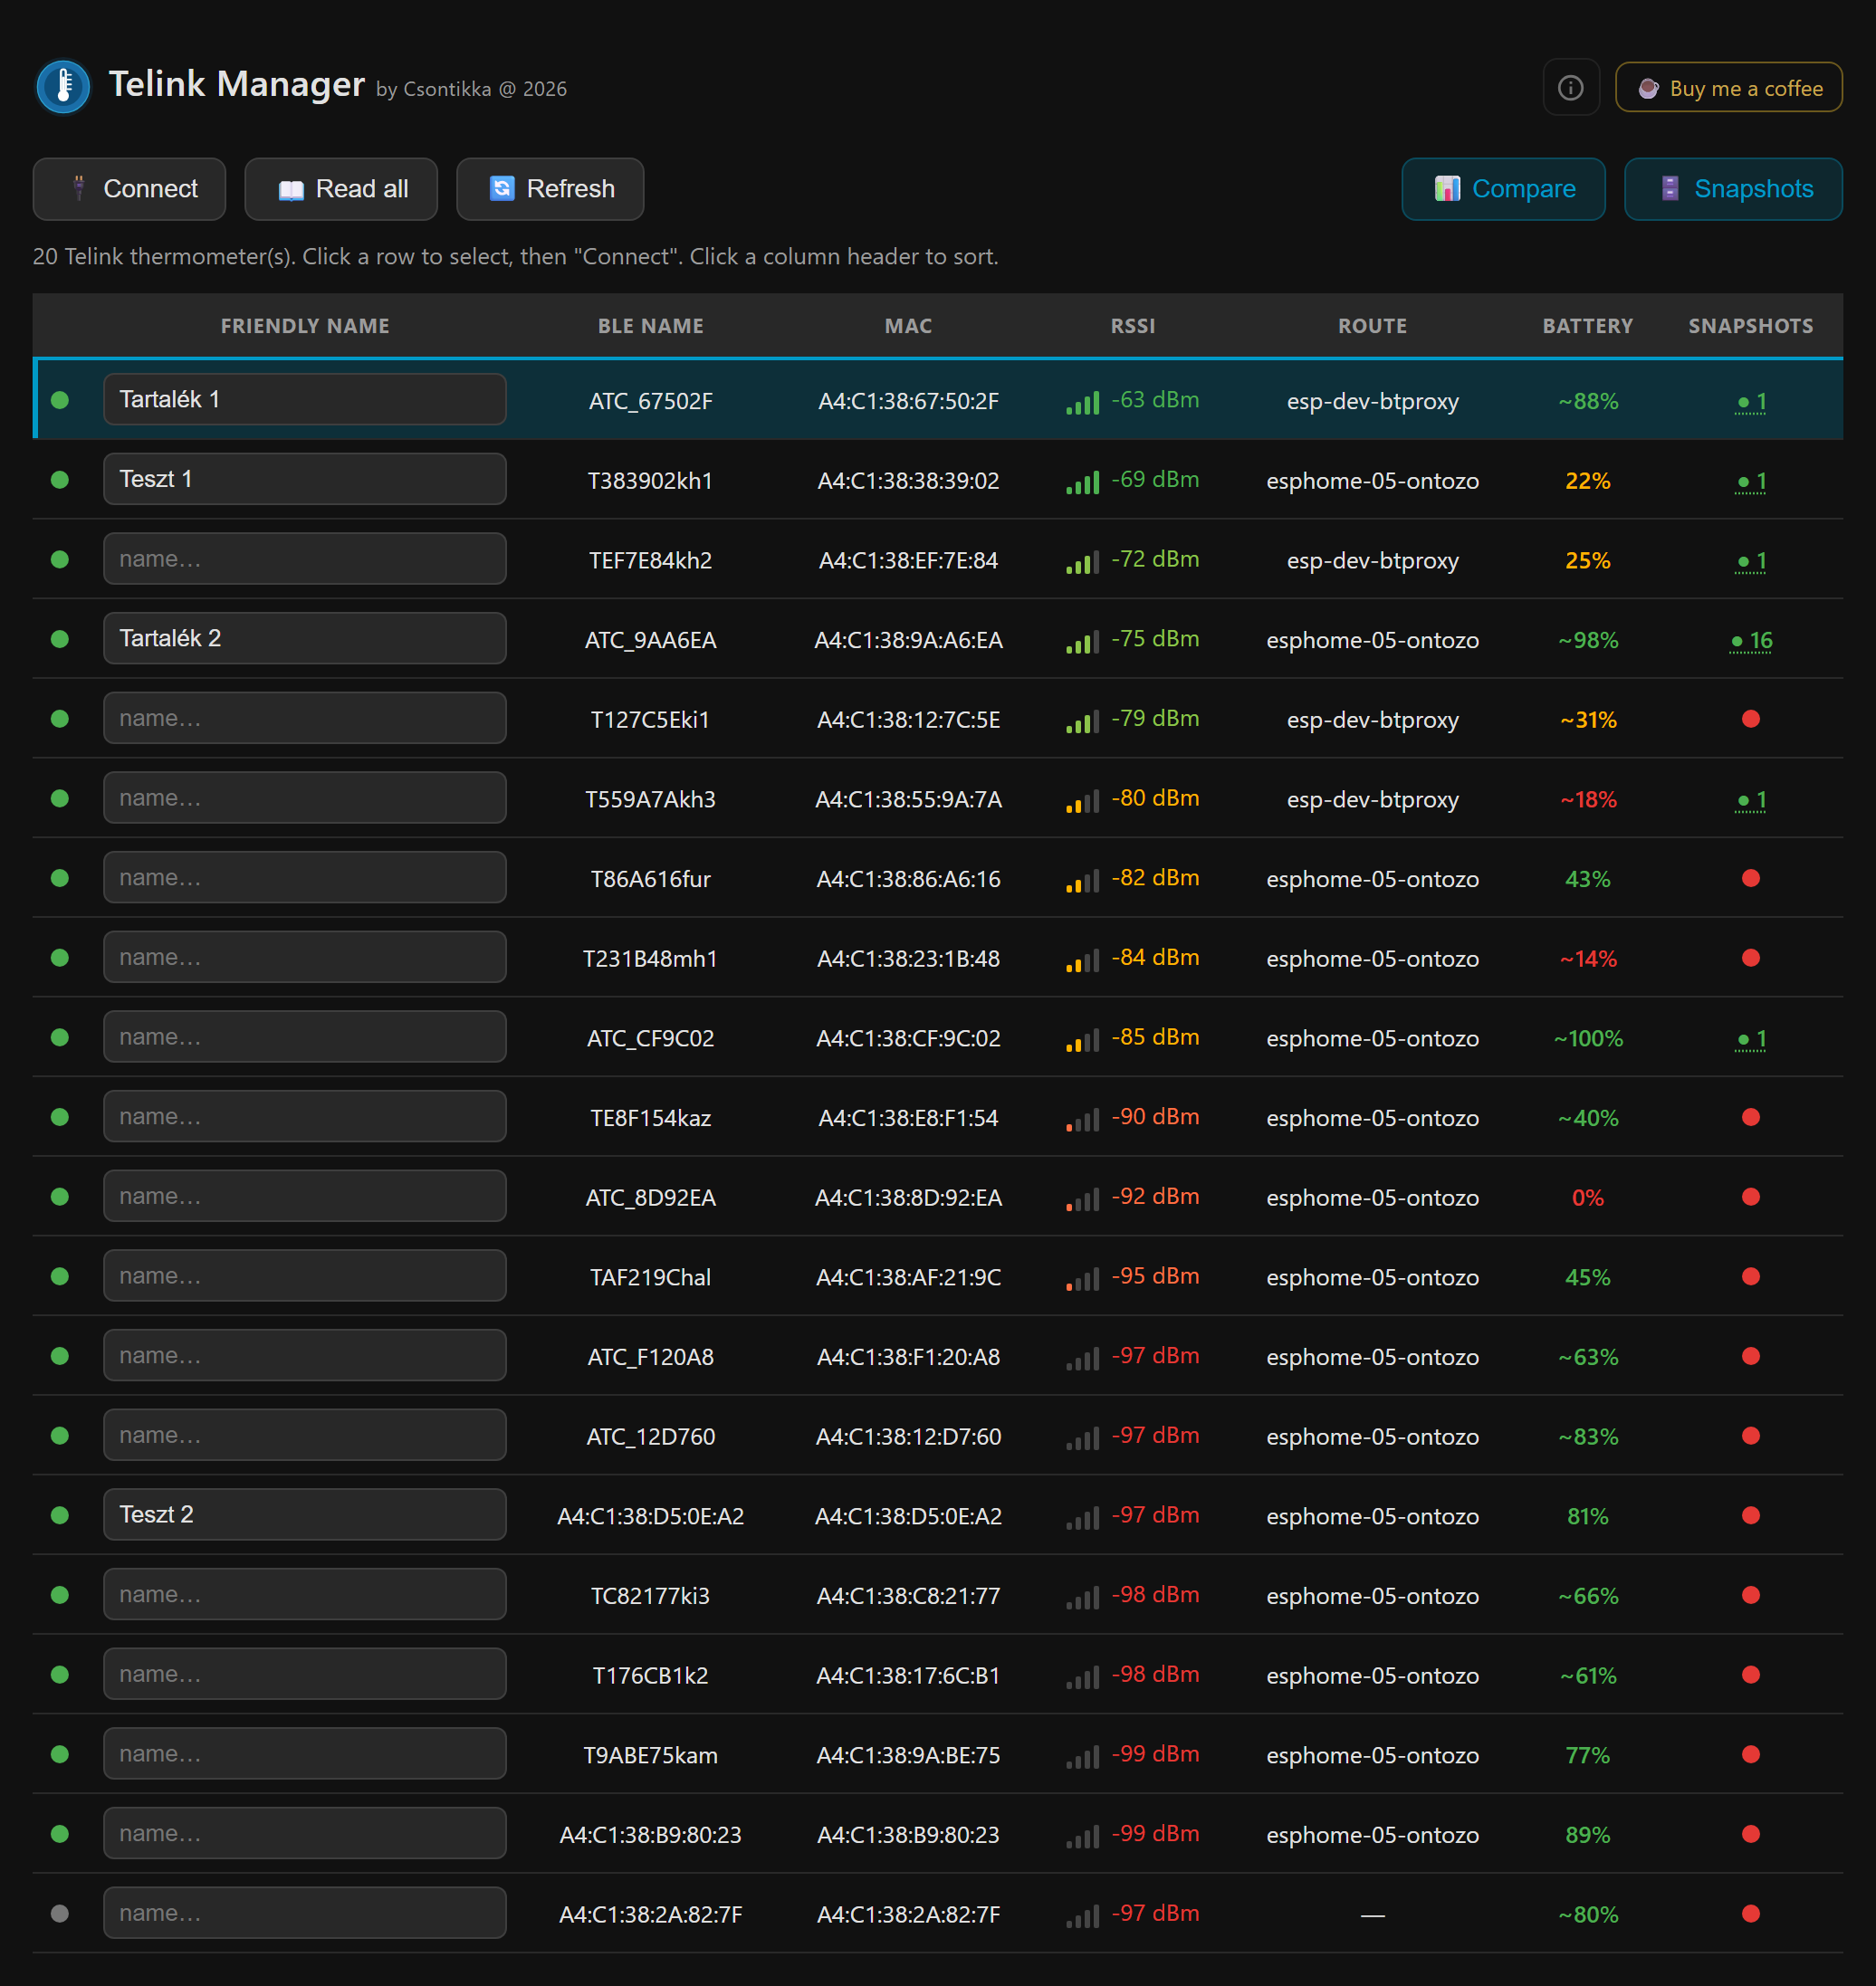
- Scan / Refresh — discover every PVVX/ATC thermometer your proxies can see, with live RSSI, connectable state and battery level (parsed from the advertisement).
- Friendly names — assign and persist a human name per device (stored in HA, independent of the device's own BLE name).
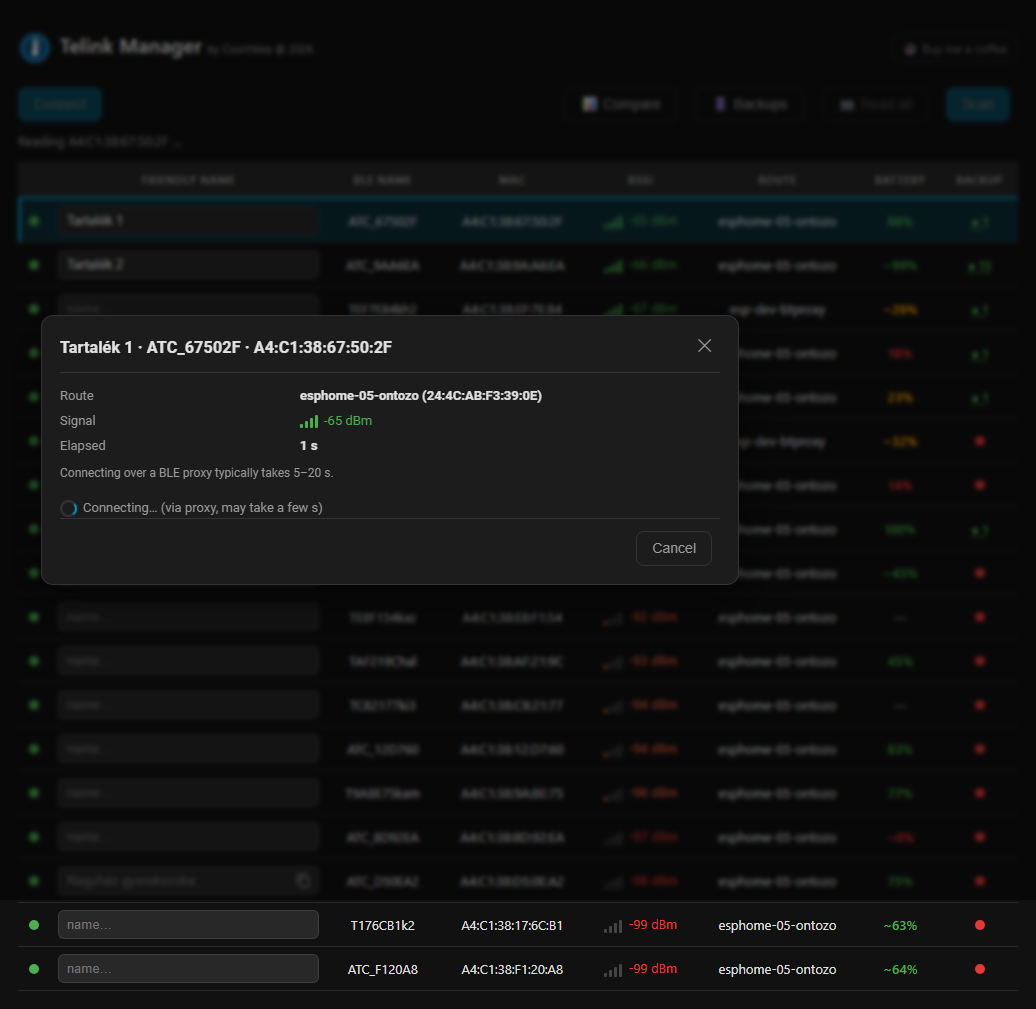
- Connect & read — pull the full configuration blob plus device name, comfort thresholds, sensor calibration and bind key.
- Hardware detection — the board revision and its temperature/humidity sensor chip (e.g.
LYWSD03MMC B1.6 · SHT4x) are decoded from the configuration and shown in the device view and the Compare matrix. - Write (safe settings) — device name, comfort zones, RTC clock, LCD/display options, advertising interval, sensor calibration (and reset to factory calibration).
- Temporary LCD overlay — push a custom number to the screen without persisting it.
- Dangerous settings (clearly flagged, admin-only) — custom MAC address, encryption bind key, factory reset and reboot.
- RAW command — send an arbitrary command to the PVVX config characteristic (for experimentation).
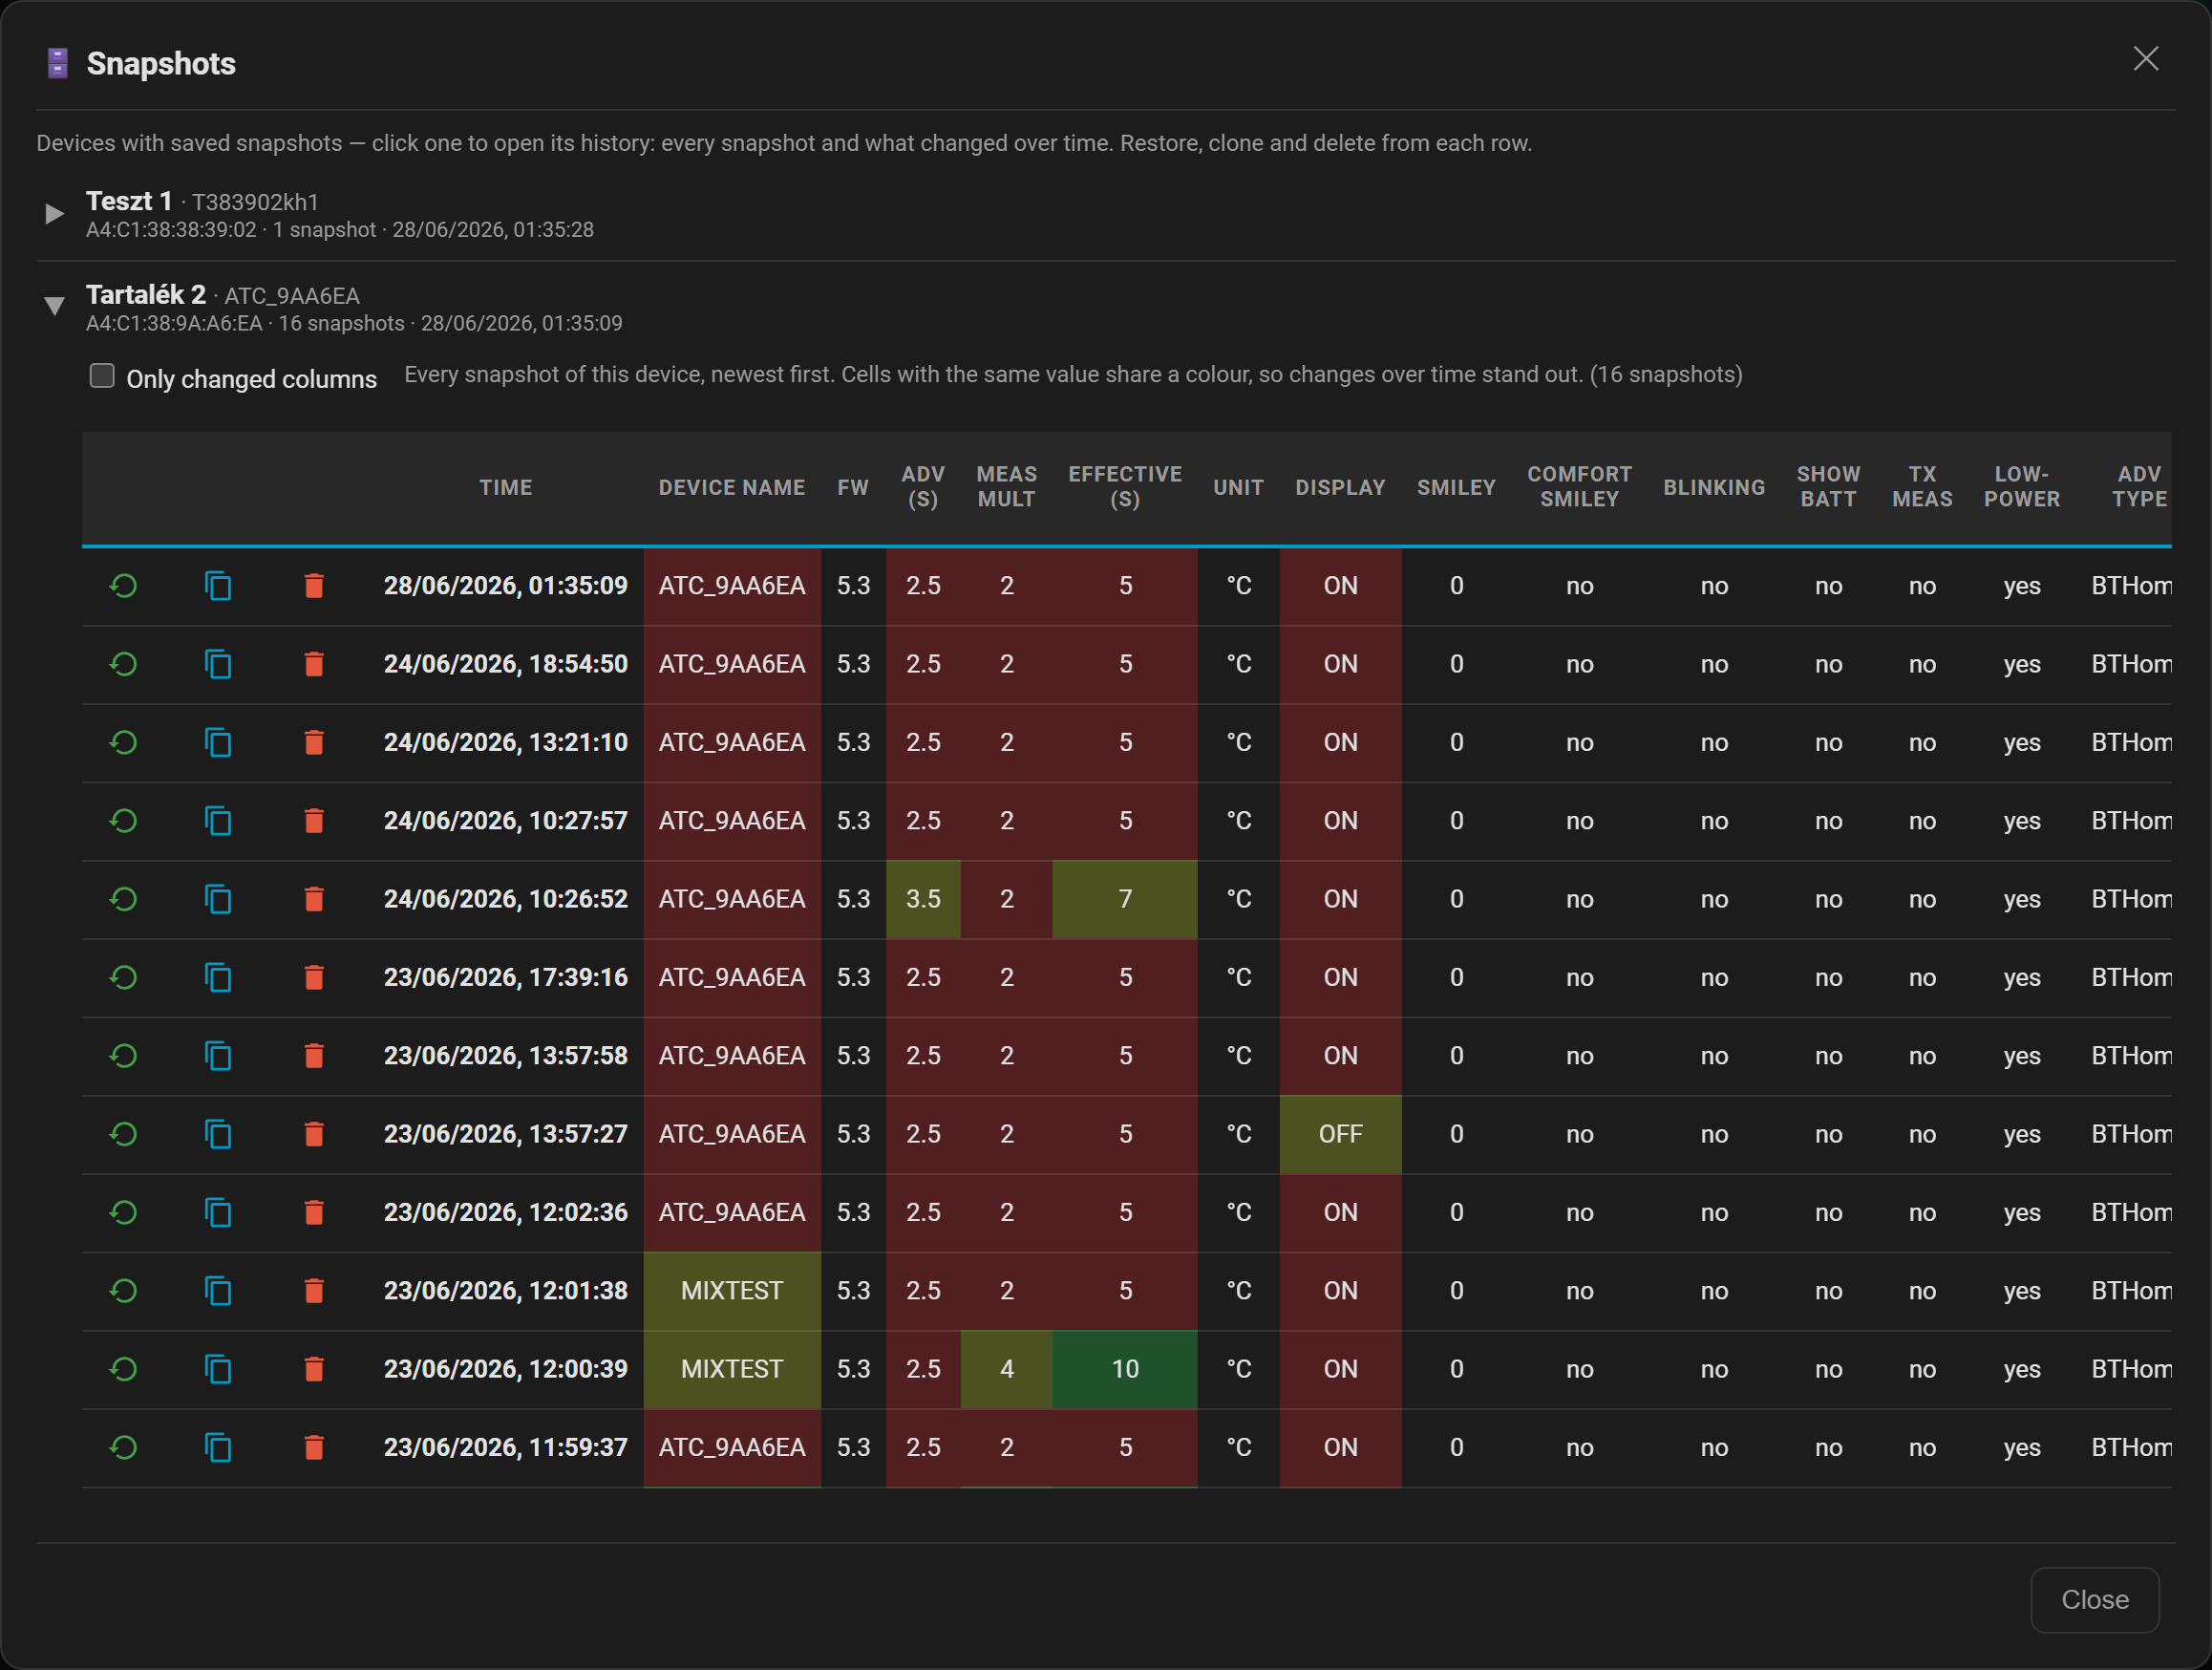
- Snapshots / History — every read and every change is snapshotted server-side automatically (with de-duplication and a history limit). Browse each device's history of snapshots, restore any snapshot back onto the same device, or clone a configuration onto another device (the MAC is never cloned). A safety snapshot of the target is always taken before an overwrite, so any restore is reversible.
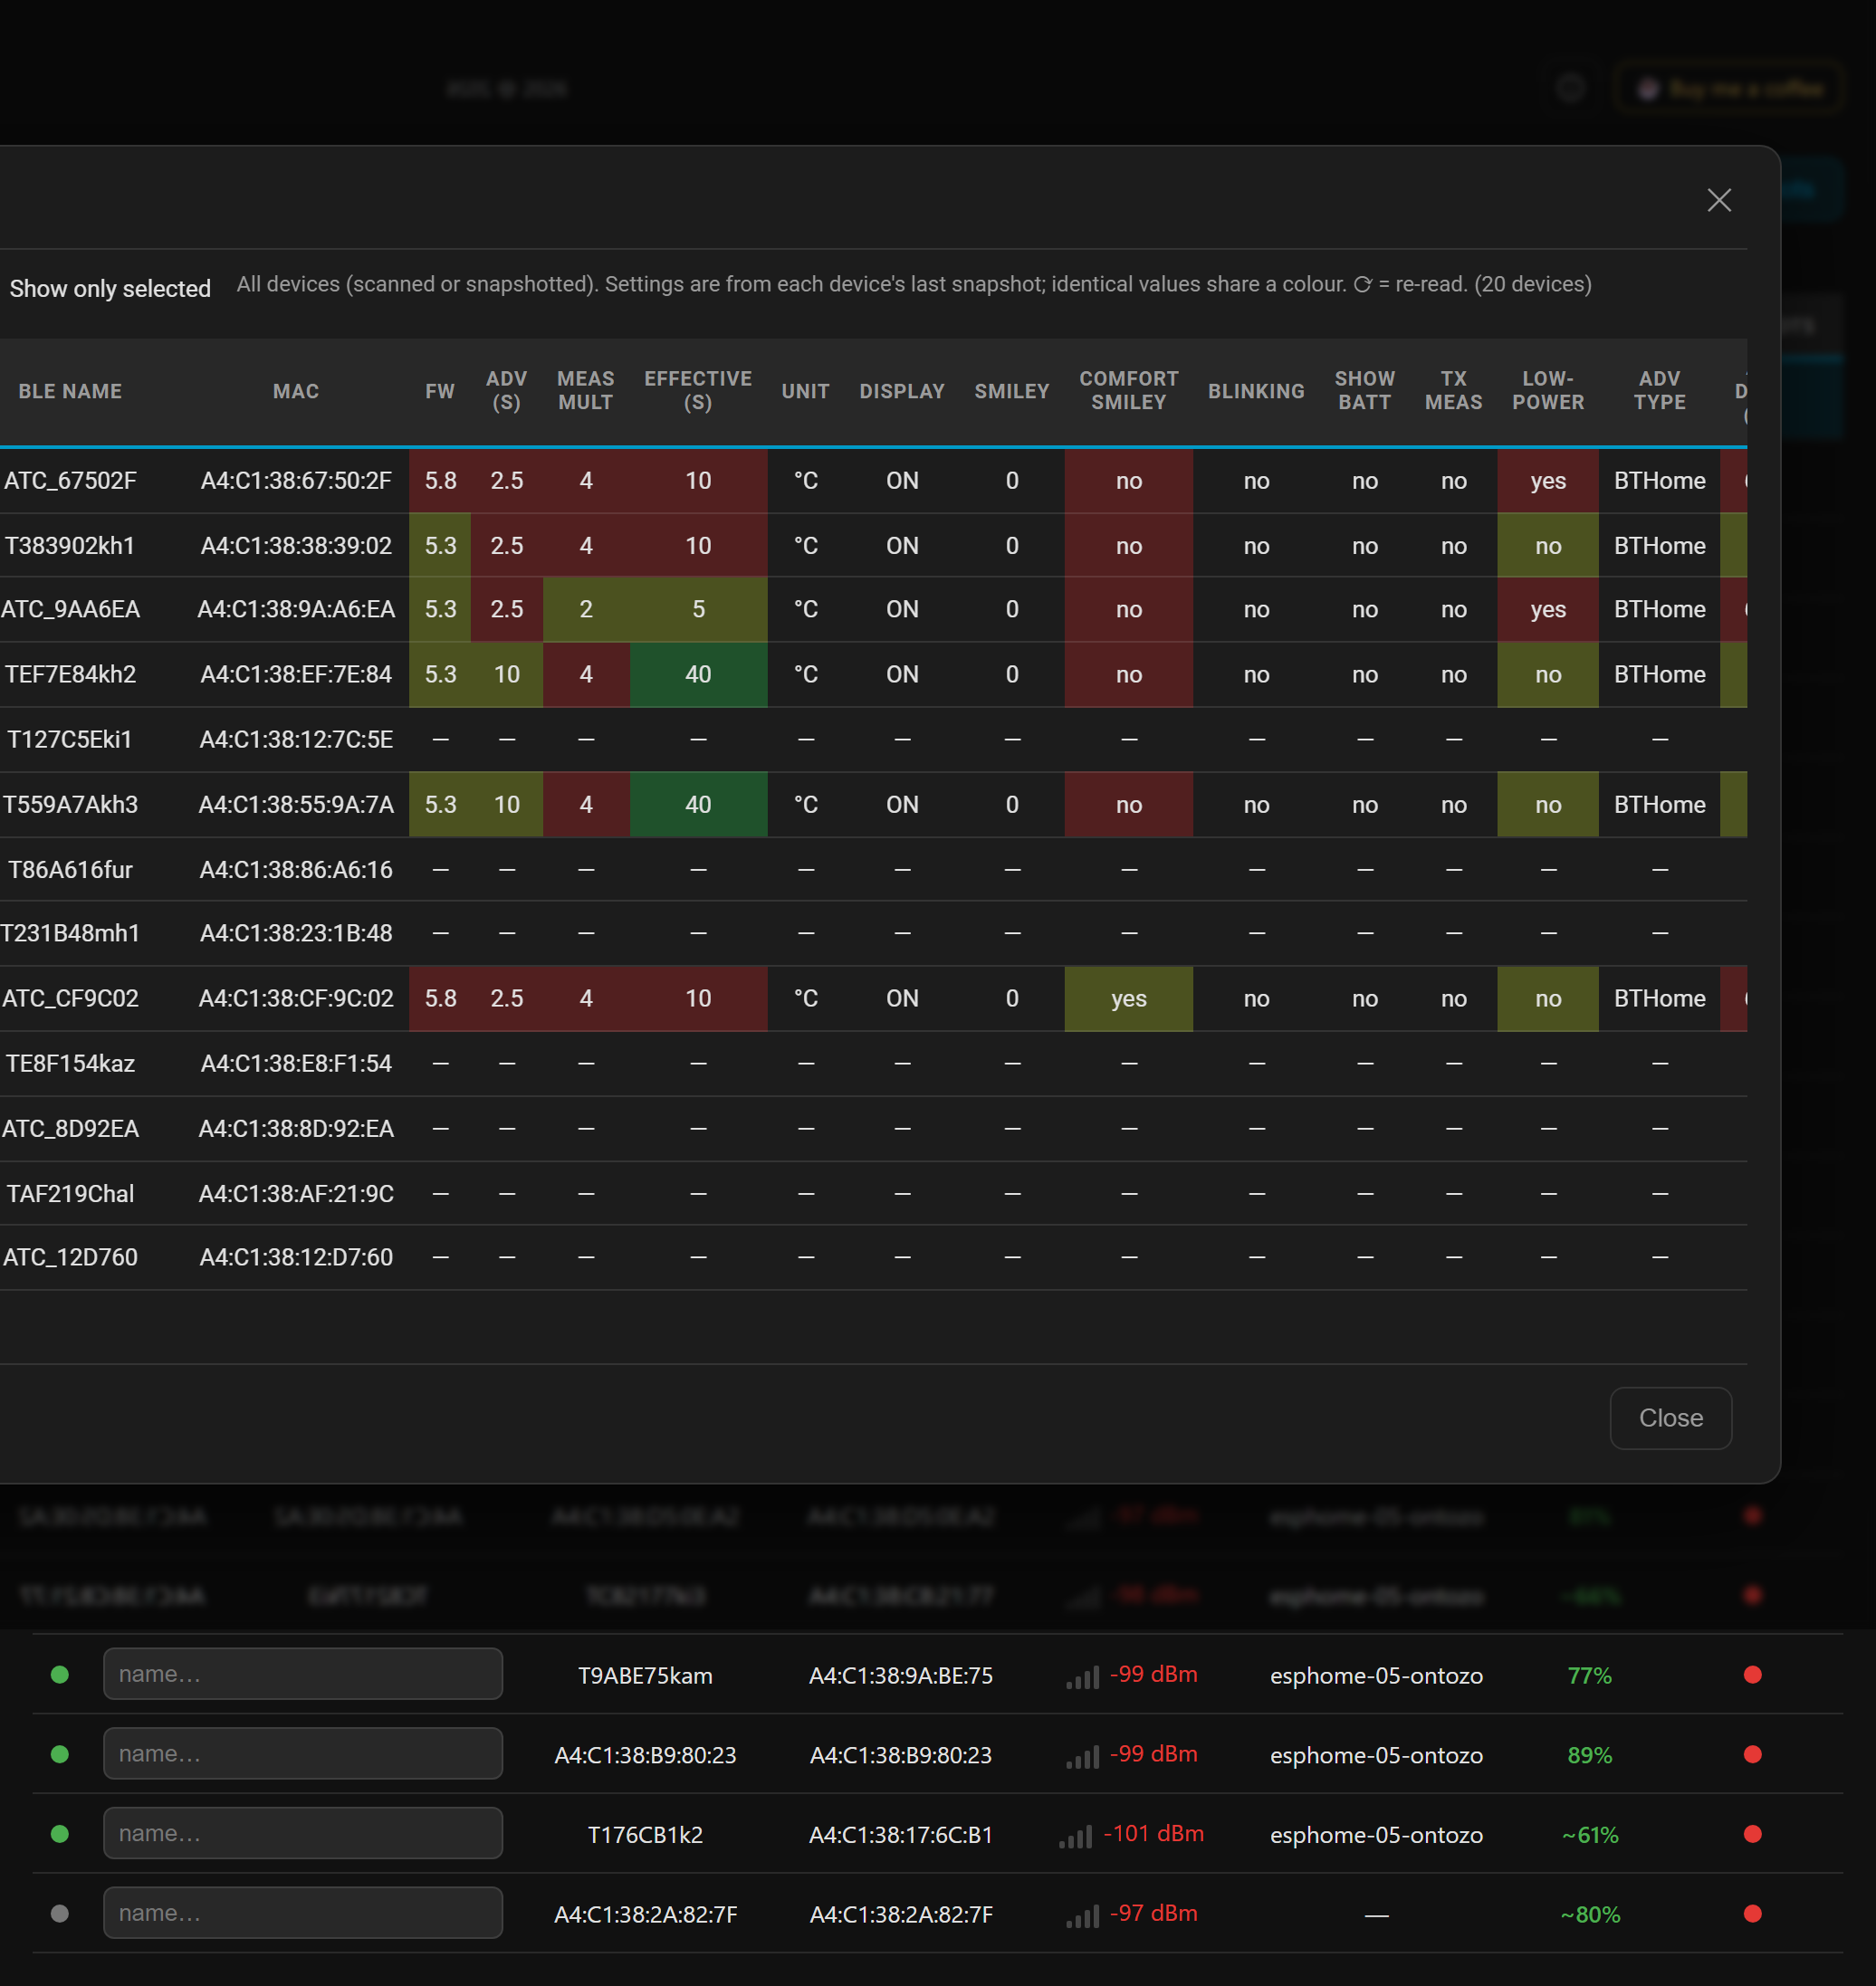
- Compare & Snapshots — a matrix view comparing the latest config of all snapshotted devices, and a per-device Snapshots matrix showing every snapshot and what changed over time (with restore, clone and delete on each row) — all without touching BLE.
- Read all — a server-side bulk job that reads every device in parallel, grouped by proxy, with retries. It survives page refresh and navigation (progress is polled from the server) so you can walk away and come back.
- Battery column — estimated charge and voltage from the advertisement, colour-coded.
Main panel — scan results with friendly names, RSSI, battery and per-device actions:
Device configuration — read and edit the full PVVX configuration (display, measurement, advertising):
Compare — every device's settings side by side, differences highlighted (from snapshots, no connection):
Snapshots — each device's history as a change matrix; expand a device to see every snapshot and what changed over time, with restore, clone and delete on each row (no connection needed):
- Home Assistant 2024.7.0 or newer.
- At least one active (connectable) Bluetooth source within range of the thermometers: an ESPHome
bluetooth_proxywithactive: true, or a local Bluetooth adapter. Both reading and writing need an active connection. Passive proxies that only forward advertisements, including Shelly, can show a device in the scan list and its battery, but cannot read or write (see Bluetooth proxies). - Thermometers running PVVX firmware (stock Xiaomi firmware is not supported; the original atc1441 firmware is not supported for configuration either, flash PVVX with the web flasher).
Reading, and especially writing, happens over a GATT connection — so the proxy must be able to make active connections, not just forward advertisements:
- ESPHome: set
active: trueon thebluetooth_proxy:component. A passive proxy (active: false) can still scan and show battery from advertisements, but cannot connect or configure a device. - A local Bluetooth adapter on the Home Assistant host also works, as long as a thermometer is in range.
- Shelly proxies do not work for this. Shelly Gen2/Plus Bluetooth proxies are passive (advertisement-only, non-connectable): a Shelly can put a device in the scan list and report its battery, but Home Assistant cannot open a GATT connection through it, so you cannot read or write settings over a Shelly. Use an ESPHome
active: trueproxy or a local adapter instead.
A minimal ESPHome proxy:
esp32_ble_tracker:

bluetooth_proxy:
  active: true   # let Home Assistant open GATT connections — required to configure devices
Tips:
- Leave the scan interval/window at the ESPHome defaults. A near-100% scan duty cycle looks good for discovery but starves the radio of the time it needs for connections — which is exactly what this integration relies on. (Optionally add
esp32_ble_tracker: scan_parameters: active: truefor nicer advertised names; that's separate frombluetooth_proxy: active.) - An ESP32 proxy handles roughly 3 active connections at once. "Read all" reads serially within one proxy and in parallel across proxies, so more proxies = faster bulk reads and better coverage.
- Place a proxy close enough that devices read better than -80 dBm (shown in the RSSI column). Weak links are the number-one cause of failed connects and writes.
Telink Manager is in the HACS default store, so no custom repository is needed.

- Open HACS in Home Assistant.
- Search for Telink Manager and click Download.
- Restart Home Assistant.
Installed it earlier as a custom repository? Nothing to do: updates keep working, and the custom repository entry can stay as it is.
- Copy
custom_components/telink_manager/to your HAconfig/custom_components/directory. - Restart Home Assistant.

- Go to Settings → Devices & Services → Add Integration.
- Search for Telink Manager and select it.
- Confirm — there is nothing to configure. A Telink Manager entry appears in the sidebar (admin users only).
That's it. Open the panel and press Scan.
- Reading is always safe. It opens a short BLE connection, reads the configuration and disconnects cleanly.
- Writing safe settings (name, comfort, time, display, calibration) cannot brick a device — the worst case is a failed write you can simply retry.
- Dangerous settings change device identity:
- Custom MAC — after a reboot the thermometer advertises under the new MAC, so Home Assistant (and any BTHome sensors) will see it as a new device. Update your other integrations accordingly.
- Bind key — changing the encryption key will break decryption for any integration still using the old key.
- Factory reset — clears all custom configuration back to firmware defaults.
- These actions are grouped, labelled as dangerous, and require admin access to the panel.
- Clone never copies the MAC. Cloning writes a source device's settings onto a different target device while leaving the target's own MAC intact, so you never end up with two devices sharing one address.
- If a write fails or a device "disappears" mid-operation, it is usually a weak proxy link — move the device closer to a proxy, or use a proxy with a stronger signal, and retry.
- Configures, doesn't flash. This panel reads and writes settings using the PVVX firmware's configuration protocol, so devices must be running PVVX firmware. It cannot flash firmware (use the PVVX web flasher), and it does not configure stock Xiaomi firmware or the original atc1441 firmware (their config interfaces differ from PVVX's).
- It is not a sensor integration. Temperature and humidity reach Home Assistant through the built-in Bluetooth/BTHome integration — Telink Manager creates no sensors. It only configures the device.
- An active (connectable) proxy is required to read or write. A passive proxy only forwards advertisements (so you get scan and battery, but no connection) — see Bluetooth proxies.
- No BLE pairing / PIN. Home Assistant's Bluetooth proxies cannot perform BLE pairing, so a device PIN is intentionally not settable here — setting one would lock this panel out, recoverable only with a hardware flasher.
- Encrypted advertisements cannot be decoded without the bind key (this affects the BTHome sensor side, not configuration through this panel).
- Validated on the Xiaomi LYWSD03MMC. Telink Manager talks to the PVVX firmware's config protocol (the same
0x55characteristic on every PVVX device), not a per-model format, so it is expected to work across the wider PVVX device family (MHO-C401, CGG1, CGDK2, …). It is, however, currently field-tested only on the LYWSD03MMC; the one display-specific feature is the temporary LCD overlay, whose number layout targets that screen.
- Go to Settings → Devices & Services → Telink Manager.
- Click the three-dot menu → Delete. The sidebar panel is removed.
- Optionally delete
custom_components/telink_manager/and restart Home Assistant.
Saved friendly names and backups are kept in HA storage; they are only removed if you delete the corresponding .storage/telink_manager_* files.
Most connection problems are range / Bluetooth-proxy issues rather than bugs in this integration. Work through these first.
- Scan finds nothing — you need at least one active (connectable) Bluetooth source in range: an ESPHome device with
bluetooth_proxyandactive: true, or a local Bluetooth adapter. A Shelly proxy is passive only, so it can show devices but cannot connect. Check the thermometer is powered and advertising (it should also show up in Home Assistant's normal Bluetooth/BTHome). - A device won't connect / "Connecting…" times out — almost always a weak link. Move the thermometer or a proxy closer (aim for better than -80 dBm in the RSSI column), make sure the chosen proxy is active and connectable, and retry. Writing needs a stronger link than reading.
- Write shows "not verified" / a setting didn't stick — usually the link dropped mid-write; retry with a stronger signal. A few values are clamped or rejected by the firmware itself.
- A device "disappears" mid-operation / "no connectable" — no proxy can reach it right now (out of range or asleep). Bring it closer to a proxy and Scan again.
- The panel isn't in the sidebar — it is admin-only; log in with an admin account.
Before opening an issue, run the reference test with the official PVVX tool. It talks to the same firmware over Web Bluetooth — straight from a phone or laptop, with no Home Assistant and no proxy in between:
👉 PVVX TelinkMiFlasher — open it in Chrome/Edge, hold the device close, and try the same connect / read / write.
- The flasher can't do it either → the problem is the device, its firmware, or your Bluetooth, not this integration. If it looks like a firmware bug, report it to the PVVX firmware project — this integration cannot fix what the firmware does.
- The flasher works fine right next to the device, but this integration keeps failing even with a strong proxy nearby → that is worth a bug report here (attach the debug log below).
This keeps every report — yours and mine — pointed at the layer that actually owns the bug.
Enable debug logging by adding to configuration.yaml:
logger:
  default: info
  logs:
    custom_components.telink_manager: debug
This logs every BLE connection attempt, which proxy was chosen, and the raw bytes exchanged with each device.
When the reference test above points at the integration, open an issue with: your Home Assistant version, what you did, the RSSI shown, which proxy was used, and the debug log around the failure.
Telink Manager collects no telemetry and never phones home. It runs entirely inside your Home Assistant instance: it talks only to your thermometers (over your own Bluetooth proxies) and stores friendly names and backups in your local HA storage. No usage data, device identifiers (including BLE MAC addresses), or analytics are sent to the developer or any third party.
The only place this integration ever appears in any statistics is Home Assistant's own Analytics, which is opt-in, anonymized and aggregated. If you have enabled HA Analytics, this integration's name and version are included — exactly like every other custom integration — and show up only as anonymous totals on the public analytics dashboard. You can turn it off at any time in Settings → System → Analytics.
Found a bug or have an idea? Open an issue — feedback and feature requests are welcome.
If any of these sound familiar, consider buying me a coffee or sponsoring me on GitHub ☕:
- Saved you a lap around the house to push new settings to every device.
- Helped you figure out why one thermometer reports half as often as the others.
- Means you no longer have to explain to your family why you're crawling behind the radiator with a laptop.
- One integration, zero thermometer safaris.
Built on the excellent open-firmware work that makes these thermometers configurable:
- pvvx/ATC_MiThermometer — the PVVX firmware and the BLE configuration protocol this integration speaks to, released under a permissive (no-restriction) license.
- Aaron Christophel (atc1441) — the original ATC custom firmware and advertising format that opened up these devices in the first place.
This integration is an independent client for that firmware: it does not include or redistribute the firmware itself, and is not affiliated with Telink, Xiaomi, pvvx or atc1441.