Cluster setting and Debug: Ying Peng, Junjie Chu
Ray code and Debug: Ying Peng, Junjie Chu
ML code and Debug: Mandus, Ying Peng
The detailed settings could be read in the Steps.md(step1-step3 are for Orchestration VM).
git clone:
https://github.com/Junjie-Chu/DE2_Project.git
Note: Be careful with the position of your key and authority of the key.(i.e. chmod 600 DE2_group11.pem)
Command:
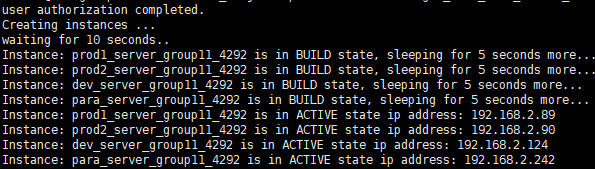
python3 DE2_Project/openstack-client/single_node_with_docker_ansible_client/start_instances.py
According to the IP of our instances, edit the file.
sudo nano /etc/ansible/hosts
Command:
export ANSIBLE_HOST_KEY_CHECKING=False
ansible-playbook configuration.yml --private-key=/home/ubuntu/cluster-keys/cluster-key

Log in the development node:
ssh -i /home/ubuntu/cluster-keys/cluster-key appuser@192.168.2.89
cd /home/DE2_Project/ci_cd/development_server/
sudo -s
docker build -t trainmodel .
According to the way you like, you could edit the .py file via vim/nano, or via jupyternotebook(floatingip:5100 and do not forget to start jupyternotebook service).
Now we could run the scripts in the VM directly or run them in the containers.
If in VM:
python3 GDBT_train.py
python3 NN_train.py
python3 RF_train.py
If in containers:
- Build image
docker build -t trainmodel .
- Run models
docker run -it imagename filename.py
- After the .py is changed, copy the new modeltraining.py from the VM to the container
Note: if you want to make the containers communicate with the outside VM more easily, you could use volumes. We would like to make each container more isolated. So we do not do that.
docker cp /home/DE2_Project/ci_cd/development_server/trainmodel.py 10704c9eb7bb:/app
- Log in the container and run new modeltraining.py
docker exec -it imagename bash
python3 new modeltraining.py
- Copy the result from containers to the VM
docker cp 10704c9eb7bb:/app/model.name /home/DE2_Project/ci_cd/development_server/
Select the best one!
Copy the best result model to git folder
cp gdbt_model.m /home/appuser/my_project/
On the head node (just choose some node to be the head node, in our case, we use dev server as head node), run the following. If the --port argument is omitted, Ray will choose port 6379, falling back to a random port.
$ ray start --head
or
$ ray start --head --port=6379
...
Next steps
  To connect to this Ray runtime from another node, run
    ray start --address='<ip address>:6379' --redis-password='<password>'

If connection fails, check your firewall settings and network configuration.
The command will print out the address of the Redis server that was started (the local node IP address plus the port number you specified).
Then on each of the other nodes, run the following. Make sure to replace <address> <password> with the value printed by the command on the head node (it should look something like 192.168.2.89:6379).
$ ray start --address=<address> --redis-password='<password>'
--------------------
Ray runtime started.
--------------------
To terminate the Ray runtime, run
$ ray stop
In the .py file:
import ray
ray.init(address='auto', _redis_password='5241590000000000')
Note: In our project, the ray cluster contains 2 servers: devserver(192.168.2.124) and paraserver(192.168.2.242).
You could easily use more nodes if you want.
NOTE: Ray needs you to be root
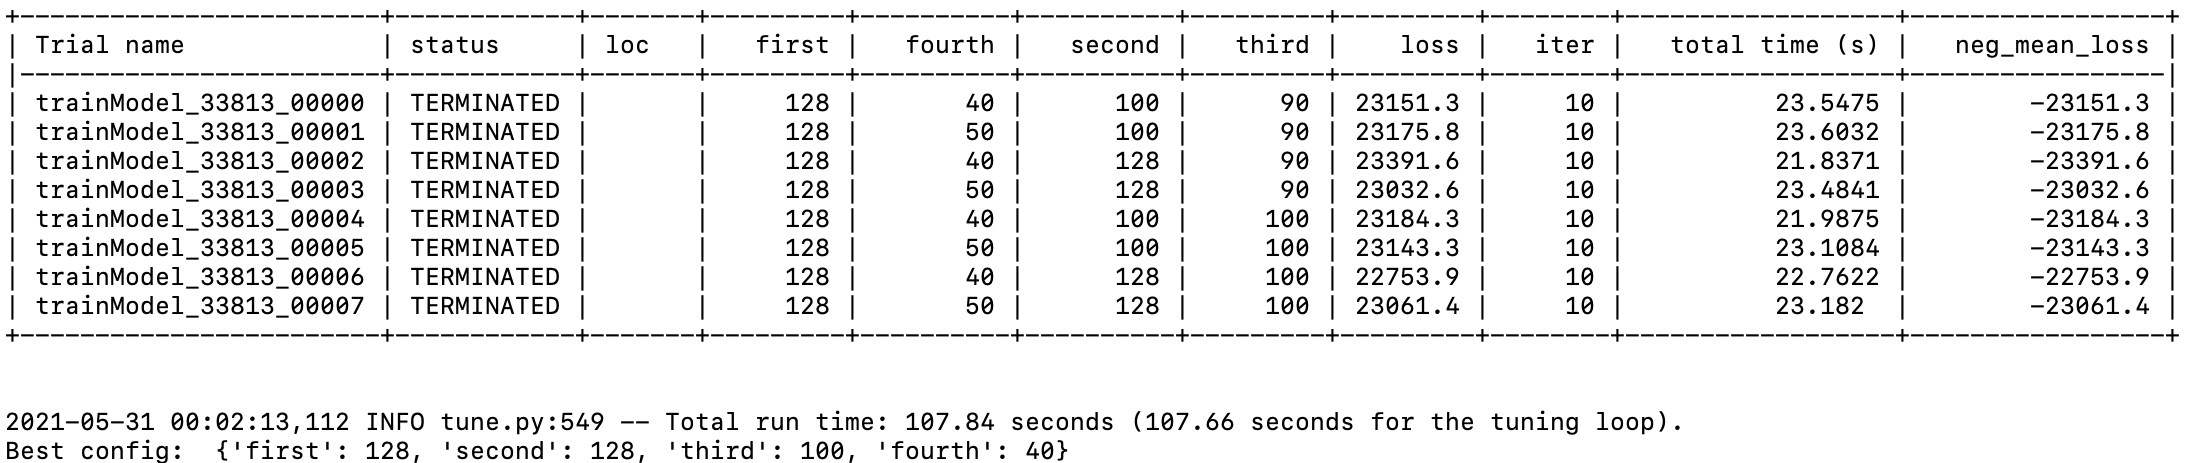
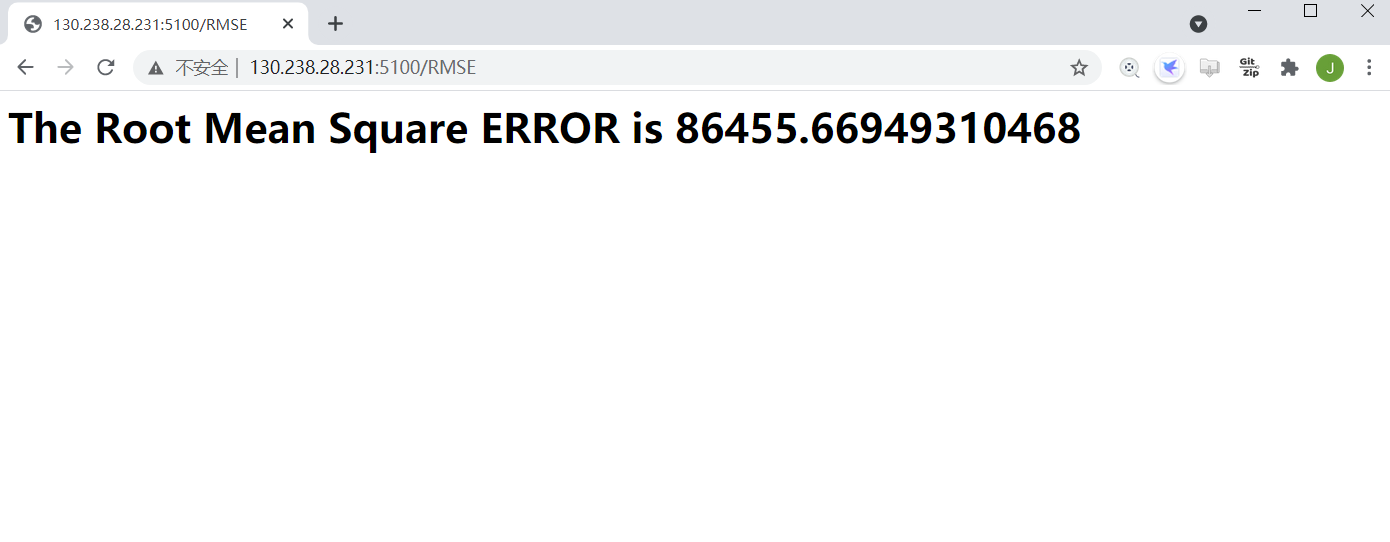
We have run Neural Network, the result as follows:
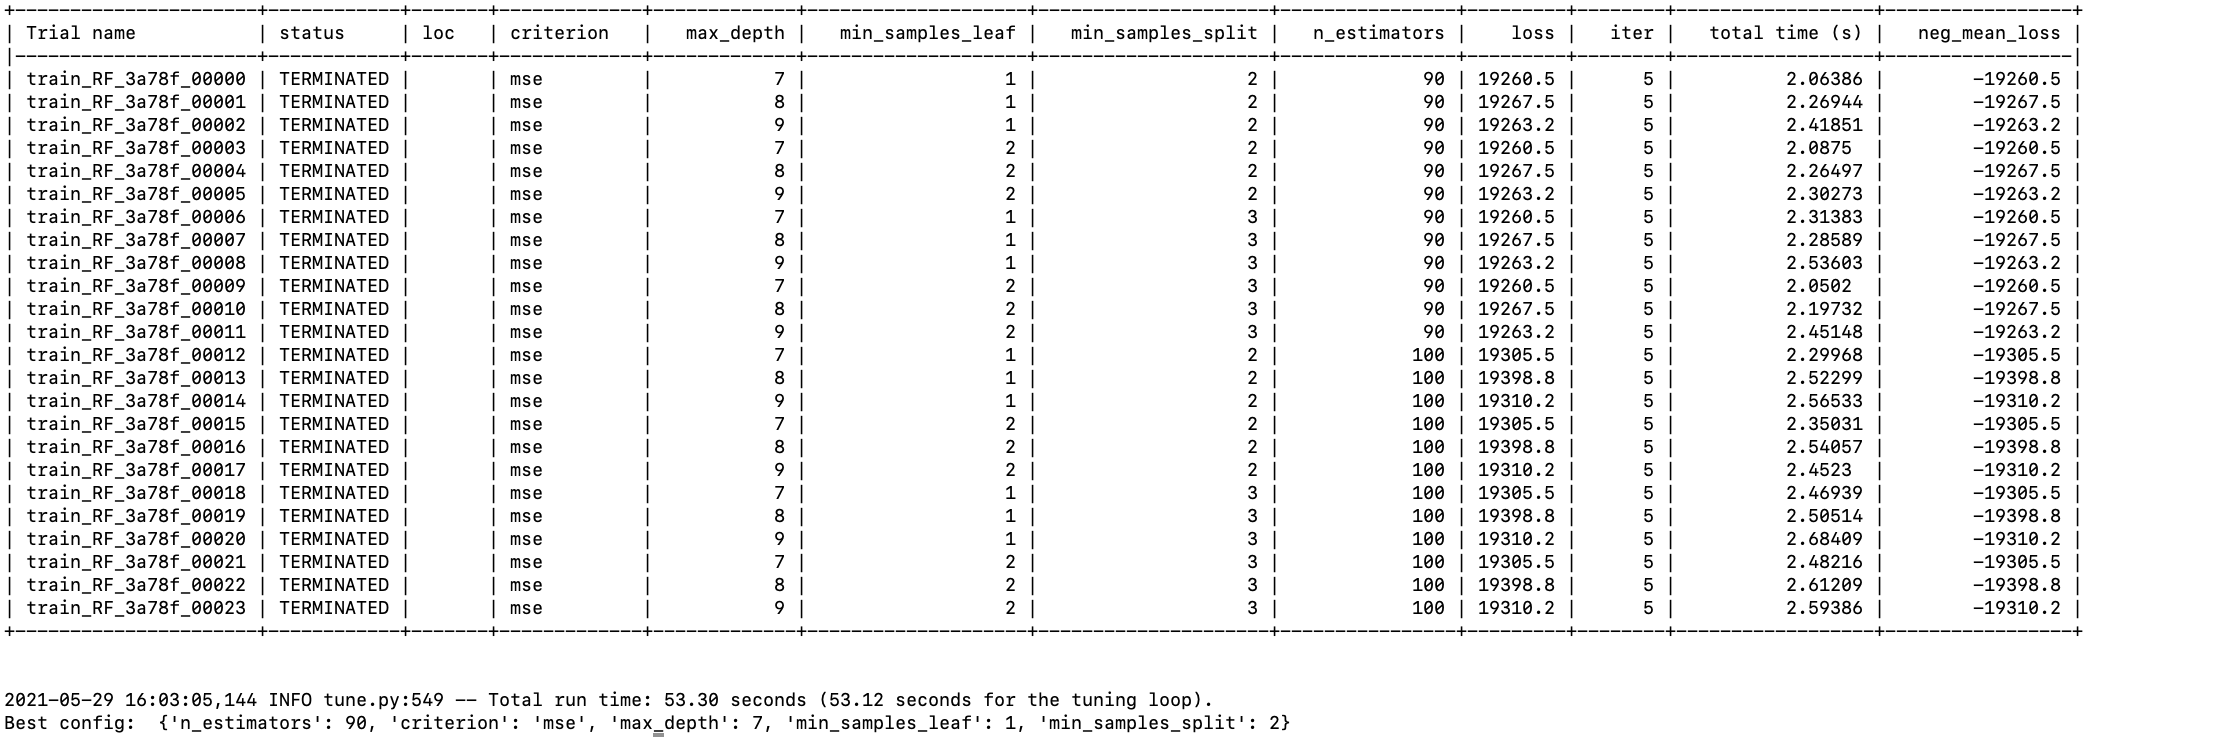
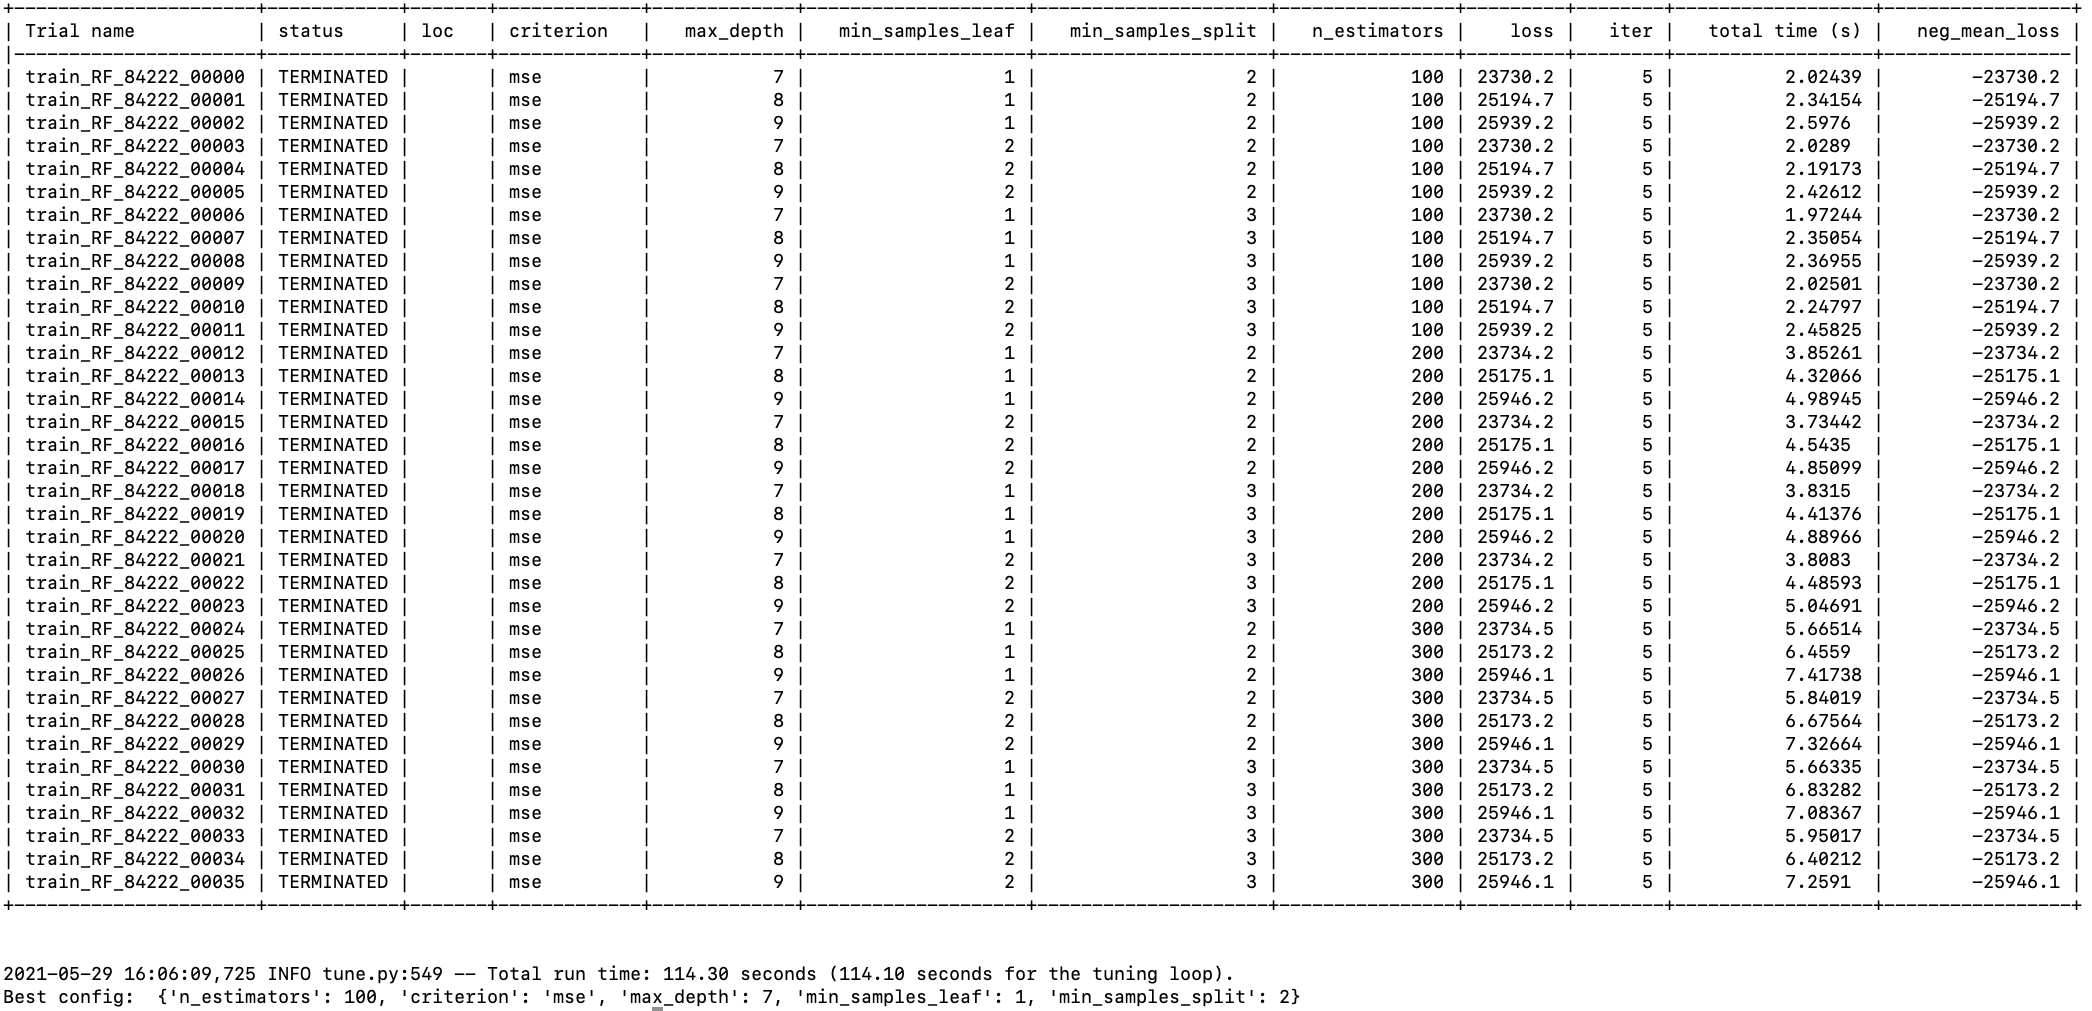
 Random Forest Regressor
 Gradient Boosting Regressor
 Here we can see that best model is random forest regressor.
Sometimes, it reminds us to re-run the ray install command, please use:
pip install ray[default]
pip install ray[rllib]
Or something others it says.
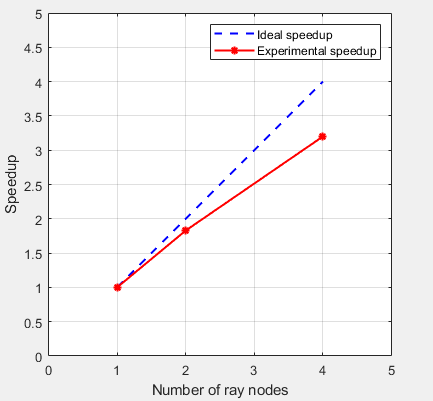
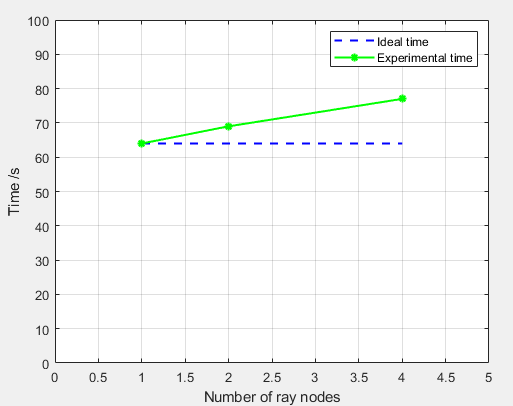
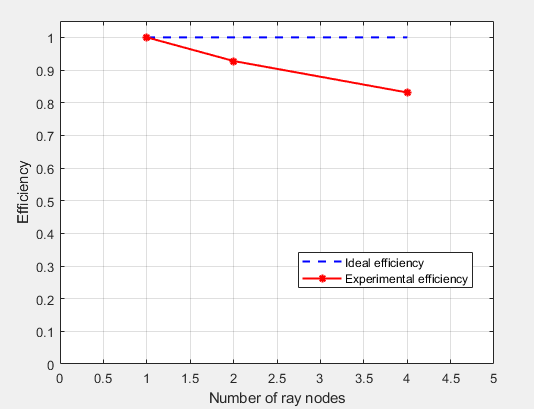
Strong Scalability:
Using 1/2/4 nodes with the same total workload(8 sets of parameters of NN)

Weak Scalability:
Using 1/2/4 nodes with the same local workload(8/16/32 sets of parameters of NN in total, 8 set in each node)
1.Log in the Orchestration VM.
2.Via Orchestration VM, log in prod1(set it as master of swarm)
ssh -i /home/ubuntu/cluster-keys/cluster-key appuser@192.168.2.89
3.Change work dir
cd /home/DE2_Project/ci_cd/production_server
4.Set up
On prod1:
docker login
docker swarm init --advertise-addr 192.168.2.89:2377 --listen-addr 192.168.2.89:2377
On prod2:
To add a worker to this swarm, (on the worker node) run 'docker swarm join-token worker' and follow the instructions.
docker swarm join --token SWMTKN-1-2mp6cxamqvsuzve6nd8yjd5ldulnuzmgl6dxjy8dhkssqyg4nk-8bh0npbssxzoesthcuwwcszz2 192.168.2.89:2377

To add a manager to this swarm, run 'docker swarm join-token manager' and follow the instructions.
5.
if not use docker login in step 4, sometimes the worker node will be rejected when try to pull image!
docker login
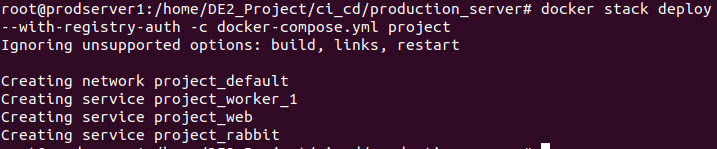
use docker stack deploy instead of docker compose!
docker stack deploy --with-registry-auth -c docker-compose.yml project
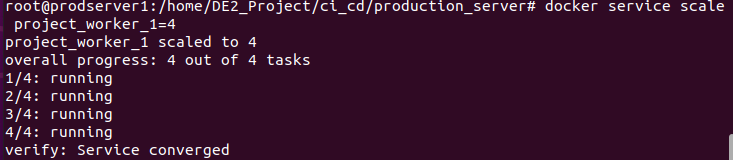
docker service scale project_worker_1=4
docker stack ps project

docker stack services project

If you want to see 1 container more detailed(if the container in prod2, please log in prod 2):
docker logs -f --tail=100 b3f4
docker exec -it b3f4 bash
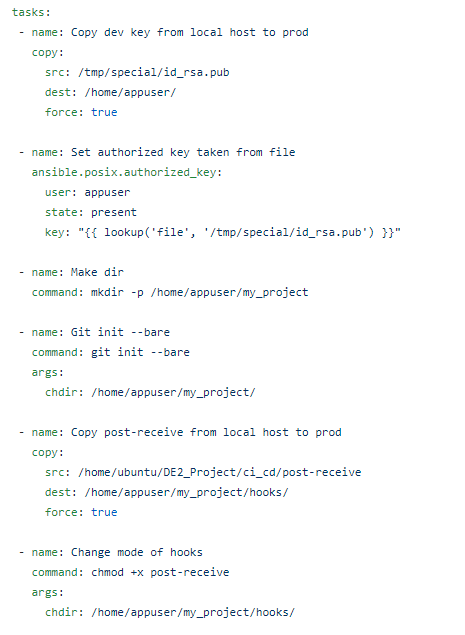
The ci/cd is realized by githook. The setting of githook is realized via Ansible playbook.
The part for dev server in Ansible playbook:

The part for prod server in Ansible playbook:
Now push the first model:
Make sure your are appuser instead of root!
log in devserver:
ssh -i cluster-key appuser@<DEVELOPMENT-SERVER-IP>
Go to the /home/appuser/my_project directory
Add files for the commit and commit files
git add .
git commit -m "test 1"
Connect development server's git to production server's git
git remote add production appuser@<PRODUCTIONS-SERVER-IP>:/home/appuser/my_project
git remote add production1 appuser@<PRODUCTIONS-SERVER-IP>:/home/appuser/my_project
Push your commits to the production server
git push production master
git push production1 master
Note: all the tests should be run in the same environment.
Run test.py and the start time(just example) will be recorded.

The end time(just example):
