Team Members:
- Namith Gangireddyvari
- John Peng
Video Demo: Watch on YouTube
The IoT Smart Room Control System is an automated environment management solution that regulates temperature and lighting using a distributed "Master-Slave" architecture. The system integrates an Arduino for low-level hardware control and a Raspberry Pi 4 for high-level logic, computer vision, and web hosting.
Users can interact with the system via a Web Dashboard, a physical IR Remote, or enable Auto Mode for fully autonomous operation based on human presence and temperature thresholds.
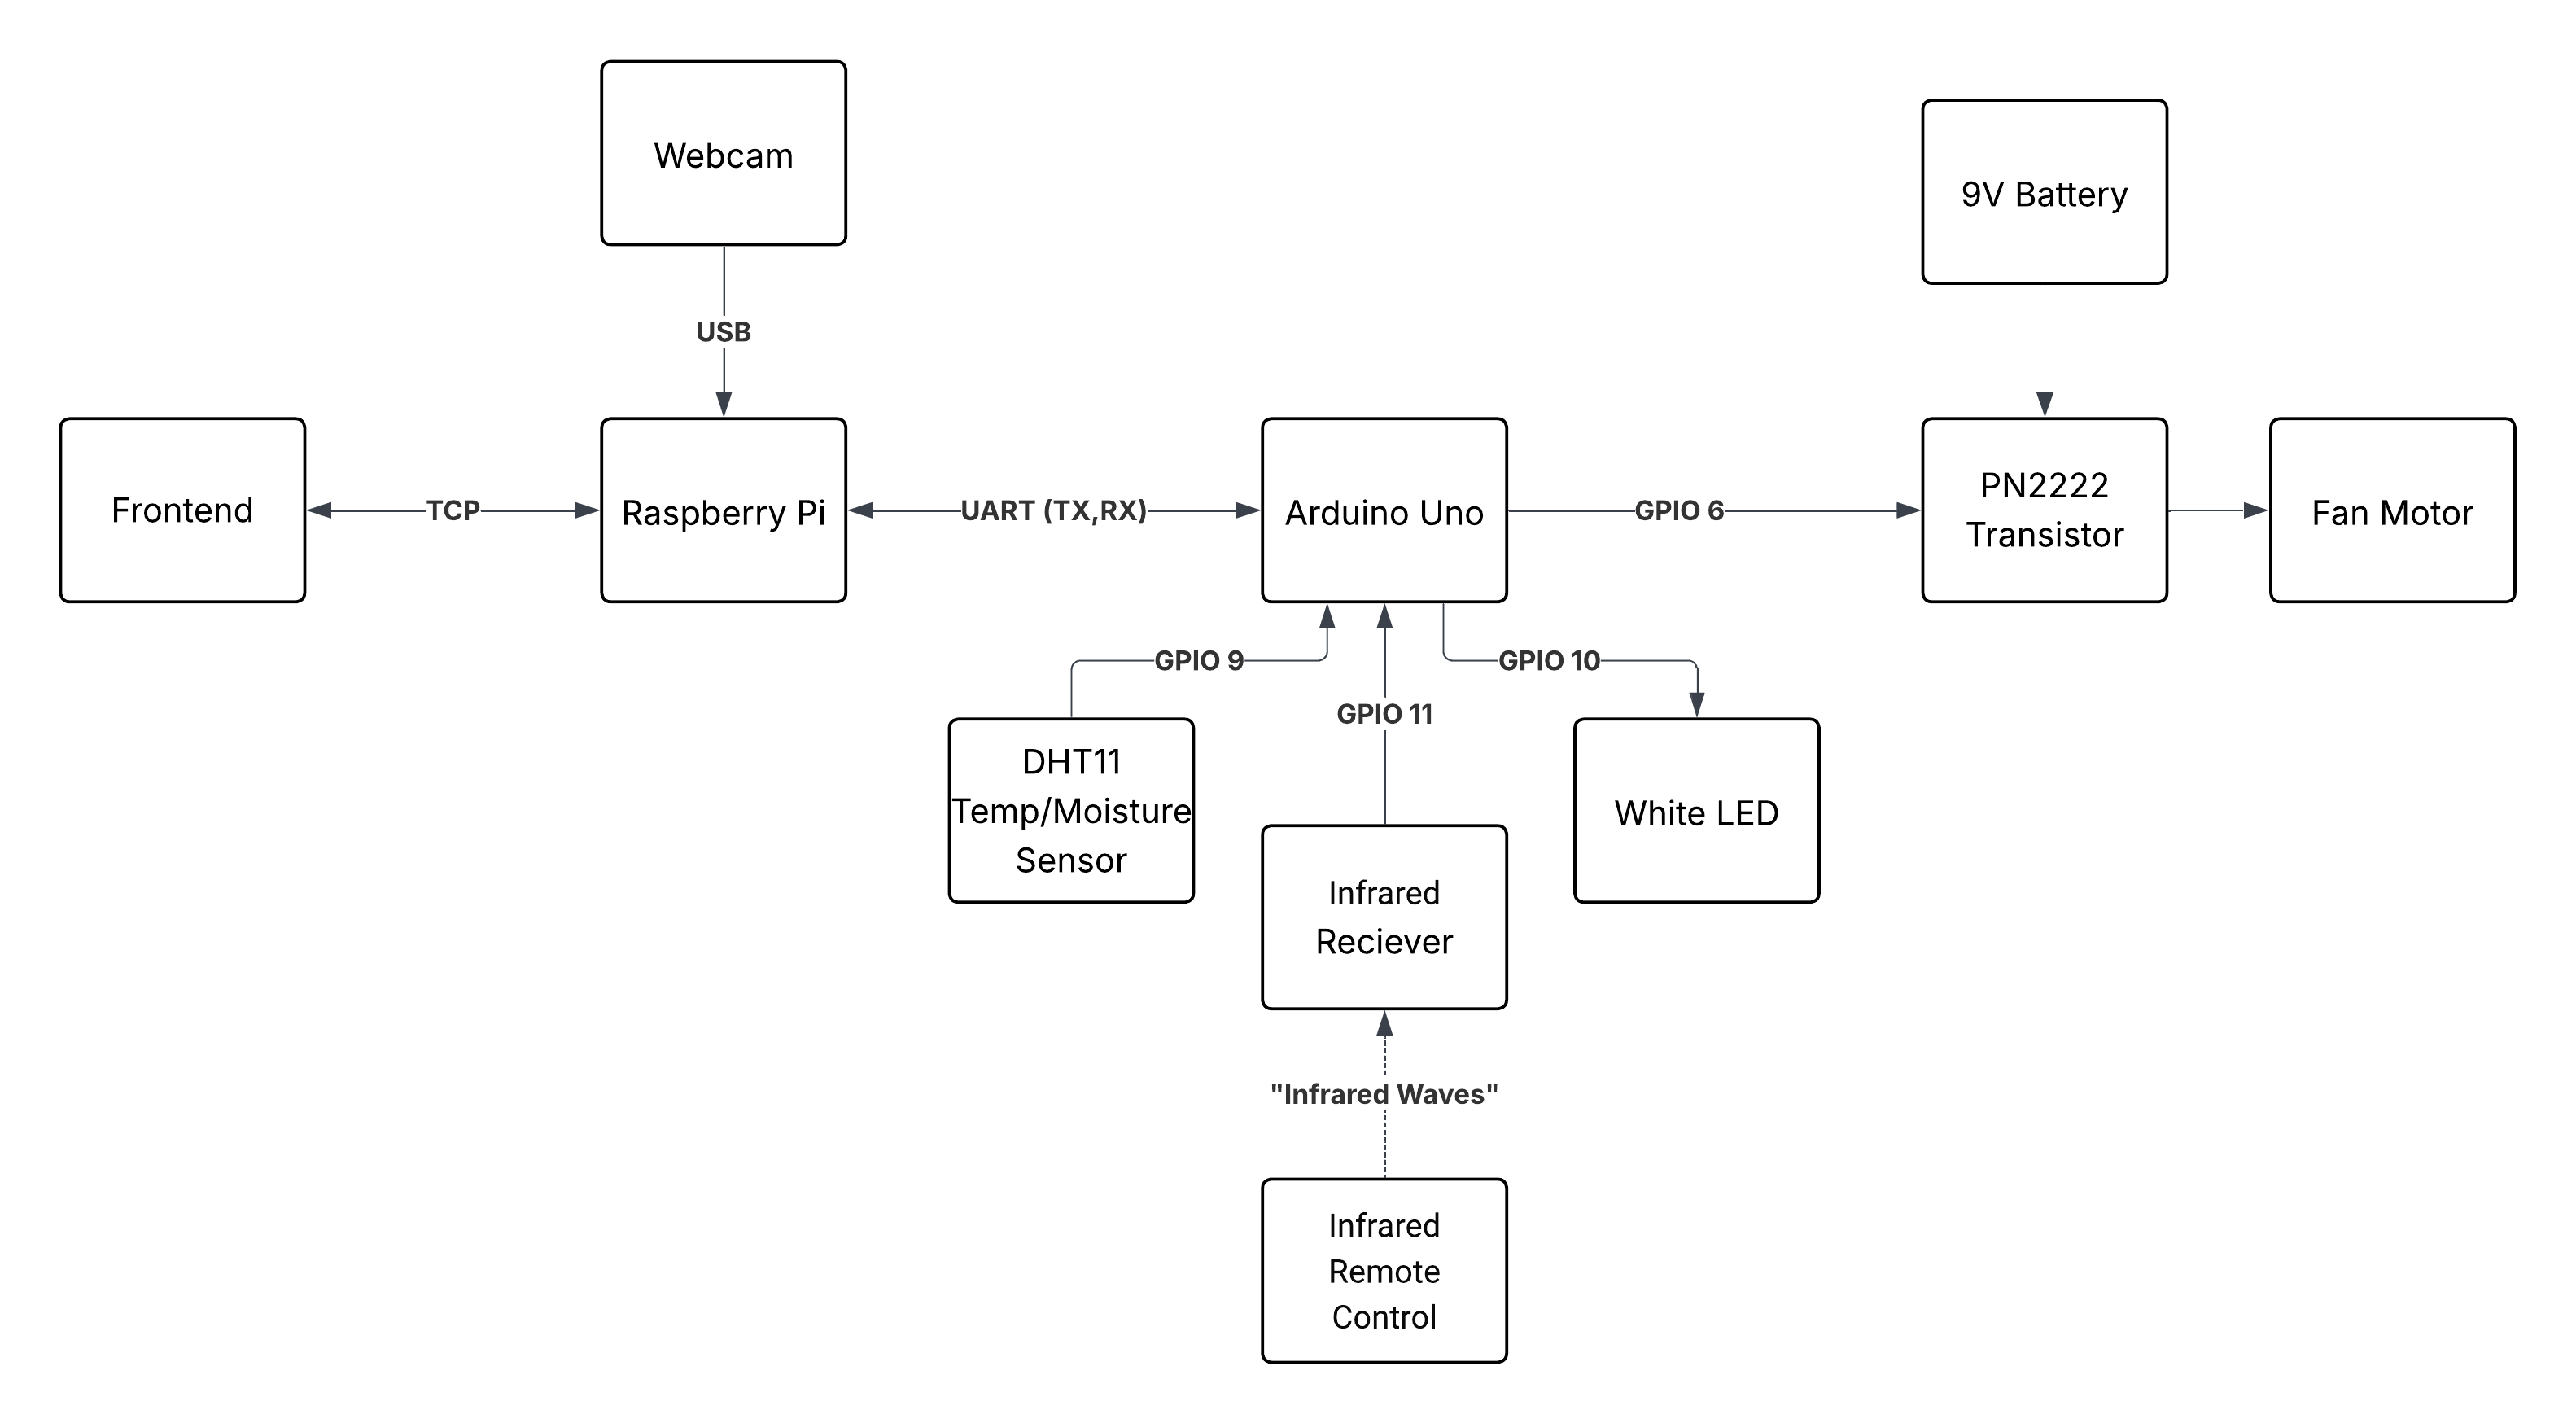
- Controller: Raspberry Pi 4 (Control and Logic)
- Microcontroller: Arduino Uno (Outputs/Sensors Interfacing)
- Sensors:
- DHT11 Temperature & Humidity Sensor
- Infrared (IR) Receiver
- USB Webcam
- Actuators:
- DC Fan Motor (driven by PN2222 Transistor)
- White LED
- 9V Battery (Fan Power)
- Backend: Python 3 (Flask, OpenCV, Threading)
- Frontend: HTML5, JavaScript, Chart.js
- Firmware: C++ (Arduino)
- AI Model: YOLOv3-Tiny (Object Detection)
- Web Dashboard:
- Real-time visualization of Temperature and Humidity using Chart.js.
- Manual toggles for Fan and Light.
- Adjustable temperature threshold for automatic fan activation.
- Computer Vision Automation:
- Uses YOLOv3-Tiny to detect human presence.
- Auto-Light: Lights turn ON when a person enters and OFF when the room is vacant.
- Smart Fan Control:
- Automatically activates the fan when the room temperature exceeds the user-defined threshold.
- Includes hysteresis logic to prevent motor chattering.
- Multi-Interface Synchronization:
- The system utilizes a continuous feedback loop. Whether you use the Web UI or the IR Remote, the system state remains synchronized across all devices.
The Raspberry Pi and Arduino communicate via serial RX-TX (/dev/serial0) at 9600 baud.
- Arduino -> Pi: Broadcasts JSON status packets every 2 seconds.
- Example:
{"temp":24.5, "humidity":60.2, "fan":true, "led":false}
- Example:
- Pi -> Arduino: Sends compact string commands for actuation.
- Example:
"FAN:1"or"LED:0"
- Example:
The Python application handles blocking I/O and heavy processing by running four concurrent threads:
- Flask API: Handles HTTP requests from the frontend.
- YOLO Inference: Processes camera frames for human detection.
- Serial Manager: Listens for Arduino updates and sends commands.
- Auto Logic: Executes control decisions based on state.
Mutex Locking: state_lock and serial_lock are implemented to prevent race conditions when accessing the shared global state or the serial port.
- Buffer Flushing: The vision loop actively discards buffered camera frames to eliminate input lag and ensure real-time responsiveness.
- Resolution: Input frames are resized to 320x320 for optimal performance on the Pi.
- Install the required libraries in the Arduino IDE:
DHT sensor libraryby Adafruit (v1.4.6)IRremoteby shiriff, z3t0, ArminJo (v4.5.0)
- Connect the hardware components according to the circuit diagram.
- Important: Disconnect the RX/TX pins while uploading the code to avoid interference.
- Compile and upload the firmware to the Arduino Uno.
- Ensure Python 3 is installed.
- Install the required Python dependencies:
pip3 install numpy pyserial flask flask-cors opencv-python
- Download the required YOLO model files into the project directory:
curl -L -o yolov3-tiny.cfg "[https://github.com/pjreddie/darknet/raw/master/cfg/yolov3-tiny.cfg](https://github.com/pjreddie/darknet/raw/master/cfg/yolov3-tiny.cfg)"
curl -L -o yolov3-tiny.weights "[https://pjreddie.com/media/files/yolov3-tiny.weights](https://pjreddie.com/media/files/yolov3-tiny.weights)"
curl -L -o coco.names "[https://raw.githubusercontent.com/pjreddie/darknet/master/data/coco.names](https://raw.githubusercontent.com/pjreddie/darknet/master/data/coco.names)"
- Connect the Arduino to the Raspberry Pi via USB.
- SSH into the Raspberry Pi.
- Navigate to the server directory and run:
python3 full_server.py
- On a computer connected to the same network, open the
frontend.htmlfile in a web browser.
- Electrical Noise: The 9V fan battery shares a common ground with the IR sensor. When the fan is running, it generates electrical noise that the IR sensor interprets as dummy values. A software filter was implemented to ignore these specific noise patterns.
- Blocking I/O: The Flask server is blocking by default. We successfully implemented threading to ensure the camera feed doesn't freeze when the web server is waiting for a request.
- Hardware Uploads: The active serial connection between Pi and Arduino interferes with code uploading; wires must be physically disconnected during firmware updates.
- Python:
threading,time,json,numpy,pyserial,flask,flask-cors,opencv-python - Frontend:
Chart.js - Arduino:
Adafruit DHT,IRremote