Assuming that you have already installed Node.js on your machine, you should follow the steps below to setup our sandbox:
-
Clone our repo:
git clone https://github.com/OmarTahon/ToyShop.git -
Install the app's dependencies:
npm install npm install cookie-parser -
Create an ".env" file and write the following, replacing the user and password of your own MySQL client:
  SQL_HOST=localhost
  SQL_USER=root
  SQL_PASSWORD=ABCDEF
  SQL_DATABASE=shop
https://toyshop-ejust.onrender.com/
It's a simple web application for a toy shop
-
The Project was hosted by the website onrender to deploy express js., and it uses the website freemysql for the database
-
To sign in, use the following email:
email: ziyad.shokry@ejust.edu.eg Password: 123 -
To sign in with an empty wallet account, use the following email:
 email: hamo.eltekha@hamboly.mola
 Password: 123
The website contains the following:
- The user should find himself on the home page where all the items available on the website are listed
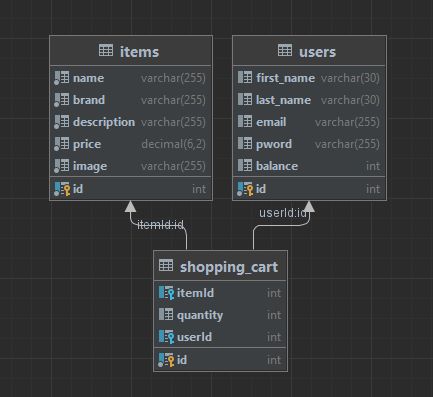
- Each item has Name, Brand, Description, Price, and Image
- Each user has a first_name, last_name, email, password, balance, and id
- A shopping cart has two foreign keys, itemId, and userId, a quantity and id
- Search bar
- Minimum value bar, maximum value bar
- Drop down list contains all the available brands
The User can do the following:
- User can search for specific items using the search bar
- The search can be done using the item's name or the brand
- The user can filter the search results by typing the minimum value and maximum value of the items he wishes to find
- The user can filter the search results by selecting the brand he wants from the drop-down list
To add some items to the shopping cart, the user has to sign in first
-
By clicking on the Sign in button, by triggering the following route:
router.get('/signin', ItemsController.signin_page) -
The user will find himself on the sign in page where he needs to write his email and password and press the sign in button to trigger the following route:
router.post('/signin', ItemsController.signin) -
The user will return to the home page with the ability to add items to the shopping cart
After the signing in process, the welcome sentence will show up containing the user name followed by his wallet balance. the options available on each item will change to contain extra two buttons
- +1 button where on every click the item should be added to the cart with an amount equal to the number of clicks
- -1 button which does the opposite of the +1 button
When the user finishes shopping, he can click on the cart icon to finish the purchasing process and trigger the following route:
router.get('/cart', ItemsController.getCartItems);
On the cart page:
-
The user can see the total cost of the items he selected
-
The user can see the items he selected
-
Each item is represented by its name, brand, image, quantity, and the total cost of that quantity of that item
-
Each item has a +1 button and a -1 butten to modify the selected quantity of that item and they both trigger the following routes respectively:
          router.get('/add/to/cart/:item_id', ItemsController.addItemToCart);
          router.get('/delete/from/cart/:item_id', ItemsController.deleteItemFromCart);
The cart page contains other buttons
- 'BACK TO ITEMS LIST' button to return and select more items from the list
- 'Checkout' button to confirm the purchasing process
When clicking on the 'Checkout' button, the following route will be triggered:
router.get('/checkout', ItemsController.checkout)
- If the wallet balance is enough, the purchase process will complete
- If the wallet balance is less than the total cost, a message says 'Insufficient Money in your Wallet. Go back to the cart from here' will appear
- When the user clicks on 'here', he will return to his cart to modify the items to make the total cost less than the wallet balance
When the user finishes shopping, he can sign out by clicking on the Sign out button to trigger the following route:
router.get('/signout', ItemsController.signout)
- Modifying the project to serve multiple users was done by Karim Fouad
- Simulating the payment process was done by Omar Tahon
- Adding a cool feature (hovering over the item image to make a funny sound and motion) was done by Omar Tahon
- Hosting the project on a server or a cloud service was done by both team members Karim Fouad and Omar Tahon