This tutorial describes how to use a web-based client application to implement Microsoft Entra ID API-driven inbound provisioning. Using the steps in this tutorial, you can upload a CSV file or pull data directly from an HRMS system, visually map attributes to SCIM schema, preview the bulk request payload, and send it to the Microsoft Entra provisioning /bulkUpload API endpoint. The article also provides guidance on how the same client can be extended to integrate with any system of record.
Your system of record periodically generates CSV file exports containing worker data, or you have an HRMS system that exposes employee data through a REST API. You want to implement an integration that reads data from the source and automatically provisions user accounts in your target directory (on-premises Active Directory for hybrid users and Microsoft Entra ID for cloud-only users).
From an implementation perspective:
- You want to use a browser-based wizard to visually map source fields to SCIM attributes, preview the payload, and send it to the inbound provisioning API endpoint.
- You want to support multiple data sources — CSV file upload or direct HRMS API integration — from a single client.
- You want to support custom SCIM schema extensions for HR fields (e.g., HireDate, CostCenter) that aren't part of the standard SCIM schema, and have the client automatically update provisioning app attribute mappings via Microsoft Graph API.
- In your client, you don't want to implement the complex logic of comparing identity data between your system of record and the target directory.
- You want to use Microsoft Entra provisioning service to apply your IT-managed provisioning rules to automatically create/update/enable/disable accounts in the target directory (on-premises Active Directory or Microsoft Entra ID).
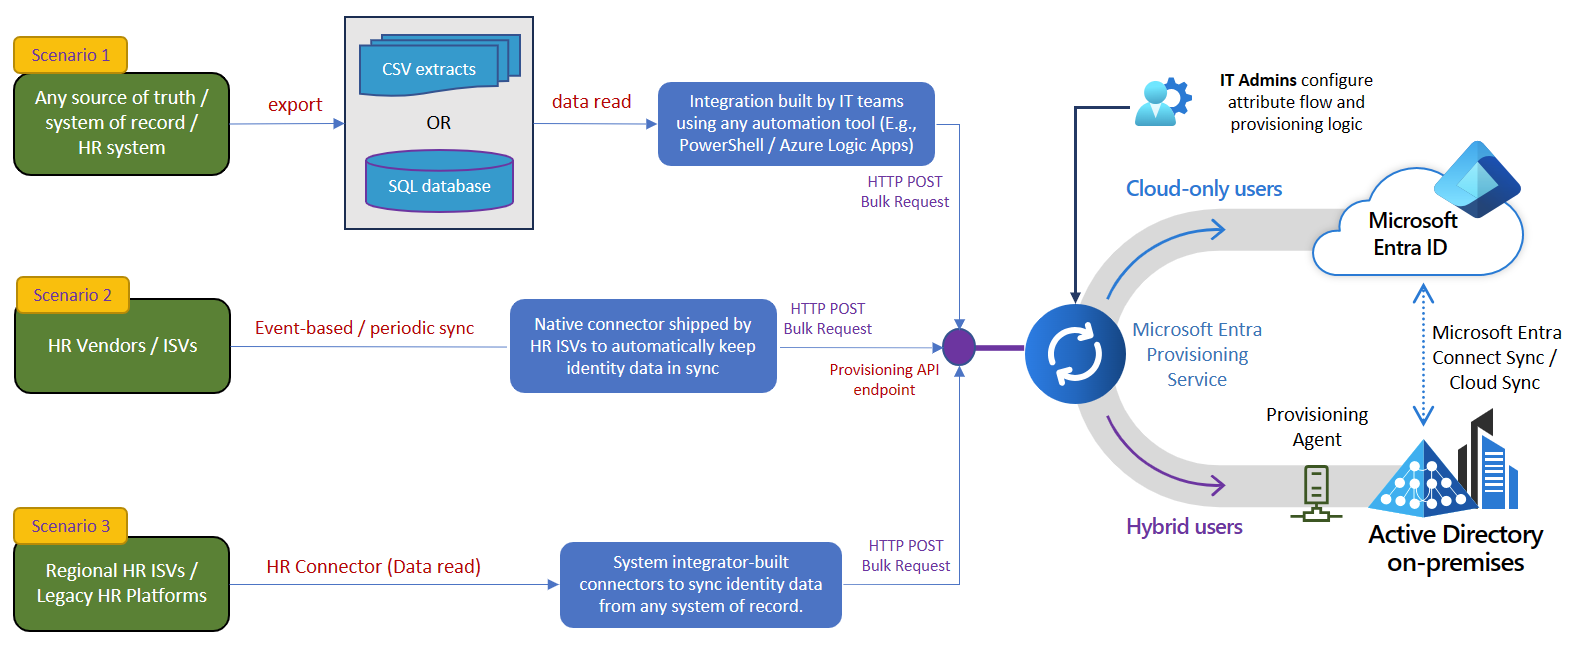
While this tutorial uses a CSV file and HRMS connectors as systems of record, the client is extensible. Here's a list of enterprise integration scenario variations where this web-based client can be used.
| # | Scenario | How to implement |
|---|---|---|
| 1 | CSV file from any HR system | Upload the CSV file directly in the browser. The client parses headers and presents them for mapping. |
| 2 | HRMS with REST API (Workday, BambooHR, ADP, etc.) | Use the built-in HRMS connector. Configure API credentials, test the connection, and fetch employee data. |
| 3 | SAP SuccessFactors | Use the built-in SAP SuccessFactors connector with Basic authentication. |
| 4 | Oracle HCM Cloud | Use the built-in Oracle HCM Cloud connector with Basic authentication. |
| 5 | Custom REST API | Use the generic Custom REST API connector. Supports no auth, basic, bearer, API key, and OAuth2 authentication types. |
After reading the source data, the client converts each record to a SCIM Core User + Enterprise User representation and sends it as a bulk request to the Microsoft Entra provisioning /bulkUpload API endpoint.
Important
The web-based client is provided "as-is" for implementation reference. If you have questions or would like to enhance it, use the GitHub project repository.
The web-based client automates several tasks. It has logic for visual attribute mapping, auto-mapping of common field names, handling large datasets by chunking bulk requests to send 50 records per request, and automatic provisioning log monitoring. Here's how you can test it and customize it per your integration requirements.
Note
The web-based client is provided "as-is" for implementation reference. If you have questions related to the client or if you'd like to enhance it, please use the GitHub project repository.
| Step | Basic scenario | Advanced scenario |
|---|---|---|
| 1. Read worker data from the source. | Upload a CSV file or connect to an HRMS via the built-in connector. The client parses the data and displays a preview. | If your system of record is different, add a custom HRMS connector to the registry. |
| 2. Map attributes to SCIM format. | Use Auto-Map to match common field names, or map manually via dropdowns. At minimum, map externalId and userName. |
If your source includes non-standard fields, use the Custom SCIM Schema Extension section to define custom attributes with types and target Entra attribute mappings. |
| 3. Use a certificate or client secret for authentication. | Configure authentication in Step 1 — Connect. Supports client secret, client certificate (.pem/.pfx), and managed identity. | For production, use certificate-based authentication. See Configure client certificate for service principal authentication. |
| 4. Provision accounts in on-premises Active Directory or Microsoft Entra ID. | Configure an API-driven inbound provisioning app. Copy the /bulkUpload API endpoint into the API Endpoint field in Step 1. Click Send in Step 6. |
If you use custom SCIM schema extensions, the client automatically updates the provisioning job schema and configures attribute mappings via Microsoft Graph API. |
| 5. Scan the provisioning logs and retry provisioning for failed records. | After sending, the client automatically polls provisioning logs and displays a summary with success/failure counts per record. | Use the Refresh Logs button to manually re-query the provisioning logs at any time. |
| 6. Deploy to production. | Once verified, deploy the client as a Docker container or Node.js service. All credentials are entered at runtime — no secrets are stored on disk. | Use the provided Dockerfile and docker-compose.yml for containerized deployment. |
| Requirement | Details |
|---|---|
| Node.js | Version 18 or later (download) |
| npm | Comes with Node.js |
| Microsoft Entra ID | An API-driven inbound provisioning app configured in your tenant |
| App registration | With SynchronizationData-User.Upload permission (and Synchronization.ReadWrite.All if using custom schema sync) |
No other tools, databases, or cloud accounts are needed to run the client locally. Docker is optional.
- Access the GitHub repository.
- Use the Code > Clone or Code > Download ZIP option to copy the contents to your local folder.
- The repository has the following directory structure:
entra-provisioning-client/
├── setup.bat / setup.sh          # One-command local setup
├── package.json                  # Server dependencies + scripts
├── Dockerfile                    # Multi-stage Docker build
├── docker-compose.yml            # Docker Compose config
├── server/
│   ├── index.js                  # Express entry point (binds to 127.0.0.1)
│   ├── connectors/registry.js    # HRMS connector definitions (extensible)
│   ├── routes/
│   │   ├── upload.js             # CSV upload endpoint
│   │   ├── mapping.js            # SCIM schema + validation
│   │   ├── provisioning.js       # Preview, Send, and Logs endpoints
│   │   ├── schema.js             # Provisioning app schema update endpoint
│   │   └── connectors.js         # HRMS connector API
│   ├── schemas/scimSchemas.js    # SCIM attribute definitions
│   └── services/
│       ├── csvParser.js          # CSV parsing
│       ├── scimBuilder.js        # CSV/HRMS → SCIM bulk payload builder
│       ├── entraAuth.js          # OAuth2 token + bulkUpload API call
│       ├── hrmsClient.js         # Generic HRMS API client
│       └── schemaUpdater.js      # Provisioning app schema sync via Graph
├── client/
│   ├── package.json              # React dependencies
│   └── src/
│       ├── App.js                # 6-step wizard shell
│       ├── App.css               # Fluent 2 design system styles
│       └── components/
│           ├── ConnectionConfig.js     # Step 1: Entra credentials
│           ├── DataSourcePicker.js     # Step 2: CSV vs HRMS
│           ├── FileUpload.js           # Step 3a: CSV upload
│           ├── HRMSConnector.js        # Step 3b: HRMS integration
│           ├── AttributeMapping.js     # Step 4: Attribute mapping
│           ├── PayloadPreview.js       # Step 5: JSON preview
│           └── SubmitResult.js         # Step 6: Send + log monitor
-
Run the setup script:
Windows
setup.batmacOS / Linux
chmod +x setup.sh && ./setup.shOr run the steps manually:
npm install
cd client && npm install && npx react-scripts build && cd ..
-
Start the client:
npm start
You see the following output:
Entra Provisioning Client running at http://127.0.0.1:3001 All credentials stay on this machine — nothing leaves until you click Send. -
Open http://localhost:3001 in your browser.
Note
Your credentials never leave your machine. The server binds to 127.0.0.1 and is not reachable from other machines. Nothing is sent to any cloud service until you explicitly click Send in the final step.
-
In the browser, on the Connect step, choose a Provisioning Target:
- Microsoft Entra ID — provision users to cloud-based Entra ID
- On-premises Active Directory — provision users to on-prem AD via the Entra Cloud Sync provisioning agent
-
Enter your app registration details:
Field Where to find it Tenant ID Entra admin center → Overview → Tenant ID Client ID App registrations → Your app → Overview → Application (client) ID Authentication method Choose Client secret or Certificate Client Secret or Certificate path App registrations → Your app → Certificates & secrets API Endpoint Enterprise apps → Your provisioning app → Provisioning → Overview → Provisioning API Endpoint The API endpoint looks like:
https://graph.microsoft.com/beta/servicePrincipals/{id}/synchronization/jobs/{jobId}/bulkUpload
Tip
For certificate-based authentication, upload the .pem or .pfx file to your app registration under Certificates & secrets → Certificates, and provide the local file path to the private key in the client.
Choose a data source:
- On the Choose Data Source step, select CSV / File Upload.
- Drag and drop your CSV file, or click to browse.
- The client parses the headers and shows a data preview table.
-
On the Choose Data Source step, select HRMS / API Integration.
-
Select your HRMS connector from the available list:
System Auth type Workday OAuth2 SAP SuccessFactors Basic BambooHR API Key ADP Workforce Now OAuth2 Oracle HCM Cloud Basic Custom REST API Any (none / basic / bearer / API key / OAuth2) -
Enter the API credentials and connection details.
-
Click Test Connection to verify.
-
Click Fetch Employees to pull the data.
- On the Map Attributes step, map your source columns to SCIM user attributes.
- Click Auto-Map to auto-detect common field name patterns (supports ~25 patterns including
WorkerID → externalId,FirstName → name.givenName,Department → enterprise.department, etc.). - At minimum, map externalId (a unique worker identifier) and userName.
- Click Validate to check for missing required fields and column mismatches.
If your source includes HR fields that aren't part of the standard SCIM schema (e.g., HireDate, JobCode, CostCenter):
- Toggle Custom SCIM Schema Extension to enable it.
- Set the Schema Namespace URI (e.g.,
urn:ietf:params:scim:schemas:extension:contoso:1.0:User). - Add custom attributes specifying:
- Attribute name (e.g.,
HireDate) - Type (
String,DateTime,Integer, orBoolean) - Target Entra attribute — select from the dropdown (e.g.,
employeeHireDate,extensionAttribute1) or type a custom value
- Attribute name (e.g.,
- Map each custom attribute to a source column.
- When you send in Step 6, the client automatically:
- Adds the custom attributes to the provisioning job's source schema via Microsoft Graph synchronization API
- Configures Direct attribute mappings in the provisioning job's synchronization rules
- No manual portal configuration needed
Note
Automatic schema sync requires the Synchronization.ReadWrite.All application permission on your app registration. Learn more about custom SCIM schema extensions.
- On the Preview step, click Generate Preview.
- Review the exact SCIM JSON that will be sent to the
/bulkUploadAPI endpoint. - Verify the attribute values, schema URNs, and operation types.
- You can copy or download the payload for offline inspection or use with Graph Explorer or cURL.
- On the Send step, click Send to Provisioning API.
- The client performs the following operations in sequence:
- Schema sync — If custom attributes are defined or standard attribute mappings need to be configured, the client reads the provisioning job schema, adds missing attributes and mappings, and writes it back via Graph API.
- Bulk upload — Authenticates using your configured credentials, chunks the data into batches of 50 operations per request, and POSTs each batch to the
/bulkUploadAPI endpoint. - Log monitoring — Automatically polls the provisioning logs API and displays a summary of created, updated, and failed records.
- Review per-batch results. Look for
202 Acceptedstatus codes indicating the provisioning service accepted the request. - Use the Refresh Logs button to re-query at any time.
Before using this client, create an app registration in Microsoft Entra ID with the required permissions:
-
Go to Entra admin center → App registrations → New registration.
-
Name it (e.g., "Inbound Provisioning Client") and register.
-
Go to API permissions → Add a permission → Microsoft Graph → Application permissions.
-
Add the following permissions:
Permission Required for SynchronizationData-User.UploadSending bulk request to the /bulkUploadendpointSynchronization.ReadWrite.AllAutomatic schema and attribute mapping sync (optional) AuditLog.Read.AllReading provisioning logs after send (optional) -
Click Grant admin consent.
-
Go to Certificates & secrets and create a client secret or upload a certificate.
The connector system is extensible. To add a new connector:
- Open
server/connectors/registry.js. - Add a new entry to the
CONNECTORSobject:
myHrms: {
  id: 'myHrms',
  name: 'My HRMS',
  description: 'Pull employee data from My HRMS',
  icon: '🏢',
  category: 'HCM',
  authType: 'bearer',
  configFields: [
    { key: 'baseUrl', label: 'API Base URL', placeholder: 'https://...', required: true },
    { key: 'authValue', label: 'Bearer Token', placeholder: 'token', required: true, secret: true },
  ],
  responseMapping: {
    dataPath: 'data.employees',
    pagingParam: 'offset',
    pageSizeParam: 'limit',
    defaultPageSize: 100,
  },
  sampleFieldHints: {
    'employee_id': 'externalId',
    'first_name': 'name.givenName',
  },
},- Save — the new connector appears in the UI automatically.
# Build the image
docker build -t entra-provisioning-client .

# Run (credentials entered in-browser, no .env needed)
docker run -p 3001:3001 entra-provisioning-client
Or with Docker Compose:
docker-compose up --build| Problem | Solution |
|---|---|
npm install fails |
Ensure Node.js 18+ is installed. Run node -v to check. |
| Port 3001 already in use | Set a different port: PORT=3002 npm start (or create a .env file). |
| "Authentication failed" at Send | Verify Tenant ID, Client ID, and credentials. Ensure SynchronizationData-User.Upload permission is granted with admin consent. |
| Schema update fails | Ensure Synchronization.ReadWrite.All permission is granted. The provisioning job must be configured with an API-driven inbound source. |
| CSV not parsing correctly | Ensure your file is UTF-8 encoded CSV with a header row. BOM is handled automatically. |
| HRMS connection fails | Check the API URL, credentials, and that your IP is allowlisted by the HRMS vendor. |
| Provisioning logs show errors | Open the provisioning logs in the Entra admin center for detailed error messages per record. |
| Concern | How it's handled |
|---|---|
| Client secrets | Entered in-browser, held in memory only, never written to disk |
| Network exposure | Server binds to 127.0.0.1 — not reachable from other machines |
| Data transmission | Nothing is sent to any cloud service until you explicitly click Send in the final step |
| Git safety | .env, secrets, certificates, and build artifacts are all in .gitignore |