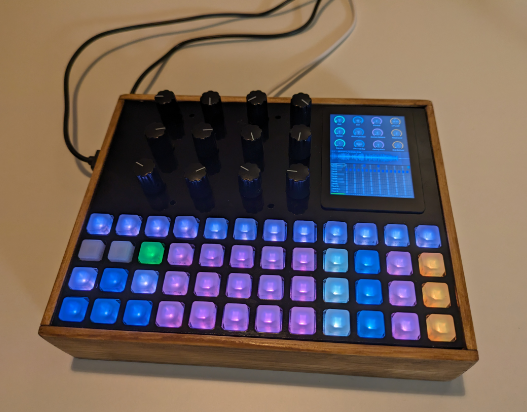
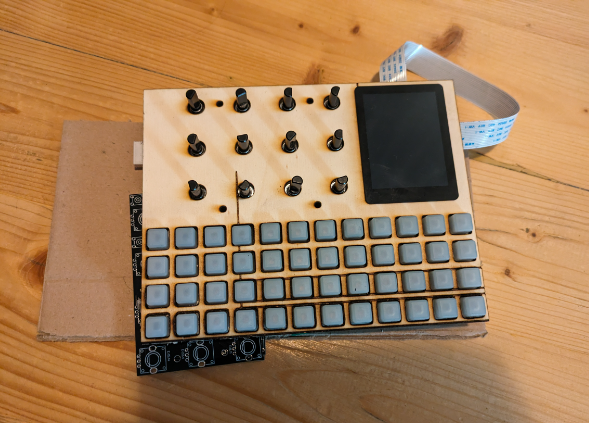
10 Zic Grid
Zic Grid is an advance hardware version of ZicBox with a big touch screen, 12 encoders and a 4x12 RGB keypad.

Audio Output Considerations
This design currently does not include a dedicated DAC, which may be a limitation for some users. While the built-in audio output on the Raspberry Pi 4 saw some improvement, it's still far from ideal for high-quality audio applications. When I initially put this build together, the idea was to rely on USB audio devices instead. In my setup, for example, I use either an Elektron Digitone or a Behringer Xenyx 302 USB mixer as the audio interface.
The decision to leave out a DAC was intentional, to prioritize simplicity and interface usability, allowing for more encoders to be connected directly to the Pi's GPIO instead. Given that many modern devices support class-compliant USB audio in/out, this approach felt like a practical trade-off for a DIY groovebox.
Adding a DAC is definitely possible and wouldn’t be particularly difficult, but it would require some PCB modifications. Specifically, the encoders would need to be moved to a separate controller IC and connected via I²C, rather than taking up direct GPIO pins on the Pi.
Next Steps: CM4-Based Design
The long-term goal is to transition from this prototype to a more compact and integrated version based on the Raspberry Pi Compute Module 4 (CM4). This would allow for a significant size reduction, potentially cutting the footprint by half, and offer more flexibility in hardware design.
In this future version:
- A built-in DAC would be included for higher-quality onboard audio.
- A custom or existing CM4 carrier board would be required.
- To free up GPIO for audio and other features, encoders would need to be driven by a GPIO expander (e.g., via I²C).
This approach would make the system cleaner, more compact, and better suited for integration into a standalone unit, while improving audio quality and still maintaining good hands-on control.
- 1x Adafruit NeoTrellis M4 Express 37€ on mouser
- 1x Adafruit NeoTrellis 12€ on mouser
- 3x Silicone Elastomer 4x4 Button Keypad 4.60€ on mouser
- 1x 2.8inch Capacitive Touch Display for Raspberry Pi, 480×640, DSI 40€ on Geekbuying, 60€ on Amazon
- 12x encoders wihtout detent PEC12R-4025F-N0024 1.13€ on mouser (but might get expensive with shipping, could use other encoder to reduce cost)
- 1x PCBs at JLCPCB 4€ inlucing shipping
- 1x Raspberry PI about 50€ depending on the model you get (note that RPi5 doesn't have jack output so the only way to get audio output will be using a USB sound card. At some point I might add a DAC but for this I would need to rework the encoder array to use an I2C IC to free the I2S GPIO)
To reduce cost, I would recommend to order everyhting at once on mouser and get free shipping.
About 190€ without enclosure.
For the enclosure, there is 2 options:
- PCB front panel, about 30€ at JLCPCB
- Laser cutted wood and/or acrylic
The rest of the enclosure is hand made out of wood.
 |
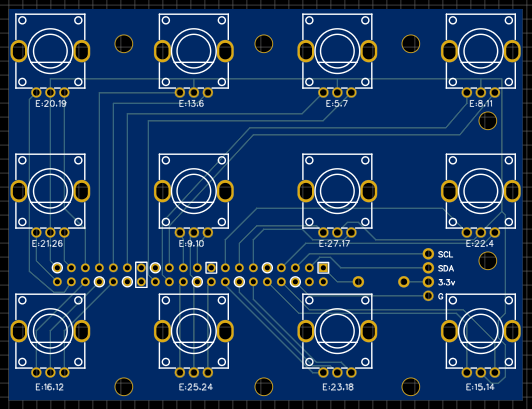 |
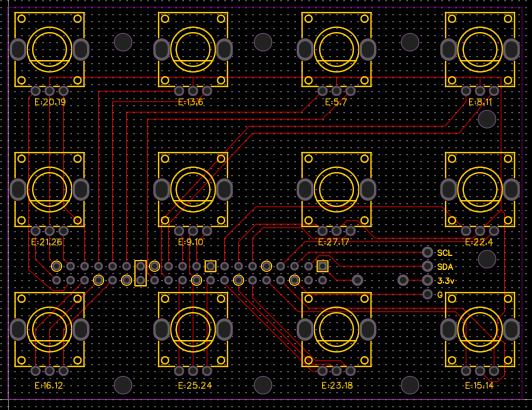
The PCB has been created with EasyEDA. You can load the copy of the PCB project using the json file PCB_zicbox_encoders_2024-01-11.json.
To order the PCB, you need to send the Gerber file Gerber_zicbox_encoders_2024-01-11.zip to https://jlcpcb.com/. With slow shipping (about 10 days), it cost around 4€. Just upload the file using the button Add gerber file and normally there should be nothing to change. You can eventually change the color from green to black, it should not impact the price. Finally Save to cart and proceed to the checkout.
The PCB assembly is quiet easy, it is just few encoder and pins headers to solder to the board.
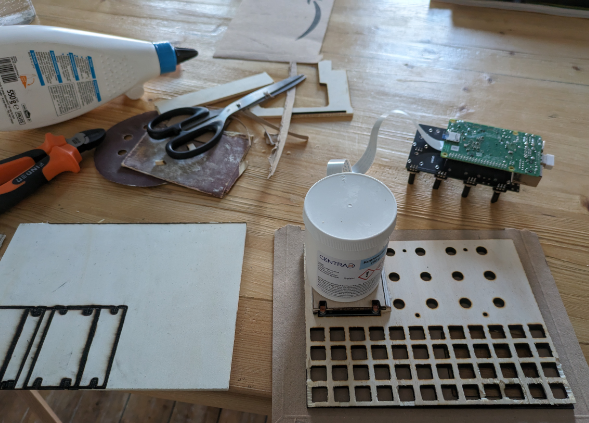
For the front panel, it is also possible to order it as a PCB. I haven't yet tried myself, as it is more expensive due to the size (around 30€). I am waiting for the graphic design before to order it. So far, I made the front panel using my laser engraver to cut wood and acrylic sheet. To do this, I was converting the gerber file of PCB outline to Gcode, using a small script. For more details about this process, see my notes in the case folder.
The EasyEDA file and the gerber file for the front panel are available here.
The rest of the enclosure has been fully hand made out of wood, using a saw, drill and glue. For this part, it will be up to your own creativity :p till someone come up with 3d model.
 |
 |
 |