This is a collection of useful Linux/shell-commands
To enable terminal-coloring for root, open /root/.bashrc and uncomment the following lines:
# You may uncomment the following lines if you want `ls' to be colorized:
 export LS_OPTIONS='--color=auto'
 eval "`dircolors`"
 alias ls='ls $LS_OPTIONS'
 alias ll='ls $LS_OPTIONS -l'
alias l='ls $LS_OPTIONS -lA'Consider using CaptainZero's fortress script here: https://github.com/captainzero93/security_harden_linux
Thanks to NetworkChuck (https://www.youtube.com/watch?v=ZhMw53Ud2tY)
Manual Updates:
apt update
apt dist-upgrade
Automatic Updates:
apt install unattended-upgrades
dpkg-reconfigure --priority=low unattended-upgradesadduser {username}
usermod -aG sudo {username}- Create the Public Key Directory on your Linux Server
mkdir ~/.ssh && chmod 700 ~/.ssh- Create Public/Private keys on your computer
ssh-keygen -b 4096- Upload your Public key to the your Linux Server (Windows)
ssh-copy-id -i $env:USERPROFILE/.ssh/id_rsa.pub {username}@{server ip}sudo nano /etc/ssh/sshd_config
PermitRootLogin no
PasswordAuthentication no (if you want to only permit certification-login)See open ports
sudo ss -tulpnInstall, configure and enable ufw
apt install ufwif unable to find ufw, add repository (debian):
add-apt-repository "deb http://http.debian.net/debian/ jessie main contrib non-free"See UFW status:
sudo ufw statusAllow port through firewall:
sudo ufw allow 22Start firewall:
sudo ufw enableRestart firewall:
sudo ufw reloadFollowing https://www.tecmint.com/install-apache-with-virtual-hosts-on-debian-10/
apt install apache2 -y #install
systemctl start apache2 #start service
systemctl enable apache2 #start on boot

sudo ufw allow 80/tcp #allow through firewallAlways configure virtual hosts in /etc/apache2/sites-available/
Example with domain name containing æ,ø,å and files in /var/www/alpha
<VirtualHost *:80>
	# Actual domain name is alpha.bodø.city but since it contains
	# non-ascii characters we have to use punycode, more info:
	# http://handbok.dinstudio.no/0/37/o-a-i-domenenavn/
	# https://www.punycoder.com/

        ServerName alpha.xn--bod-2na.city
        ServerAlias www.alpha.xn--bod-2na.city

        ServerAdmin arvid@bodø.city
        DocumentRoot /var/www/alpha

	ErrorLog ${APACHE_LOG_DIR}/error-alpha.log
        CustomLog ${APACHE_LOG_DIR}/access-alpha.log combined
</VirtualHost>
When finished, enable site with command:
a2ensite site.name.confAlways restart service after making changes:
systemctl reload apache2Disable site with:
a2dissite site.name.confhttps://www.linode.com/docs/guides/how-to-set-up-htaccess-on-apache/ https://phoenixnap.com/kb/how-to-set-up-enable-htaccess-apache By creating a file called .htaccess in a directory served by apache, you can limit access to files and folders based on a pattern i.e. disallowing .git folder:
RedirectMatch 404 /\.gitor disallowing directory listing (showing files and folders if no index-file is present):
Options -IndexesBut first you have to enable it by adding the following to your vhost conf (inside virtualhost definition):
<Directory /var/www/html-templates>
    Options Indexes FollowSymLinks
    AllowOverride All
    Require all granted
</Directory>Install Certbot
sudo add-apt-repository ppa:certbot/certbot
apt-get install software-properties-common
apt install python-certbot-apache
certbot --apache -d templates.arvid.softwareFollowing https://computingforgeeks.com/how-to-install-latest-php-on-debian/
sudo apt -y install lsb-release apt-transport-https ca-certificates
sudo wget -O /etc/apt/trusted.gpg.d/php.gpg https://packages.sury.org/php/apt.gpg
echo "deb https://packages.sury.org/php/ $(lsb_release -sc) main" | sudo tee /etc/apt/sources.list.d/php.list
sudo apt update
sudo apt -y install php7.4
sudo apt install php libapache2-mod-php php-mysqlwget http://repo.mysql.com/mysql-apt-config_0.8.13-1_all.deb
sudo apt install ./mysql-apt-config_0.8.13-1_all.deb
#apt update
#apt upgrade should work
sudo apt-get install mysql-community-server
sudo systemctl status mysqlCREATE DATABASE stock;
CREATE USER 'stock'@'localhost' IDENTIFIED BY 'StockFish123';
GRANT ALL PRIVILEGES ON stock.* TO 'stock'@'localhost';
FLUSH PRIVILEGES;or use the built-in python-script to generate SQL code for you:
C:\Users\Arvid\Desktop\git\linux-cheat-sheet>python create_mysql_db_and_usr.py

Welcome!

This script will generate sql for creating a database, user,
and giving the user full permissions on the specified host like this example:

********************************************
CREATE DATABASE <dbname>;
CREATE USER '<usr>'@'<host>' IDENTIFIED BY '<pw>';
GRANT ALL PRIVILEGES ON <dbname>.* TO '<usr>'@'<host>';
********************************************

Enter value for host (default: localhost):
Enter value for db (default: ): phpmyadmin
Enter value for usr (default: ): phpmyadmin
Enter value for pw (default: ): Php@Myadm123!
********************************************

CREATE DATABASE phpmyadmin;
CREATE USER 'phpmyadmin'@'localhost' IDENTIFIED BY 'Php@Myadm123!';
GRANT ALL PRIVILEGES ON phpmyadmin.* TO 'phpmyadmin'@'localhost';

********************************************Latest tutorial: DigitalOcean Debian 11 MariaDB Installation
apt install mariadb-server
mysql_secure_installation
Answer according to the tutorial on the questions that come.
When you are finished you can simply
root@localhost:~# mariadb
Welcome to the MariaDB monitor.  Commands end with ; or \g.
Your MariaDB connection id is 36
Server version: 10.5.15-MariaDB-0+deb11u1 Debian 11

Copyright (c) 2000, 2018, Oracle, MariaDB Corporation Ab and others.

Type 'help;' or '\h' for help. Type '\c' to clear the current input statement.

MariaDB [(none)]>
If the database I want to create is called games, a common way to go is to create a user with the same name that has full access to the database.
Remember that database users are always created by specifying the location/hostname/IP of the user (aka the application server).
However you can ignore this by specifying *
database: games username: games password:ChangeMyPassword123 hostname/IP if the application server: *
sudo apt install php7.4-mysqli
Following #https://phoenixnap.com/kb/how-to-install-phpmyadmin-on-debian-10 #sudo apt install php php-cgi php-mysqli php-pear php-mbstring php-gettext libapache2-mod-php php-common php-phpseclib php-mysql -y #do I need all these?
https://computingforgeeks.com/install-phpmyadmin-with-apache-on-debian-10-buster/
Do we reaaally need phpmyadmin?
sudo apt install gnupg2 gpa
gpg --full-generate-key #1 enter #4096 enter #0 enter #y #<name and email> #o enter
#enter passphrase

sudo gpa
hamvocke.com - quick and easy guide to tmux
Nice cheat-sheet MohamedAlaa@github
Tmux allows you to split your terminal in many ways
sudo apt install tmux
Commands:
tmux creates a new tmux-session with a nice all-green status bar at the bottom
tmux new -s monitoring creates a new session called "monitoring"
exit exits a tmux-session
tmux ls lists active tmux-sessions
tmux attach -t 0 attaches to session id 0
tmux attach -t monitoring attaches to session with name "monitoring"
If tmux is running but you get the following error:
no server running on /tmp/tmux-1000/default
pkill -USR1 tmux
it works sometimes :)
Keyboard shortcuts:
ctrl + b + d disconnects from the current session
ctrl + b + % splits screen vertically
ctrl + b + " splits screen horizontally
ctrl + b then release the b-key and use arrows to resize window
Keyboard shortcut-commands:
ctrl + b + : to open the command prompt
:set-option -g mouse on
:set -g default-terminal "screen-256color"
:set-option history-file ~/.bash_history
:resize-pane -D (Resizes the current pane down)
:resize-pane -U (Resizes the current pane upward)
:resize-pane -L (Resizes the current pane left)
:resize-pane -R (Resizes the current pane right)
:resize-pane -D 10 (Resizes the current pane down by 10 cells)
:resize-pane -U 10 (Resizes the current pane upward by 10 cells)
:resize-pane -L 10 (Resizes the current pane left by 10 cells)
:resize-pane -R 10 (Resizes the current pane right by 10 cells)
Shows network in/out traffic as a nice graph
sudo apt install nload to install
nloadto start the monitoring-application
Shows process information similar to task manager in windows
top to start
f to open filter-settings
shift + s write current settings to configuration file
Useful arguments:
| Parameter | Description |
|---|---|
| -i | Do not show idle processes |
shows a nice graph displaying cpu-load
sudo apt install s-tui to install
s-tui to start
disk activity monitoring, similar to "top" but for disk activity instead
sudo iotop to run
Useful arguments
| Parameter | Description |
|---|---|
| -o | Only show active processes (that actually does I/O) |
| -P | Show processes instead of threads |
like top but better
apt install htop
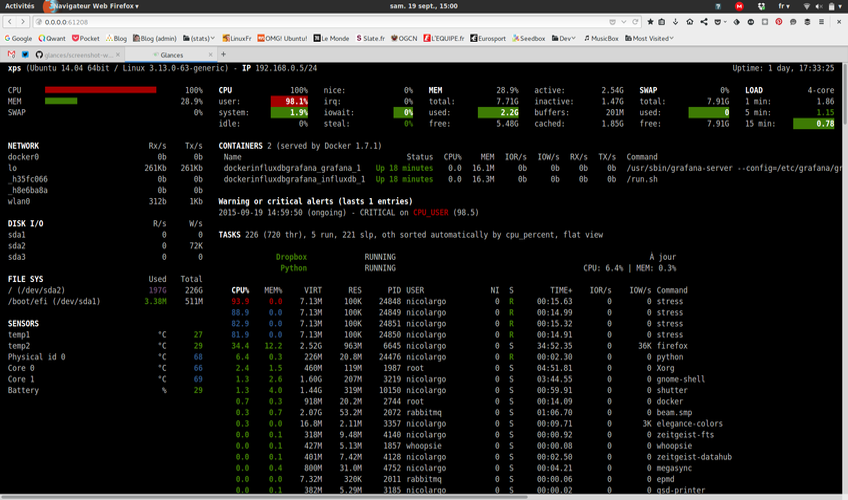
The best monitoring utility Behaves smart
apt install glances
find / -name tmux.conf
Will search the entire file system for tmux.conf, but will spam out a whole bunch of "permission denied"-messages.
To avoid that use this little trick:
find / -name tmux.conf 2>&1 | grep -v "Permission denied"
To find files CONTAINING a search string use *
find / -name *history*
To prevent users disconnecing from terminal, add the following lines
to your /etc/ssh/sshd_config
TCPKeepAlive yes
ClientAliveInterval 60
grep "authentication failure" /var/log/auth.log | awk '{ print $13 }' | cut -b7- | sort | uniq -c
| Name | Description |
|---|---|
| grep | Finds information in input |
| awk | Filters columns? |
| sed | |
| wc | Word count |
| sort | |
| cut | |
| uniq |
https://www.geeksforgeeks.org/awk-command-unixlinux-examples/
pstree -p
shows a tree structure of which processes spawned from where
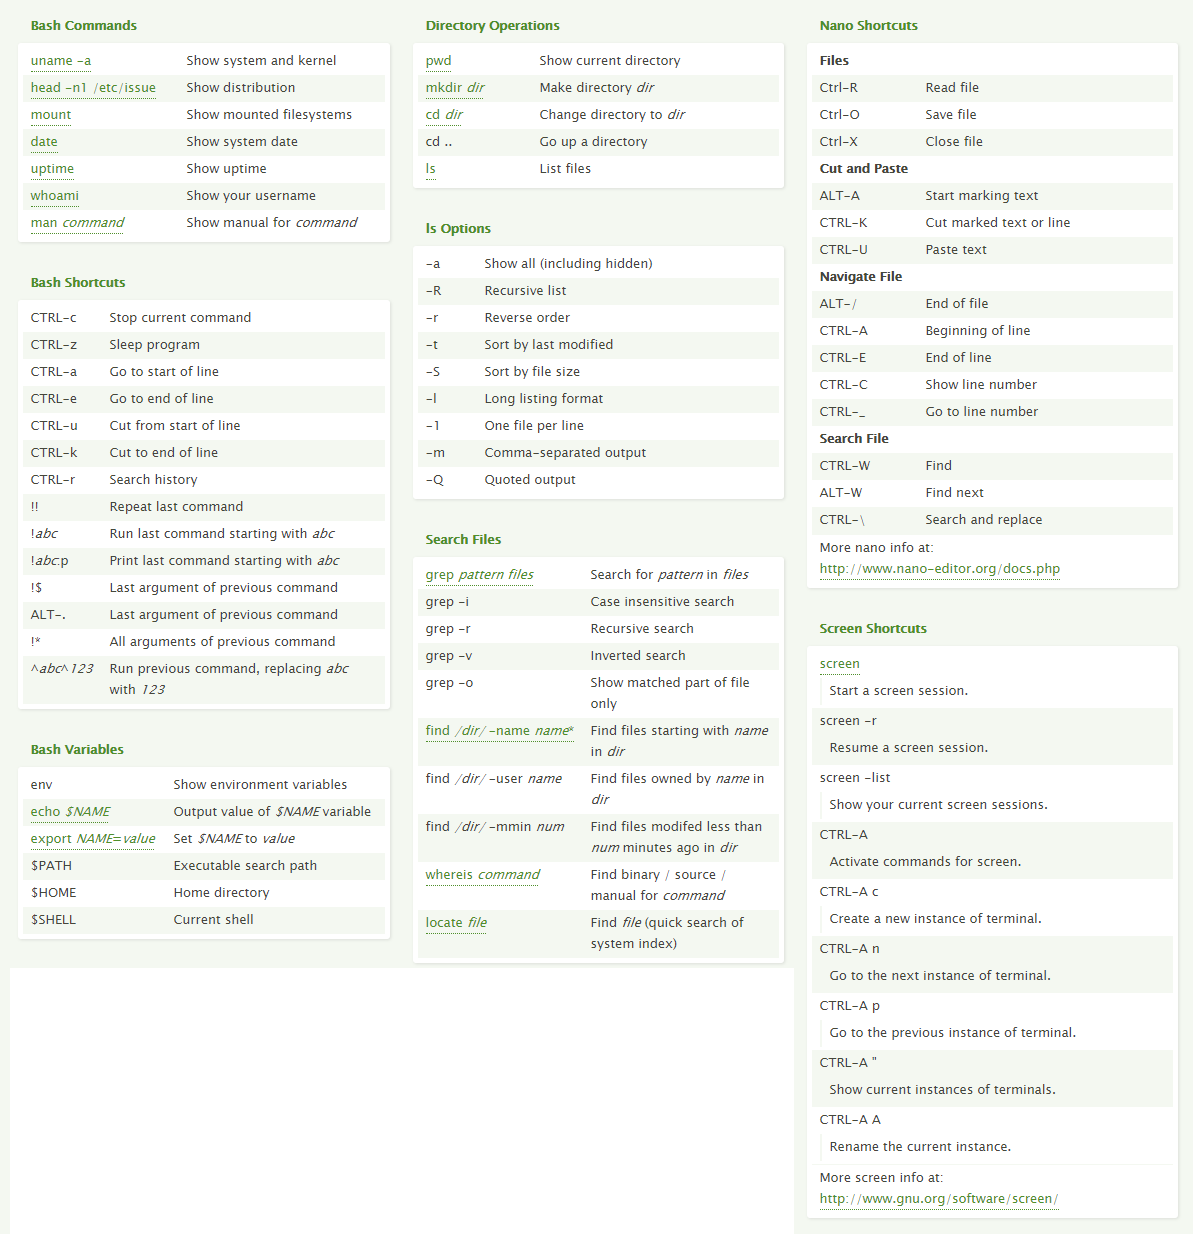

If you use VSCode with the remote SSH plugin, you will sometimes see hanging processes even after you exit. These can take up a lot of memory when they pile up. The processes are spawned because VSCode tries to do some autocorrect stuff described here
- Hit the extensions button in VS Code (which looks like building blocks on the left toolbar)
- Search for ‘@builtin TypeScript’
- Disable the TypeScript and Javascript Language Features extension
- Reload
apt install bluez
systemctl start bluetooth
All commands prepended by bluetoothctl <command> when done outside the interactive shell, otherwise you can do all the commands directly into the shell spawned by bluetothctl
discoverable on
scan on
pair 78:2B:64:A2:F8:F1
trust 78:2B:64:A2:F8:F1
If names do not show, try this:
bluetoothctl devices | cut -f2 -d' ' | while read uuid; do bluetoothctl info $uuid; done|grep -e "Device\|Connected\|Name"
connect 78:2B:64:A2:F8:F1
and when done:
disconnect
power on
This video is nice:
Youtube - BugsRider Bluetoth Guide

https://www.linuxcommands.site/linux-file-and-directory-commands/linux-ls-sort/
Identify USB-device lspci lsusb dmesg | less
sudo pmount /dev/sda1 /media/a
partition now mounted
sudo apt-get install sshuttle
sudo yum install git
git clone git://github.com/apenwarr/sshuttle
sudo sshuttle -r user@remote_host 0.0.0.0/0 --dns
sudo sshuttle -r user@remote_host 172.194.0.0/16 172.195.0.0/16apt install neofetch
echo neofetch >> ~/.bash_profile # run automatically on loginapt install redshift
mkdir ~/.config/redshift
wget https://raw.githubusercontent.com/jonls/redshift/master/redshift.conf.sample
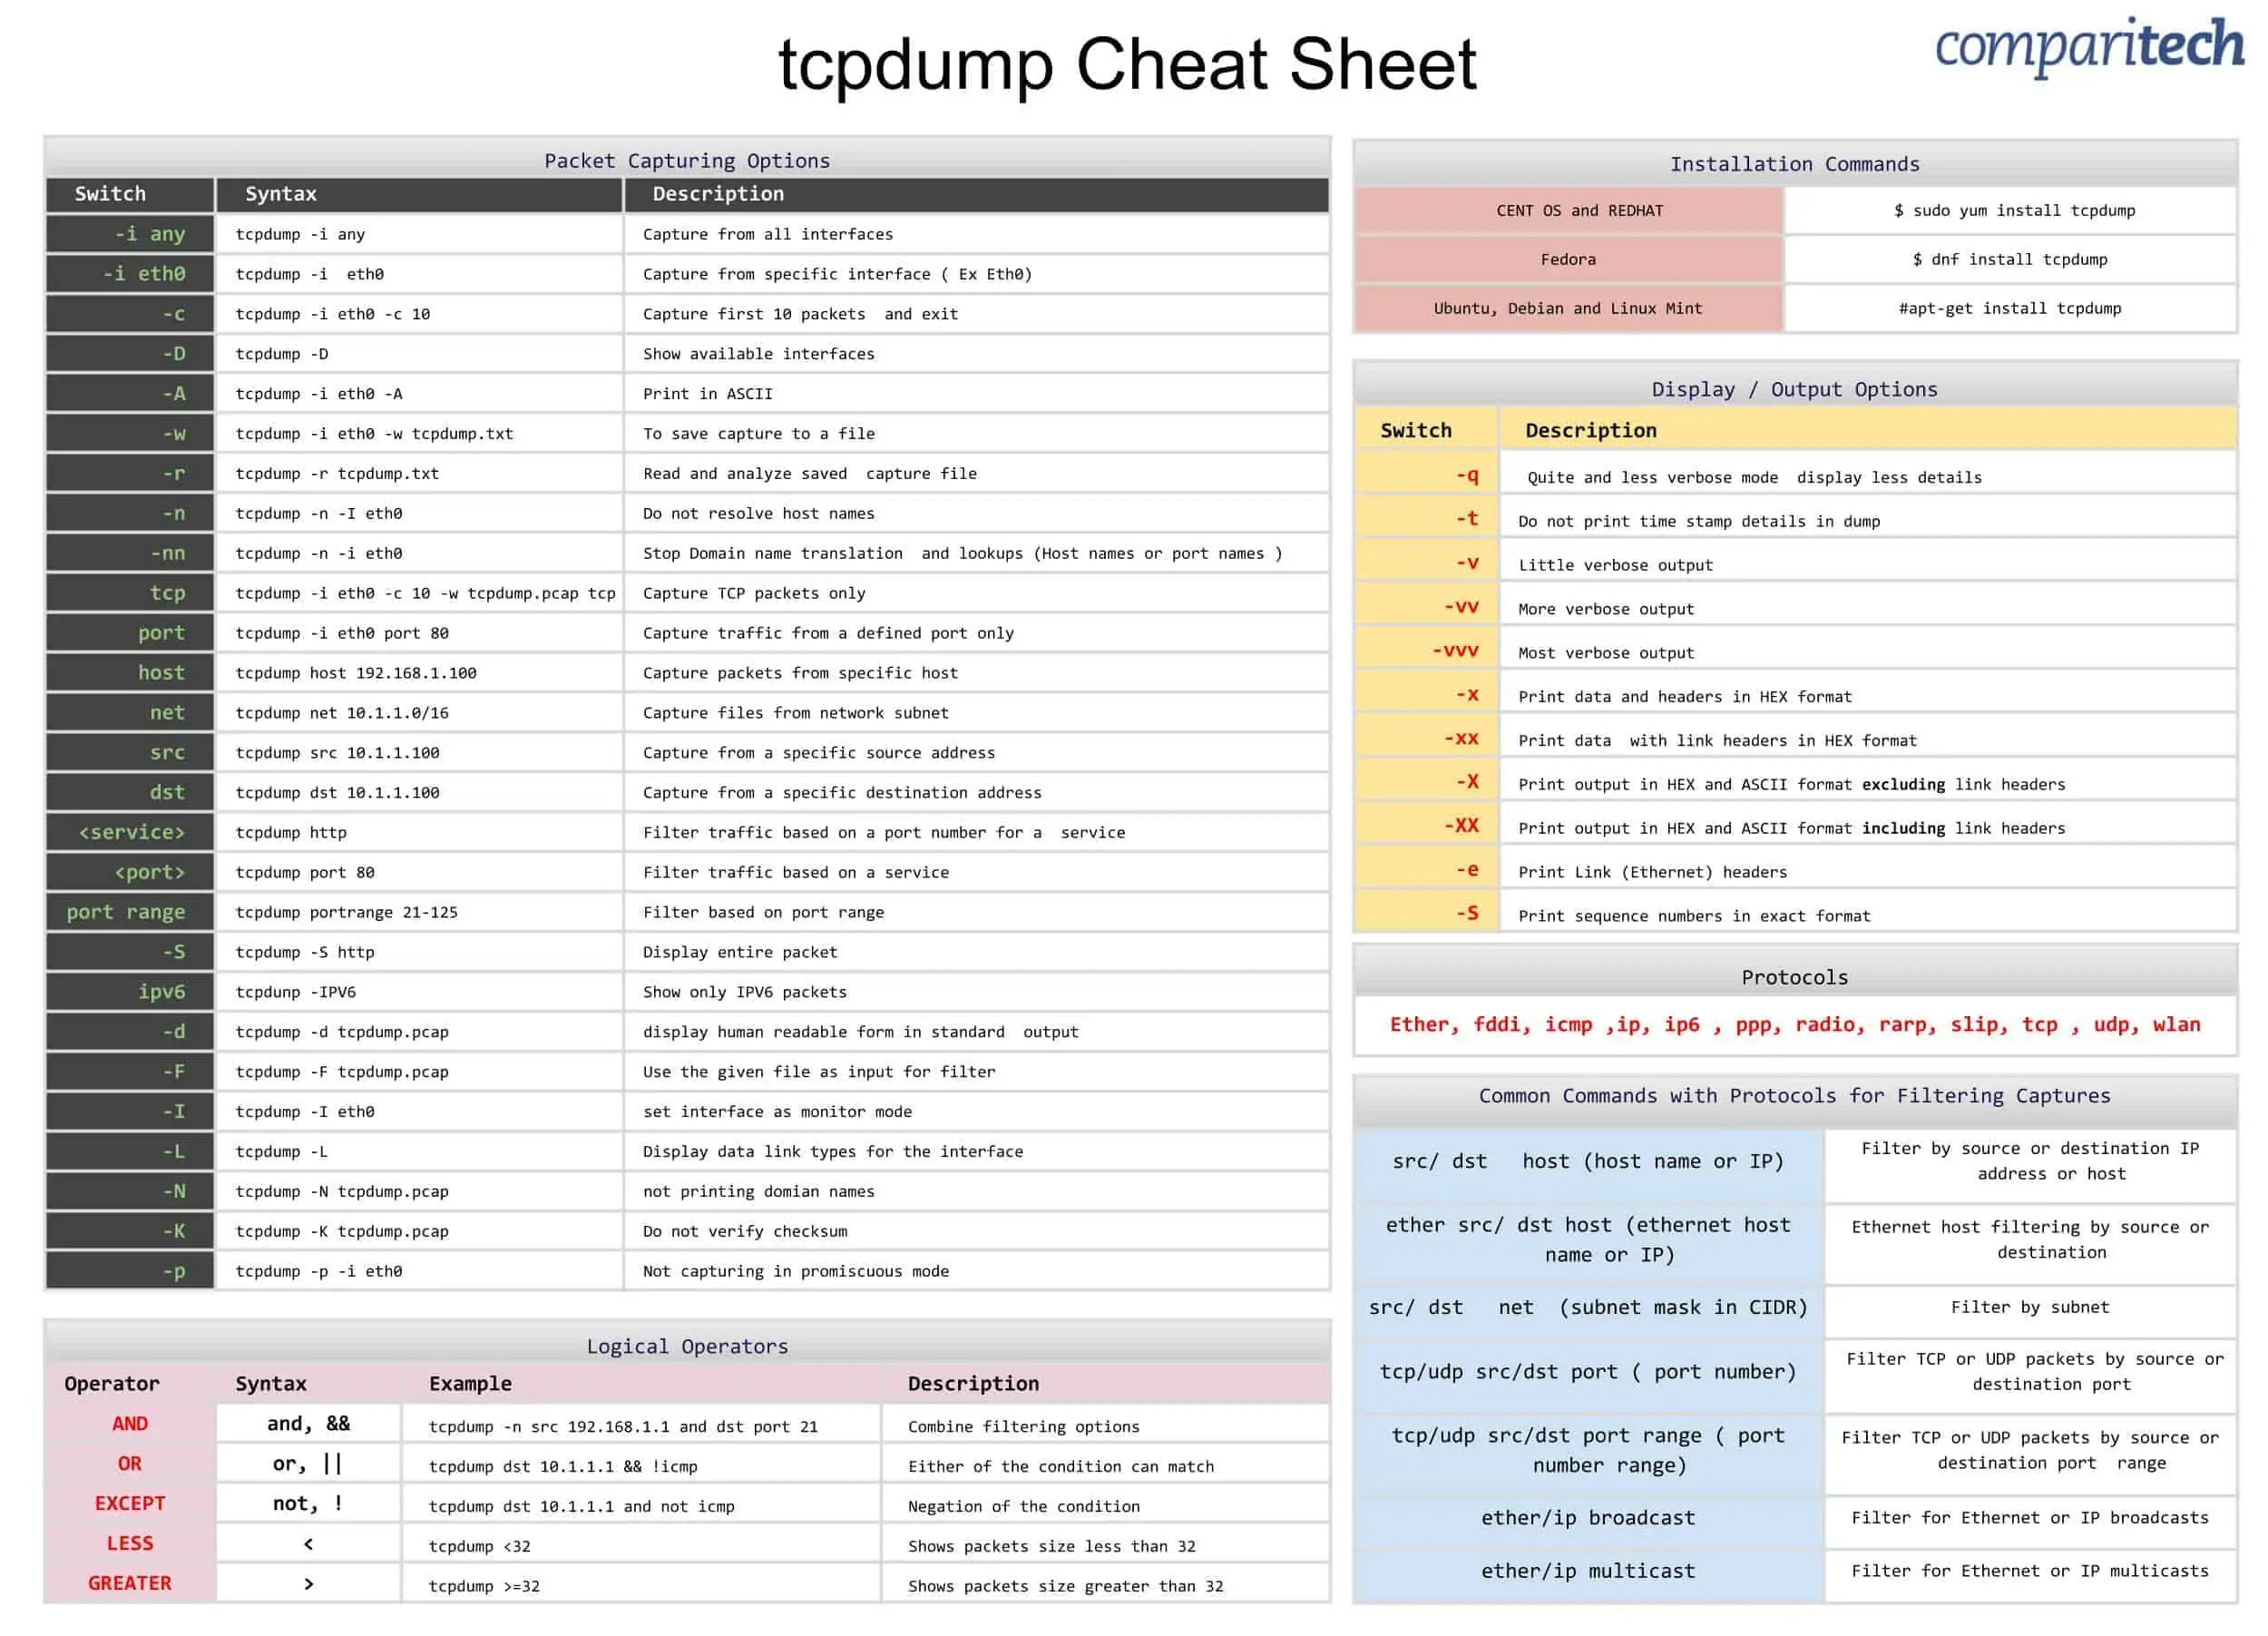
mv redshift.conf.sample ~/.config/redshift/redshift.conftcpdump tutorial daniel miessler
tcpdump cheat sheet by packetlife
tcpdump cheat sheet comapitech
redirect the output (AKA stdout) to a file:
SomeCommand > SomeFile.txt Or if you want to append data:
SomeCommand >> SomeFile.txtIf you want stderr as well use this:
SomeCommand &> SomeFile.txt or this to append:
SomeCommand &>> SomeFile.txt if you want to have both stderr and output displayed on the console and in a file use this:
SomeCommand 2>&1 | tee SomeFile.txt(If you want the output only, drop the 2 above)
First install
sudo apt-get -y install postgresqlDisplay hostname:
hostnamectlChange hostname:
hostnamectl set-hostname <hostname> --static Update $PS1 variable in ~/.bashrc if you want full hostname displayed in prompt
| Variable | Value |
|---|---|
| \h | hostname (short) |
| \H | hostname (full) |
Update from \h to \H:
if [ "$color_prompt" = yes ]; then
    PS1='${debian_chroot:+($debian_chroot)}\[\033[01;32m\]\u@\H\[\033[00m\]:\[\033[01;34m\]\w\[\033[00m\]\$ '
else
    PS1='${debian_chroot:+($debian_chroot)}\u@\H:\w\$ '
fi
More commands: https://linuxhint.com/bash-ps1-customization/
xfreerdp <ip>Very nice guide from https://linuxhint.com/change-debian-desktop-environment/
Command on Windows to forward port
netsh interface portproxy add v4tov4 listenport=4000 listenaddress=0.0.0.0 connectport=4000 connectaddress=192.168.101.100
tar czf - <filename> | ssh <hostname> "cd <target-directory> && tar zxvf -"Starting Cinnamon manually
If you prefer to start Cinnamon manually from the console, add the following line to Xinitrc:
~/.xinitrc
exec cinnamon-session
Choosing which desktop-environment to install can be done during the installation or by running the following command:
tasksel
| Library | Description | How to Use (compile/link) |
|---|---|---|
| glibc | Core C library (syscalls, I/O, memory, sockets) | Included by default, headers <stdio.h>, <stdlib.h>. |
| libm | Math functions (sin, cos, sqrt) |
#include <math.h> → gcc prog.c -lm |
| libpthread | POSIX threads | #include <pthread.h> → gcc prog.c -lpthread |
| libdl | Dynamic linking/loading of shared libs (dlopen, dlsym) |
#include <dlfcn.h> → gcc prog.c -ldl |
| librt | Real-time (timers, POSIX semaphores, message queues) | #include <time.h>, <mqueue.h> → gcc prog.c -lrt |
| libstdc++ | Standard C++ library (STL, streams) | Auto-linked by g++, can explicitly add -lstdc++ |
| libgcc | Low-level compiler support (exceptions, div ops) | Auto-linked by GCC, no manual step |
| libcrypt | Password hashing, crypt functions | #include <crypt.h> → gcc prog.c -lcrypt |
| libnsl | Network services (RPC, NIS, legacy) | #include <rpc/rpc.h> → gcc prog.c -lnsl |
| libresolv | DNS resolver functions (res_query, res_init) |
#include <resolv.h> → gcc prog.c -lresolv |
| libutil | Misc. system utils (pty, login) | #include <pty.h> → gcc prog.c -lutil |
| libsystemd | Interfaces with systemd (logging, services) |
#include <systemd/sd-daemon.h> → gcc prog.c -lsystemd |
| libpam | Authentication via PAM modules | #include <security/pam_appl.h> → gcc prog.c -lpam |
| libX11 | X11 graphics client lib | #include <X11/Xlib.h> → gcc prog.c -lX11 |
| libwayland | Wayland graphics protocol client lib | #include <wayland-client.h> → gcc prog.c -lwayland-client |
| libdrm | Direct Rendering Manager (GPU) | #include <xf86drm.h> → gcc prog.c -ldrm |
| libudev | Device enumeration & monitoring | #include <libudev.h> → gcc prog.c -ludev |
| libselinux | SELinux security policies | #include <selinux/selinux.h> → gcc prog.c -lselinux |