


A powerful and user-friendly tool for annotating images with polygons and rectangles, built with PyQt6. Now with additional supporting tools for comprehensive image processing and dataset management.
If you find this project helpful, consider supporting it:


@DigitalSreeni Dr. Sreenivas Bhattiprolu
- Semi-automated annotations with SAM-2 assistance (Segment Anything Model) — Because who doesn't love a helpful AI sidekick?
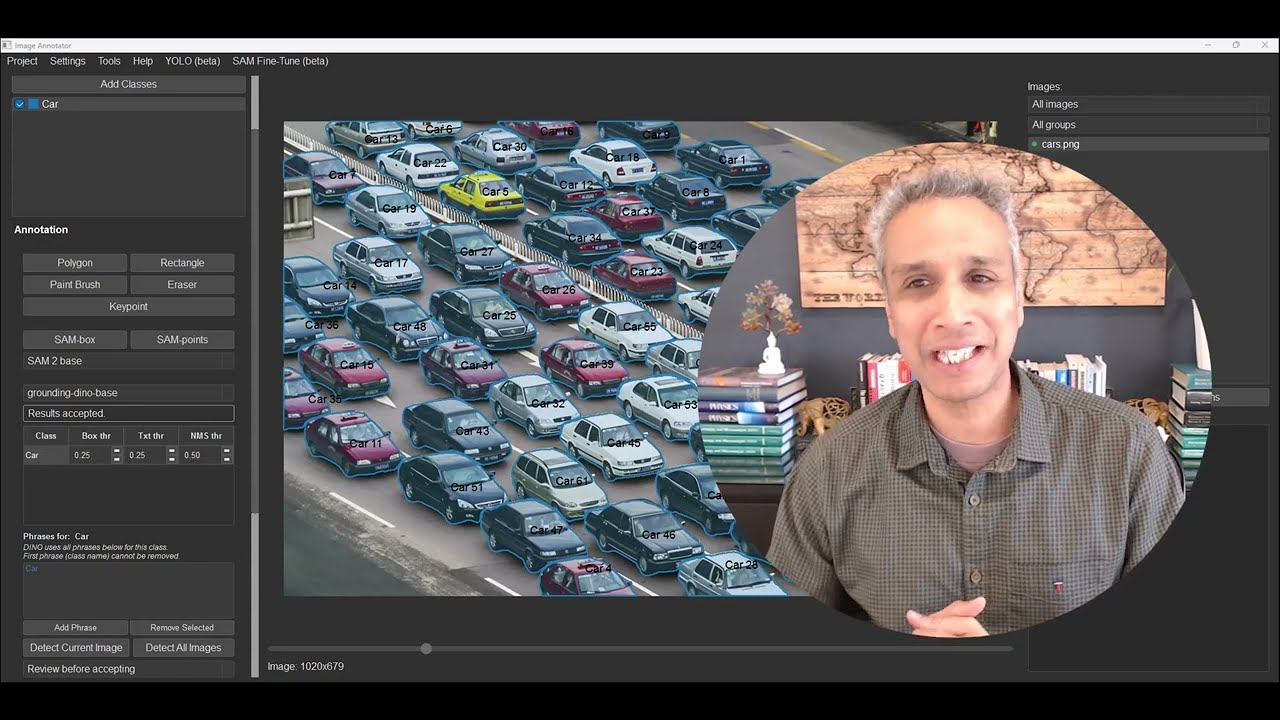
- Grounding-DINO and SAM 3 text-prompted object detection — describe what you want in plain English and review/accept detections one image or a whole batch at a time.
- Video annotation (MP4/AVI/MOV) — frame-by-frame annotation with a scrub timeline, plus SAM 3 object tracking to propagate a selected mask forward and backward across a video's frames, with per-frame or whole-run undo and one-click export of annotated frames.
- SAM 2 fine-tuning on your own annotations, with always-on MLflow experiment tracking, so you can adapt SAM to your specific dataset instead of relying on the generic pre-trained weights.
- One Train Model dialog for both YOLO and SAM 2 — it works out the task from your annotations and handles dataset preparation, YAML wrangling, loading and saving for you, so training is one dialog instead of a menu safari.
- Trained models register themselves: weights are copied into the project with a sidecar describing what they were trained on, the run is reported, and the model is offered for an immediate trial on the current image.
- Group-aware train/val split — a stack's slices and a video's frames are held out together instead of being scattered across both sides, so your validation numbers measure generalisation rather than memorisation. Where no leak-free split exists, the app says so instead of quietly reporting flattering numbers. Run the curation pass first and its near-duplicate clusters seed the grouping too, catching frames that were extracted as ordinary files and whose names give nothing away.
- Model-vs-ground-truth review: score every image by how much a trained model disagrees with its labels (or how unsure it is where there are none) and sort the image list by it — annotate what the model actually finds hard.
- Dataset curation with image embeddings (CLIP or DINOv2): find near-duplicates and coverage gaps, so you stop annotating the fortieth near-identical frame. Recommends only — it has no delete button, by design.
- Annotation QC audit — rule-based geometry, redundancy, statistics and hygiene checks, with one-click repairs applied as a single undo step.
- Keypoint / pose annotation with per-class named skeletons (COCO instance model, 3-state point visibility), including COCO-keypoints and YOLO-pose export/import.
- Manual annotations with polygons and rectangles — For when you want to show SAM-2 who's really in charge.
- Paint brush and Eraser tools with adjustable pen sizes (use - and = on your keyboard)
- Merge annotations - For when SAM-2's guesswork needs a little human touch.
- Undo / redo for annotation edits (Ctrl+Z / Ctrl+Y).
- Handle-based resize/move and vertex editing for any selected shape, with canvas selection unified with the annotations table.
- Insert and delete polygon vertices: double-click an edge to add one, Alt+click a vertex to remove it.
- Segment Everything — let SAM propose every mask it can find and review them with the same accept/reject overlay as the text-prompted detections.
- Copy and paste annotations (Ctrl+C / Ctrl+V) across images, slices and video frames.
- Onion-skinning for stacks and videos — see the neighbouring slices' annotations, image, or both, while you work.
- Keyboard-driven annotation: 1…9 pick a class, P/R/B/E/K pick a tool, V returns to selection — and they stay out of the way while you are typing in a text field.
- Save and load projects for continued work.
- Save As... and Autosave functionality.
- A secret game, for when you are bored.
- Import existing COCO JSON and Pascal VOC annotations with images.
- Export annotations to various formats (COCO JSON, YOLO v8/v11, YOLO-pose, Labeled images, Semantic labels, Pascal VOC).
- Handle multi-dimensional images (TIFF stacks and CZI files).
- Zoom and pan for detailed annotations.
- Support for multiple classes with customizable colors.
- User-friendly interface with intuitive controls, built on PyQt6.
- A headless command line (
sreeni-cli) for export, format conversion, annotation validation and batch prediction — for the parts of the work that belong in a script rather than in a GUI. - Change the application font size on the fly — Make your annotations as big or small as your caffeine level requires.
- Dark mode for those late-night annotation marathons — Who needs sleep when you have dark mode?
- Pick appropriate pre-trained SAM2 model for flexible and improved semi-automated annotations.
- Change the class of an annotation to a different class.
- Turn visibility of a class ON and OFF.
- YOLO training (detection, segmentation, and pose) using current annotations and loading trained models to predict on images.
- Area measurements for annotations displayed next to the Annotation name, with per-mask detail/simplification control.
- Sort and filter annotations and images by name/number or area.
- Additional supporting tools:
- Annotation statistics for current annotations
- COCO JSON combiner
- Dataset splitter
- Stack to slices converter
- Image patcher
- Image augmenter
- Merge COCO for Training (combine accumulated DINO/SAM annotations into one training-ready COCO JSON)
- Project Details: View and edit project metadata, including creation date, last modified date, image information, and custom notes.
- Advanced Project Search: Search through multiple projects using complex queries with logical operators (AND, OR) and parentheses.
- Slice Registration
- Align image slices in a stack with multiple registration methods
- Support for various reference frames and transformation types
- Stack Interpolation
- Adjust Z-spacing in image stacks
- Multiple interpolation methods with memory-efficient processing
- DICOM Converter
- Convert DICOM files to TIFF format (single stack or individual slices)
- Preserve metadata and physical dimensions
- Export metadata to JSON for reference
This application is built using PyQt6 and runs on macOS, Windows and Linux. On Linux you'll need the standard Qt 6 runtime libraries (notably libxcb-cursor0, libegl1, libgl1, and the XCB plugin set) — sudo apt install libxcb-cursor0 libegl1 libgl1 libxcb-xinerama0 libxkbcommon-x11-0 covers the common ones on Debian/Ubuntu.
You can install the DigitalSreeni Image Annotator directly from PyPI:
pip install digitalsreeni-image-annotatorThe application uses the Ultralytics library, so there's no need to separately install SAM2 or PyTorch, or download SAM2 models manually.
Prefer a clean virtual environment. Installing into an existing Conda environment that already carries its own Qt is the one setup known to break — see Troubleshooting below.
The PyTorch wheel installed by default from PyPI is CPU-only on Windows. If you have an NVIDIA GPU, SAM and Grounding DINO will run dramatically faster on CUDA — reinstall PyTorch from the CUDA index:
pip uninstall -y torch torchvision
pip install torch torchvision --index-url https://download.pytorch.org/whl/cu128
If cu128 errors as "no matching distribution", try cu124 instead. Verify the install picked up your GPU:
python -c "import torch; print(torch.cuda.is_available(), torch.cuda.get_device_name(0))"You should see True and your GPU name. For other platforms or driver combinations, use the official selector at https://pytorch.org/get-started/locally/.
PyTorch ≥ 2.8 wheels no longer include kernels for GPUs older than Volta (compute capability < 7.0), e.g. the GTX 10xx series (sm_61). On such cards the app detects the mismatch, warns once, and automatically runs inference on the CPU instead of crashing with CUDA error: no kernel image is available. To keep using the GPU, install an older PyTorch that still supports it:
pip install torch==2.4.1 torchvision==0.19.1 --index-url https://download.pytorch.org/whl/cu121If starting the app fails with
ImportError: DLL load failed while importing QtCore: The specified procedure could not be found.
(Windows exception 0xc0000139, STATUS_ENTRYPOINT_NOT_FOUND), run:
sreeni-cli doctorIt never imports Qt, so it still works when the application itself cannot start.
It prints the installed PyQt6 / Qt / sip versions and every Qt6Core.dll in the
order PyQt6's own find_qt() consults them, with each one's version.
What causes it. Almost always a second Qt in the environment, not a bad PyQt6
release. In a Conda environment qt6-main (pulled in by pyqt, qtpy, spyder,
napari, matplotlib's Qt backend, …) installs its own Qt6Core.dll, and PyQt6
finds it before the copy its own wheel ships — the interpreter's directory is
checked first, and for a Conda environment that is the environment root.
conda-forge's Qt lags PyPI's, so a newer PyQt6 ends up calling into an older Qt
that lacks the symbols it needs. An outdated msvcp140.dll from Conda's
vc14_runtime does the same thing.
This is why downgrading PyQt6 appears to fix it: the binding stops being newer than the Qt it collided with.
Fixes, best first:
# 1. Install into a clean virtual environment with no Qt of its own
python -m venv .venv
.venv\Scripts\activate          # Linux/macOS: source .venv/bin/activate
pip install -e .

# 2. Or remove the conflicting Qt, if nothing in the environment needs it
conda remove qt6-main

# 3. Or match the binding to the Qt already present
#    (doctor prints the version to use here — 6.8.* is only an example)
pip install "PyQt6==<major>.<minor>.*"-
Run the DigitalSreeni Image Annotator application:
digitalsreeni-image-annotator
or
sreeni
or
python -m digitalsreeni_image_annotator.main
-
Using the application:
- Click "New Project" or use Ctrl+N to start a new project.
- Use "Add New Images" to import images, including TIFF stacks and CZI files.
- Add classes using the "Add Classes" button.
- Select a class and use the Polygon or Rectangle or Paint Brush tool to create manual annotations.
- To use SAM2-assisted annotation:
- Select a model from the "Pick a SAM Model" dropdown. It's recommended to use smaller models like SAM2 tiny or SAM2 small. SAM2 large is not recommended as it may crash the application on systems with limited resources.
- Note: When you select a model for the first time, the application needs to download it. This process may take a few seconds to a minute, depending on your internet connection speed. Subsequent uses of the same model will be faster as it will already be cached locally, in your working directory.
- Click the "SAM-box" button and draw a rectangle around an object of interest, or click the "SAM-points" button and left-click points inside the object (right-click adds negative points to exclude regions).
- SAM2 displays the top-scoring mask as a temporary prediction — press Enter to accept it or Esc to discard it. If the desired result isn't achieved on the first try, draw the box again or adjust the points.
- For low-quality images where SAM2 may not auto-detect objects, manual tools may be necessary.
- When SAM2 auto-detect partial objects, use polygon or paint brush tools to manually define the remaining region and use the Merge tool to combine both annotations into one.
- When SAM2 over-annotates objects, extending the annotation beyond object's boundaries, use the Eraser tool to clean up the edges.
- Both paint brush and eraser tools can be adjusted for pen size by using - or = keys on your keyboard.
- Edit existing annotations by double-clicking on them.
- Edit existing annotations using the Eraser tool. Adjust the eraser size by using - or = keys on your keyboard.
- Merge connected annotations by selecting them from the Annotations list and clicking the Merge button.
- Change the class of an annotation to a different class.
- Turn visibility of a class ON and OFF.
- Use YOLO (beta) training with current annotations and load the trained model to segment images and convert segmentations to annotations. (Currently not implemented for slices or stacks, just single images.)
- Accept/reject one or select class predictions at a time to add them as annotations.
- View area measurements for annotations displayed next to the Annotation name.
- Sort annotations by name/number or area.
- Save your project using "Save Project" or Ctrl+S. Alternatively, you can use Save As... to save the project with a different name.
- Use "Open Project" or Ctrl+O to load a previously saved project.
- Click "Import Annotations with Images" to load existing COCO JSON annotations along with their images.
- Use "Export Annotations" to save annotations in various formats (COCO JSON, YOLO v8/v11, Labeled images, Semantic labels, Pascal VOC).
- Note: YOLO export (and import) is now compatible with YOLOv11 structure. (Project directory includes data.yaml, train, and valid directories, with train and valid both having images and labels subdirectories.)
- Project Details:
- Access project details by selecting "Project Details" from the Project menu.
- View project metadata such as creation date, last modified date, and image information.
- Add or edit custom project notes.
- Project details are automatically saved when you make changes to the notes.
- Advanced Project Search:
- Access the search functionality by selecting "Search Projects" from the Project menu.
- Search through multiple projects using complex queries.
- Use logical operators (AND, OR) and parentheses for advanced search criteria.
- Search covers project name, class names, image names, and project notes.
- Example queries:
- "cells AND dog": Find projects containing both "cells" and "dog"
- "cells OR bacteria": Find projects containing either "cells" or "bacteria"
- "cells AND (dog OR monkey)": Find projects containing "cells" and either "dog" or "monkey"
- "(project1 OR project2) AND (cells OR bacteria)": More complex nested queries
- Double-click on search results to open the corresponding project.
- Access additional tools under the Tools menu bar:
- Annotation Statistics
- COCO JSON Combiner
- Dataset Splitter
- Stack to Slices Converter
- Image Patcher
- Image Augmenter
- Each tool opens a separate UI to guide you through the respective task.
- Access the in-app help documentation via the Help menu or by pressing F1. For a more comprehensive reference covering every feature in depth, see USER_MANUAL.md.
- Explore the interface – you might stumble upon some hidden gems and secret features!
-
Keyboard shortcuts:
- Ctrl + N: Create a new project
- Ctrl + O: Open an existing project
- Ctrl + S: Save the current project
- Ctrl + W: Close the current project
- Ctrl + Shift + S: Open Annotation Statistics
- F1: Open the help window
- Ctrl + Wheel: Zoom in/out
- Hold Ctrl and drag: Pan the image
- Esc: Cancel current annotation, exit edit mode, or exit SAM-assisted annotation
- Enter: Finish current annotation, exit edit mode, or accept SAM-generated mask
- Up/Down Arrow Keys: Navigate through slices in multi-dimensional images
-
- and =: Adjust pen size for paint brush and eraser tools
- YOLO training now works with multi-dimensional images (TIFF stacks / CZI slices) and video frames. One caveat: a stack's slices must have been loaded in the current session — opening the image once is enough.
- SAM 2 large may crash the application on systems with limited RAM; smaller SAM2 models are recommended.
- When loading a YOLO model trained on different classes compared to the loaded YAML file, the application now gives a message to the user about the mismatch instead of crashing.
- Various other bugs have been addressed to improve overall stability and performance.
For development purposes, you can clone the repository and install it in editable mode:
-
Clone the repository:
git clone https://github.com/bnsreenu/digitalsreeni-image-annotator.git cd digitalsreeni-image-annotator -
Create a virtual environment (optional but recommended):
python -m venv venv
source venv/bin/activate  # On Windows, use `venv\Scripts\activate`
-
Install the package and its dependencies in editable mode:
pip install -e . -
Start the application:
python -m src.digitalsreeni_image_annotator.main
Contributions are welcome! Please feel free to submit a Pull Request.
- Fork the repository
- Create your feature branch (
git checkout -b feature/AmazingFeature) - Commit your changes (
git commit -m 'Add some AmazingFeature') - Push to the branch (
git push origin feature/AmazingFeature) - Open a Pull Request
This project is licensed under the MIT License - see the LICENSE file for details.
- Thanks to all my YouTube subscribers who inspired me to work on this project
- Inspired by the need for efficient image annotation in computer vision tasks
Dr. Sreenivas Bhattiprolu - @DigitalSreeni
Project Link: https://github.com/bnsreenu/digitalsreeni-image-annotator
If you use this software in your research, please cite it as follows:
Bhattiprolu, S. (2024). DigitalSreeni Image Annotator [Computer software]. https://github.com/bnsreenu/digitalsreeni-image-annotator
@software{digitalsreeni_image_annotator,
  author = {Bhattiprolu, Sreenivas},
  title = {DigitalSreeni Image Annotator},
  year = {2024},
  url = {https://github.com/bnsreenu/digitalsreeni-image-annotator}
}