Welcome to TLC303 !
Before we get started , make sure your wifi is working properly.
You would need to work in teams of 3 , find yourself two people who are sitting next to you , those will be your partners for this session. In order to build the data mesh architecture which we will then use as a foundation for telcolake use cases , you need to have 3 AWS accounts , which we will provide. Based on your seating order , the leftmost person will own the Producer account , the one sitting in the middle will own the Central data mesh account , and the person on the right will own the consumer account.
Producer → Data Mesh(Central) → Consumer
After we finish the part of building a data mesh architecture , most of the focus will be on building 3 different telco use cases , leveraging the different datasets. hence, when you get to the use cases part, you can work together on the consumer account as a team.
The AWS Data Mesh Helper library provides automation around the most common tasks that customers need to perform to implement a data mesh architecture on AWS. A data mesh on AWS uses a central AWS Account (the mesh account) to store the metadata associated with Data Products created by data Producers. This allows other AWS Accounts to act as Consumers , and to request Subscriptions , which must be approved by Producers. Upon approval, the approved grants are provided to the Consumer and can be used within their AWS Account.
- Data Mesh - An architectural pattern which provides a centralized environment in which the data sharing contract is managed. Data stays within Producer AWS Accounts, and they own the lifecycle of granting Subscriptions.
- Producer - Any entity which offers a Data Product through the Data Mesh
- Consumer - Any entity who subscribes to a Data Product in the Data Mesh
- Subscription - The central record and associated AWS Lake Formation permissions linking a Data Product to a Consumer
- Data Product - Today, a Data Product is scoped to be only an AWS Lake Formation Table or Database. In future this definition may expand.
To get started, you must first enable an AWS Account as the Data Mesh Account. This is where you will store all Lake Formation metadata about the Data Products which are offered to Consumers. Within this Account, there exist IAM Roles for Producer and Consumer which allow any AWS Identity who has access to perform tasks within the Data Mesh.
Once you have setup an Account as the Data Mesh , you can then activate another AWS Account as a Producer , Consumer , or both. All of these tasks are performed by the Data Mesh Admin , which is accessible through an additional IAM Role or as any Administrator Identity within the mesh Account. Once completed, end users can perform the following Data Mesh tasks:

In this architecture, we can see that the data mesh is configured in AWS Account 555555555555, and contains a set of IAM Roles which allow identities within producer and consumer accounts to access the mesh. This includes:
- DataMeshManager: IAM Role allowing administration of the Data Mesh itself
- DataMeshAdminProducer: IAM Role enabling the assuming Identity to act as a Producer
- DataMeshAdminConsumer: IAM Role enabling the assuming Identity to act as a Consumer
- DataMeshAdminReadOnly: IAM Role that can be used for reading Metadata from the Data Mesh Account (only)
- Open your web browser and enter the following URL : https://dashboard.eventengine.run/login
.png)
-
Please enter the Event Hash that will be provided .
-
Choose "Email One-Time Password (OTP")"
-
Enter your email address
-
You should receive an email with your one time password , copy the password and paste it in the right location .
Once done you should see the following page :
.png)
-
Click on "AWS Console" and then on "Open AWS console". that should open up the AWS console , and you should be good to start the workshop !
-
First we will need to start by setting up an IDE which will be used for us to run the datamesh scripts. For that we will use AWS cloud9.
From the search bar, search for cloud9 and click on it .
.png)
-
Click on Create Environment
-
Choose a name for the environment and click Next Step
-
Change the instance type to t3.small
Click on Next Step
Verify the details are correct and click on Create Environment
The cloud9 will take a couple of minutes to load , once done you should see the following screen :
.png)
You can close the 2 tabs on the top of the page and you can grab the terminal tab on the bottom and extend it :
.png)
- Now , we would like to clone the source code from the git repository.
In the terminal window:
Make sure you are on the following path : /home/ec2-user/environment
write :git clone https://github.com/gubaruch/Data-mesh-util.git
This command will donwload the source code to your cloud9 environment.
- Select the location for the repo, and now you should see the source code in your local cloud9 environment.

- Go to the terminal , make sure you are in the data-mesh util directory . run the following command :
pip3 install -r requirements.txt
-
That will install the relevant packages required to run the data mesh util.
-
Each step requires the configuration of a CredentialsFile environment variable, which is a JSON document on your filesystem that provides access to the Accounts to be used. This file is located in the following path :/Data-mesh-util/test/sample-test-creds.json
This file allows for the configuration of multiple accounts for the Data Mesh. Please note that the keys of this document are reserved and cannot be changed or extended (Mesh, Producer, ProducerAdmin, Consumer, and ConsumerAdmin are all reserved words).
- Create administrative users Mesh, ProducerAdmin, and ConsumerAdmin in the Mesh, Producer and Consumer accounts respectively. The access key and secret access keys of these users must be updated in the sample-test-creds.json file against their respective sections (Mesh, ProducerAdmin, and ConsumerAdmin).
Please note that Mesh, ProducerAdmin, and ConsumerAdmin must all be assigned Data Lake Admin permissions in Lake Formation. This permissions Grant falls out of the scope of this utility as it requires root or Data Lake Admin to assign. You can assign these permissions using the AWS Console in the Account you wish to configure.
The below steps show the creation of the user and assignment as data lake admin for one account. This must be repeated for all three accounts.
a. Please make sure the region is updated to us-east-1 on the sample_test_creds.json.
Create an IAM user:
b. Log in to your AWS console
c. Search for IAM , in the search bar and select IAM.
d. Select Users and then **add users **
e. Enter a user name, and try to make it identifiable - Mesh for central account, ProducerAdmin for the producer account , ConsumerAdmin for the consumer account
h. Under select AWS access type , select Access key - Programmatic access and click next:permissions
.png)
i. Under Set permissions , click on Attach existing policies directly and checkbox AdministratorAccess
j. Click on Next:Tags
.png)
k. Click Next and in the last step Create User
l. Once the user has been created, you will see a page showing the Access key ID and the secret access key .
m. Please save those in a notepad , and share those with the mesh account owner so he can then populate the credentials file
.png)
Make the user created a data lake admin
n. Now go to the search bar and search for Lakeformation. Choose add me first .
o. Click on the left side under Premissions on Administrative roles and tasks then click on Choose administrators.
p. Select the relevant user which you have created and click Save
.png)
Once done you should see that the IAM user now is a Data lake administrator:
.png)
- On the mesh account , in cloud9 , open the /Data-mesh-util/test/sample-test-creds.json file
The Mesh, ProducerAdmin and ConsumerAdmin sections are the ones which should be populated.
Once those are populated, We can start running the steps.
The first step is to run 0_setup_central_account.py.
Go to your termnial window.
Make sure you are in the right path : ~/environment/Data-mesh-util/test/reinvent
Once ready, enter the following :
python 0_setup_central_account.py and run it .
.png)
Once the first step was completed , you should see in the output ,the last line as :
Enabled Account xxxxxxxxxxxxx assume DataMeshAdminReadOnly
xxxxxxxxxxx should be your AWS consumer account ID.
- Go to your AWS producer/consumer accounts.
Go to IAM, you should see a DataMeshProducer user on the producer account and a DataMeshConsumer user in the consumer account.
Click on the on the **user name **
Select the security credentials tab
Click on the create access keys button
Make sure you copy the Access key ID and the **Secret access key **
The mesh account owner can now populate the producer and consumer account and credentials details.
Once done you should now have the credentials file fully populated .
- Next step is to download the 3 datasets that we will be using for our telecom use cases.
We would need to :
Go to the AWS producer account
In the search bar ,search for cloudshell and select it .
Once the shell is ready , create an s3 bucket by running the following command:
aws s3 mb s3://<your_unique_bucket_name>
Make sure you are creating a bucket fith a unique name.
Once done , we can download the datasets and the datasets directory strcuture into that s3 bucket which you have created.
Enter the following command to download a compressed zip file which contains the different datasets :
wget https://d29eh26mh9ajut.cloudfront.net/tlc303datasets.zip
Then run :
unzip tlc303datasets.zip
Then we can sync and copy the datasets to the s3 bucket we created :
aws s3 sync tlc303datasets s3://<enter-your-s3-bucket-name
In the search bar look for amazon s3 .
In the s3 console find the bucket you had just created .
create a directory named workshop
move all the sub directories to that workshop folder.
Verify that directory structure looks as per the below :
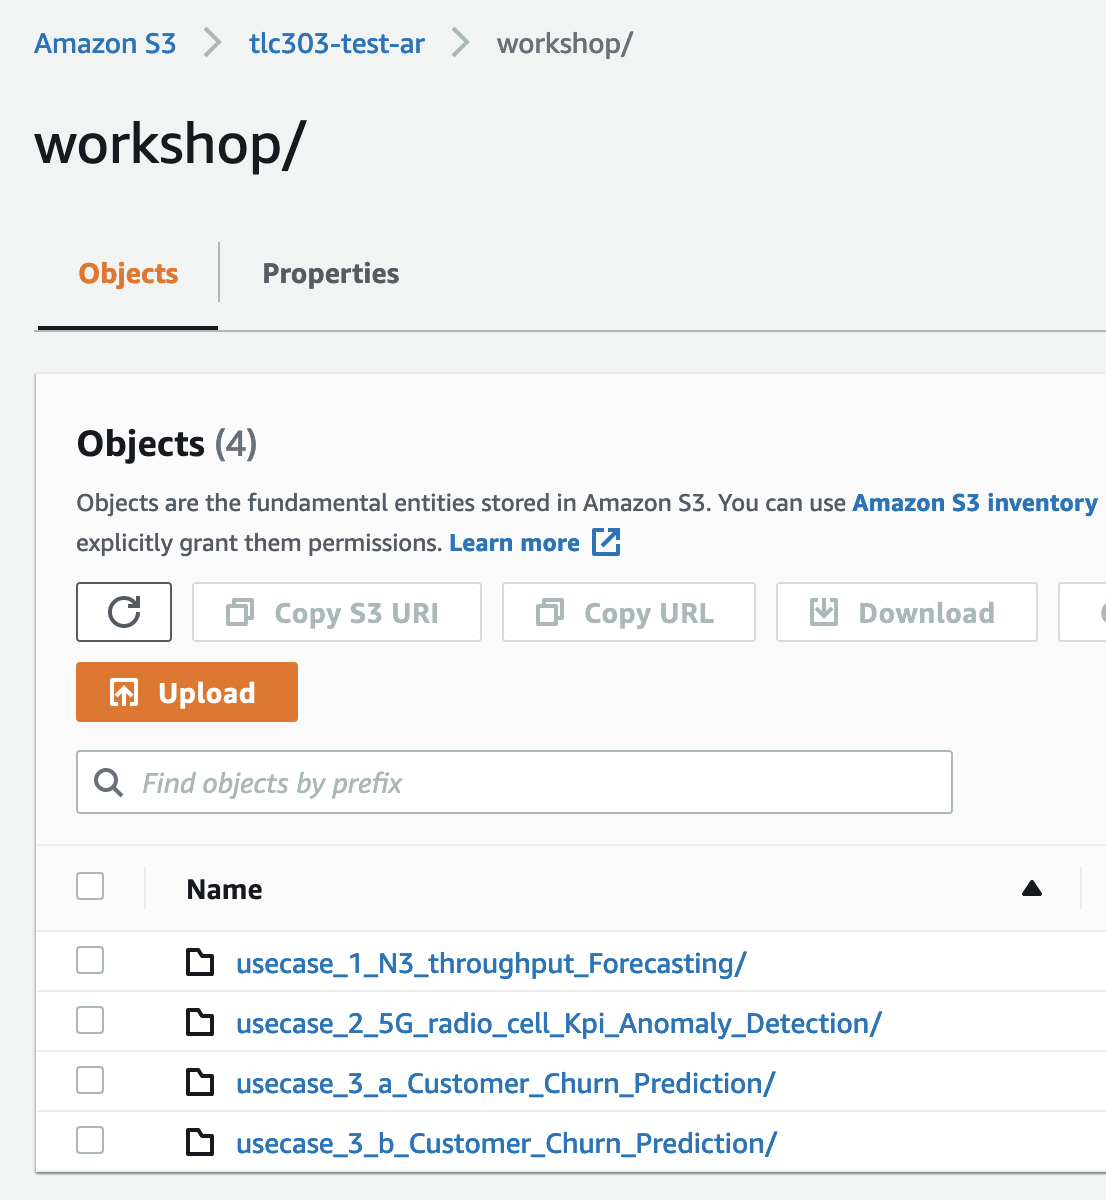
- Run the AWS Glue crawler to discover the schemas and build a glue catalog:
In the search bar type glue and select AWS Glue
Click on Crawlers under Data catalog
Click on Add crawler
Enter a Crawler name and click **next **
Click next again
Select the s3 path where the datasets for the use cases are located under **include path **
.png)
Click **Next **
Click Next
Select Create an IAM role
Enter a name for your Crawler IAM role and click Next
Click Next
Click on Add database
Enter a database name and click **Create **
Click Next and then Finish
Provide the glue crawler permissions to create, alter and describe the glue database.
Go to Lake Formation, Click on Data lake permissions on the left hand panel, click on grant, choose the glue crawler IAM role in the IAM users and roles field, choose the Named data catalog resources radio button, in the databases field choose the database you created above, in the Database permissions select create, alter and describe, and finally click Grant.
Now back on the AWS Glue console, click on the checkbox next to the crawler name and then click on Run Crawler
The Glue crawler will run for approximately one mintue , and will discover the 3 datasets and create the tables in the glue catalog.
If you go now to to Tables under Databases and the Data Catalog , you will see 3 tables that were created by the crawler you can click on each one of them and explore the schema ** **
.png)
Once that is done , we have products ready on the producer side that can be shared with the central/Hash account
- Go to the mash account .
On the mesh account, navigate to the folder /environment/Data-mesh-util/test/reinvent on the command line
We would now run step 1_create_data_product.py , where we will copy the glue catalog to the central mesh account from the producer account.
We need to tell our script what is the glue database_name and what is the table_regex
You can add those parameters to the Command line similarly to the below :
Run the following cli command
python 1_create_data_product.py --database_name <your database name> --table_regex usecase*
The script will start running and executing the relevant tasks.
Once done , you can go to the mesh account , and validate you a database and tables were created in the central catalog :
.png)
Now that we have central catalog in place , we can run proceed to the next step.
- In this step the consumer will request access to the data products in the catalog , he will do that by a subscription model
Asking for specific tables/databases and what type of premissions are required.
In the Cloud9 enviorment go to your termnial tab. Make sure you are in the folder /environment/Data-mesh-util/test/reinvent
in this example we gave only select premisions to the consumer.
make sure that your database name is the same database name which appears in the Lakeformation console in the mesh account, it should be in the format database_name-account_id
Run the following command:
python 2_consumer_request_access.py --database_name <database from the central mesh account> --tables usecase* --request_permissions Select
The subscription will be stored in a dynamodb table.
- You can now run step 2_5_list_pending_access_requests.py using the following command:
python 2_5_list_pending_access_requests.py
This will help us see exactly what the pending requests are for the central account to aprove and provide premissions .
Here is an example of the output of this step :
.png)
now , we are ready for the next step , granting data product access.
- For running the data prdouct access script you need to provide the following arguments are required: --subscription_id, --grant_permissions, --approval_notes.
The subscription id can be retrieved from the output of step 2_5_list_pending_access_requests , for grant premissions we will provide SELECT premissions .
Please save the subscription id, you will need to use it in the next step as well .
Run the following command (use the subscription id that was retrieved in the previous step) :
python 3_grant_data_product_access.py --subscription_id <your_subscription_id> --grant_permissions SELECT --approval_notes approved
Once completed , the mesh account provided access to the consumer for the data products.
- Next we will run the final step in which the consumer will approve the resource sharing.
Run the following command (use the subscription id that was retrieved in the step before the previous one)
python 4_finalize_subscription_and_query.py --subscription_id <your subsciption_id>
You can now log in to the consumer account and verify that the database and tables are seen in lakeformation.
You will see 2 databases , one is coming from the central mesh account , owned by the mesh account .
The other one is a resource link created and owned by the consumer account . this allows the AWS data analytics and ML services to acess the data .
.png)
Congratulations!! you have now setup the datamesh architecture across the Producer, Consumer and Central governance account. You are now ready to progress to the use cases section of the workshop. Follow the link below