The most efficient, reliable, and developer-friendly way to use the Naver AI Overview API.
한국어 문서는 각 섹션의 영어 설명 바로 아래에 있습니다. (Korean documentation follows each English section below.)
Actor page: apify.com/johnvc/naver-ai-overview-api Input schema: apify.com/johnvc/naver-ai-overview-api/input-schema
Track Naver's AI Overview answers for any query and get the AI-generated overview, its cited sources, and related media as structured JSON. Naver is South Korea's largest search engine, and its AI answers increasingly shape what Korean users see first. Use this API to monitor whether your brand, product, or topic appears in those answers, and which sources Naver cites. This is a brand-monitoring and answer-engine-optimization (AEO) tool.
한국어: 네이버의 AI 브리핑(AI Overview) 답변을 검색어별로 추적하여, AI가 생성한 요약과 인용 출처, 관련 미디어를 구조화된 JSON으로 받아보세요. 네이버는 한국 최대 검색 엔진이며, 그 AI 답변이 한국 사용자가 가장 먼저 보는 내용을 점점 더 좌우하고 있습니다. 이 API로 내 브랜드, 제품, 주제가 그 답변에 등장하는지, 그리고 네이버가 어떤 출처를 인용하는지 모니터링하세요. 브랜드 모니터링과 답변 엔진 최적화(AEO)를 위한 도구입니다.
한국어: 위 썸네일을 클릭하면 사용 방법을 보여주는 동영상 안내를 볼 수 있습니다.
- Python 3.11 or higher
- An Apify account and API key (get a free key here)
한국어: Python 3.11 이상이 필요하며, Apify 계정과 API 키가 필요합니다 (무료 키 받기).
-
Clone the repository / 저장소 복제
git clone https://github.com/johnisanerd/Apify-Naver-AI-Overview-API.git cd Apify-Naver-AI-Overview-API -
Install dependencies with UV / UV로 의존성 설치
# Install UV if you do not have it:
curl -LsSf https://astral.sh/uv/install.sh | sh

# Install project dependencies:
uv sync
-
Configure your API key / API 키 설정
cp .env.example .env
# Edit .env and add your Apify API key
# Get your free API key at: https://apify.com?fpr=9n7kx3
-
Run the example / 예제 실행
uv run python naver-ai-overview-api-example.py
한국어: 위 단계를 따라 저장소를 복제하고, UV로 의존성을 설치하고,
.env파일에 API 키를 넣은 뒤 예제를 실행하세요.
export APIFY_API_TOKEN="your_api_key_here"
uv run python naver-ai-overview-api-example.py
한국어:
.env파일 대신 환경 변수APIFY_API_TOKEN에 키를 직접 설정해서 실행할 수도 있습니다.
Monitor your AEO footprint in Korea. See whether Naver's AI answer mentions you, and which sources it cites, across a list of brand and category queries.
Clean, structured output. Each query returns one row: the answer as markdown, structured text blocks, cited references, and related media. Load it straight into a dataframe or dashboard.
Built for batch monitoring. Pass a list of queries and check a whole topic set in one run, then schedule it to track changes over time.
MCP-ready. AI agents can call it as a tool through the hosted Apify MCP server, so an assistant can audit your Naver AI visibility on demand.
한국어:
- 한국 시장의 AEO 입지를 모니터링하세요. 여러 브랜드 및 카테고리 검색어에 대해 네이버 AI 답변이 나를 언급하는지, 어떤 출처를 인용하는지 확인하세요.
- 깔끔한 구조화 출력. 각 검색어는 한 행을 반환합니다: 마크다운 형식의 답변, 구조화된 텍스트 블록, 인용 출처, 관련 미디어. 데이터프레임이나 대시보드에 바로 적재됩니다.
- 일괄 모니터링에 최적화. 검색어 목록을 넘겨 한 번의 실행으로 전체 주제군을 확인하고, 예약 실행으로 시간에 따른 변화를 추적하세요.
- MCP 지원. AI 에이전트가 호스팅된 Apify MCP 서버를 통해 이 도구를 호출할 수 있어, 어시스턴트가 필요할 때 네이버 AI 노출 상태를 점검할 수 있습니다.
- Resolve the Naver AI Overview for one query or many
- Get the full answer as markdown plus structured text blocks
- See the cited references (title, link, source) behind each answer
- Get related media (videos, images) shown with the answer
한국어:
- 검색어 하나 또는 여러 개에 대한 네이버 AI 브리핑 확인
- 마크다운 형식의 전체 답변과 구조화된 텍스트 블록 제공
- 각 답변 뒤에 있는 인용 출처(제목, 링크, 출처) 확인
- 답변과 함께 표시되는 관련 미디어(동영상, 이미지) 제공
- One clean row per query, with a clear
ai_overview_presentflag - Reference indexes link text blocks to their sources
- Stable JSON shape, easy to diff run-over-run for monitoring
한국어:
- 검색어당 하나의 깔끔한 행, 명확한
ai_overview_present플래그 포함- 참조 인덱스가 텍스트 블록과 출처를 연결
- 안정적인 JSON 구조로, 모니터링을 위해 실행 간 비교(diff)가 쉬움
{
  "query": "당뇨병 증상"
}{
"queries": ["당뇨병 증상", "전기차 보조금", "비타민 D 효능"]
}한국어: 기본 예시는 단일
query로 하나의 AI 브리핑을 확인합니다. 고급 예시는queries목록으로 여러 검색어를 한 번에 확인하며, 각 검색어가 한 행으로 반환됩니다.
| Parameter | Type | Required | Default | Description |
|---|---|---|---|---|
query |
str |
one of query/queries | - | A single query, in Korean or any language, e.g. 당뇨병 증상. |
queries |
list[str] |
one of query/queries | - | A batch of queries. Merged with query and de-duplicated. |
한국어 (입력 파라미터):
파라미터 타입 필수 여부 기본값 설명 querystrquery/queries 중 하나 - 단일 검색어. 한국어 또는 모든 언어 가능, 예: 당뇨병 증상.querieslist[str]query/queries 중 하나 - 검색어 묶음. query와 병합되고 중복 제거됩니다.
Each item in the dataset is one query's AI Overview. text_blocks comes in four kinds (paragraph, header, list, table), so the answer keeps its original structure:
{
  "result_type": "ai_overview",
  "query": "당뇨병 증상",
  "ai_overview_present": true,
  "markdown": "당뇨병의 대표 증상은 갈증, 다뇨, 다식입니다 ...",
  "text_blocks": [
    { "type": "header", "snippet": "당뇨병 증상", "reference_indexes": [1, 2] },
    { "type": "paragraph", "snippet": "당뇨병의 대표 증상은 갈증이 심해지고 ...", "reference_indexes": [1, 2] },
    { "type": "list", "list": [
      { "snippet": "혈당이 크게 높지 않으면 증상을 느끼지 못할 수 있습니다.", "reference_indexes": [1, 2] }
    ] },
    { "type": "table",
      "table": [
        ["증상", "의미", "함께 나타날 수 있는 증상"],
        ["갈증", "수분이 함께 빠져 탈수 느낌", "피로, 시야 흐림"]
      ],
      "formatted": [
        { "증상": "갈증", "의미": "수분이 함께 빠져 탈수 느낌", "함께_나타날_수_있는_증상": "피로, 시야 흐림" }
      ]
    }
  ],
  "references": [
    { "index": 1, "title": "당뇨병의 증상 - 삼성서울병원", "snippet": "당뇨병의 증상 모든 당뇨인이 ...", "link": "https://www.samsunghospital.com/...", "source": "삼성서울병원", "source_icon": "https://www.samsunghospital.com/favicon.ico" }
  ],
  "media": [
    { "title": "당뇨병 증상 설명", "platform": "네이버 블로그", "link": "https://blog.naver.com/...", "thumbnail": "https://..." }
  ],
  "related_questions": [
    { "question": "당뇨병 예방을 위한 식단 관리 방법 알려주세요" }
  ],
  "fetched_at": "2026-06-02T16:40:49.179631+00:00"
}| Field | Type | Description |
|---|---|---|
result_type |
str |
Always ai_overview. |
query |
str |
The query this row answers. |
ai_overview_present |
bool |
Whether Naver returned an AI Overview for this query. |
markdown |
str |
The full answer rendered as markdown. |
text_blocks |
list |
Structured answer blocks. type is paragraph, header, list, or table. Paragraph/header blocks have snippet + reference_indexes; list blocks have a list of {snippet, reference_indexes}; table blocks have a raw table (array of rows) plus a formatted array of row objects keyed by column header. |
references |
list |
Cited sources: index, title, snippet, link, source, source_icon. reference_indexes in text blocks point here. |
media |
list |
Related media: title, platform (the publisher, e.g. 네이버 블로그, 네이버 뉴스, 클립), link, thumbnail. |
related_questions |
list |
Follow-up questions Naver suggests, each as { question }. |
fetched_at |
str |
ISO 8601 timestamp of when the row was fetched. |
한국어: 데이터셋의 각 항목은 하나의 검색어에 대한 AI 브리핑입니다.
result_type: 항상ai_overview.query: 이 행이 답하는 검색어.ai_overview_present: 네이버가 이 검색어에 AI 브리핑을 반환했는지 여부.markdown: 마크다운으로 렌더링된 답변 전문.text_blocks: 구조화된 답변 블록.type은paragraph,header,list,table중 하나입니다. 문단/헤더 블록은snippet과reference_indexes를,list블록은{snippet, reference_indexes}의list를,table블록은 원본table(행 배열)과 열 머리글을 키로 하는formatted(행 객체 배열)를 가집니다.references: 인용 출처(index,title,snippet,link,source,source_icon). 텍스트 블록의reference_indexes가 여기를 가리킵니다.media: 관련 미디어(title,platform(예:네이버 블로그,네이버 뉴스,클립),link,thumbnail).related_questions: 네이버가 제안하는 후속 질문, 각각{ question }형태.fetched_at: 행을 가져온 시점의 ISO 8601 타임스탬프.
Cowork is the desktop app's automation mode. To give it the Naver AI Overview API as a tool, add the Apify MCP server as a connector.
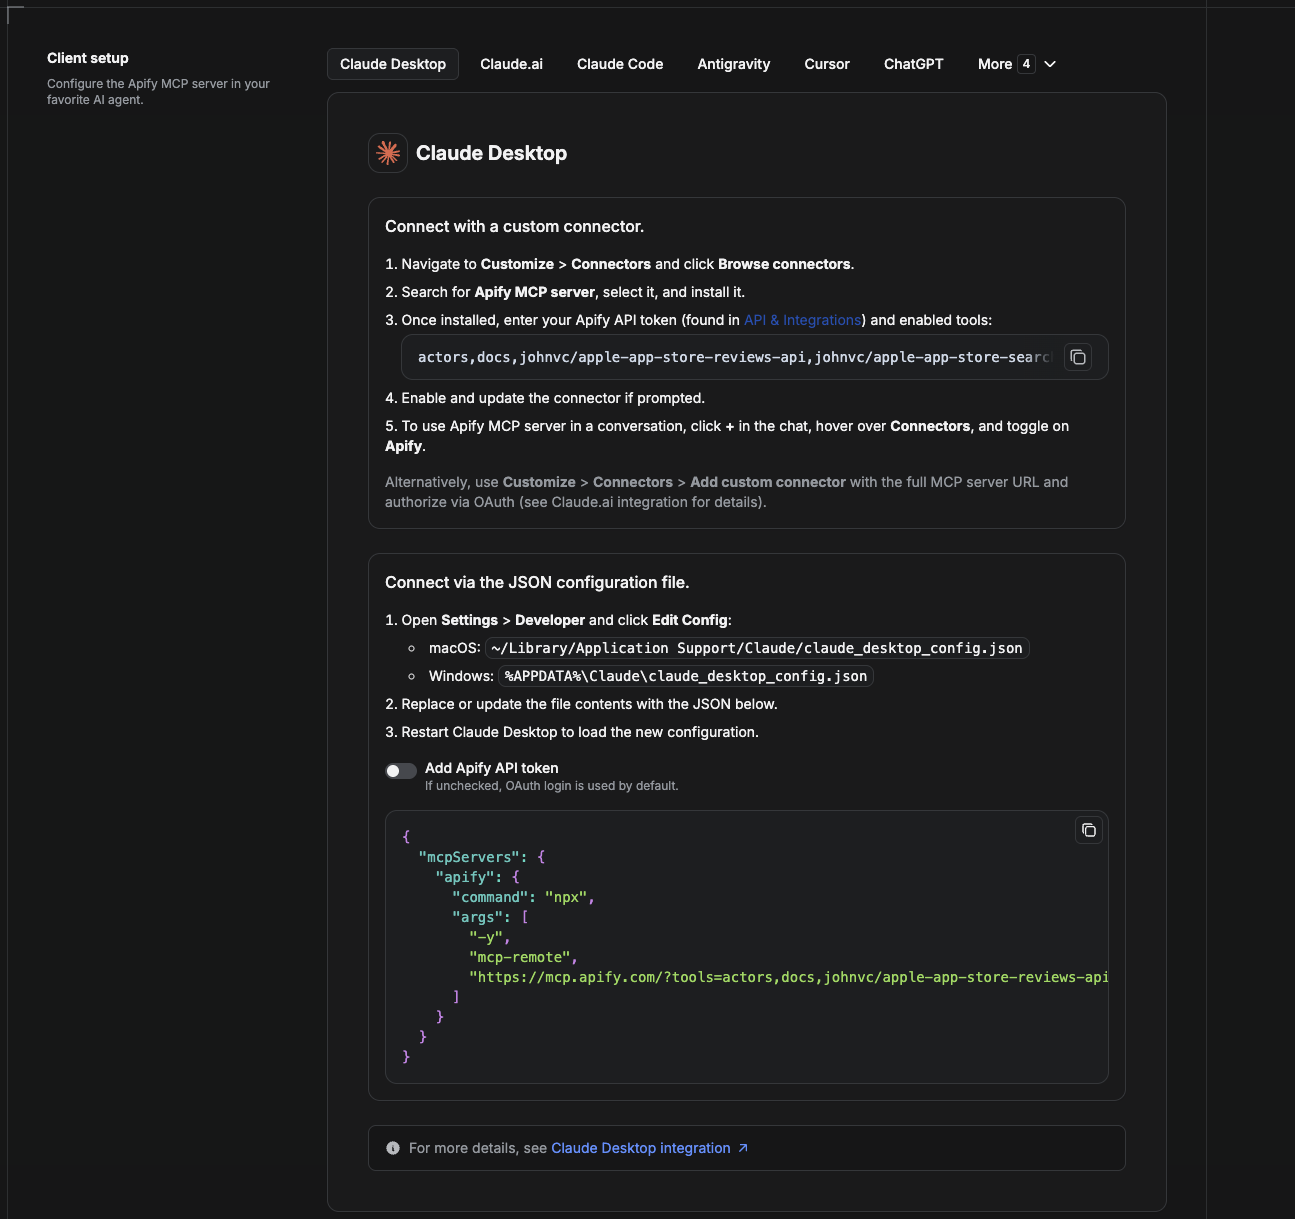
- Open the Claude desktop app and go to Settings → Connectors (or Settings → Developer → Edit Config to edit
claude_desktop_config.jsondirectly).- macOS:
~/Library/Application Support/Claude/claude_desktop_config.json - Windows:
%APPDATA%\Claude\claude_desktop_config.json
- macOS:
- Add the Apify MCP server, preloaded with only this Actor:
{
  "mcpServers": {
    "apify": {
      "command": "npx",
      "args": [
        "-y",
        "mcp-remote",
        "https://mcp.apify.com/?tools=actors,docs,johnvc/naver-ai-overview-api"
      ]
    }
  }
}- Restart the app. When Cowork first calls the tool, complete the OAuth prompt in your browser, or add your Apify API token in the connector settings to skip OAuth.
- In a Cowork chat, confirm the tool is available and ask it to run the Naver AI Overview API.
Download the desktop app and start a free trial: https://claude.ai/referral/uIlpa7nPLg More help: https://docs.apify.com/platform/integrations/claude-desktop
한국어: Cowork는 데스크톱 앱의 자동화 모드입니다. 네이버 AI 브리핑 API를 도구로 사용하려면 Apify MCP 서버를 커넥터로 추가하세요.
- Claude 데스크톱 앱을 열고 Settings → Connectors로 이동합니다 (또는 Settings → Developer → Edit Config에서
claude_desktop_config.json을 직접 편집).- 위 JSON처럼 이 Actor만 미리 로드한 Apify MCP 서버를 추가합니다.
- 앱을 재시작합니다. Cowork가 도구를 처음 호출할 때 브라우저에서 OAuth를 완료하거나, 커넥터 설정에 Apify API 토큰을 추가해 OAuth를 건너뛸 수 있습니다.
- Cowork 채팅에서 도구가 사용 가능한지 확인하고 네이버 AI 브리핑 API 실행을 요청하세요.
데스크톱 앱을 내려받고 무료 체험을 시작하세요: https://claude.ai/referral/uIlpa7nPLg
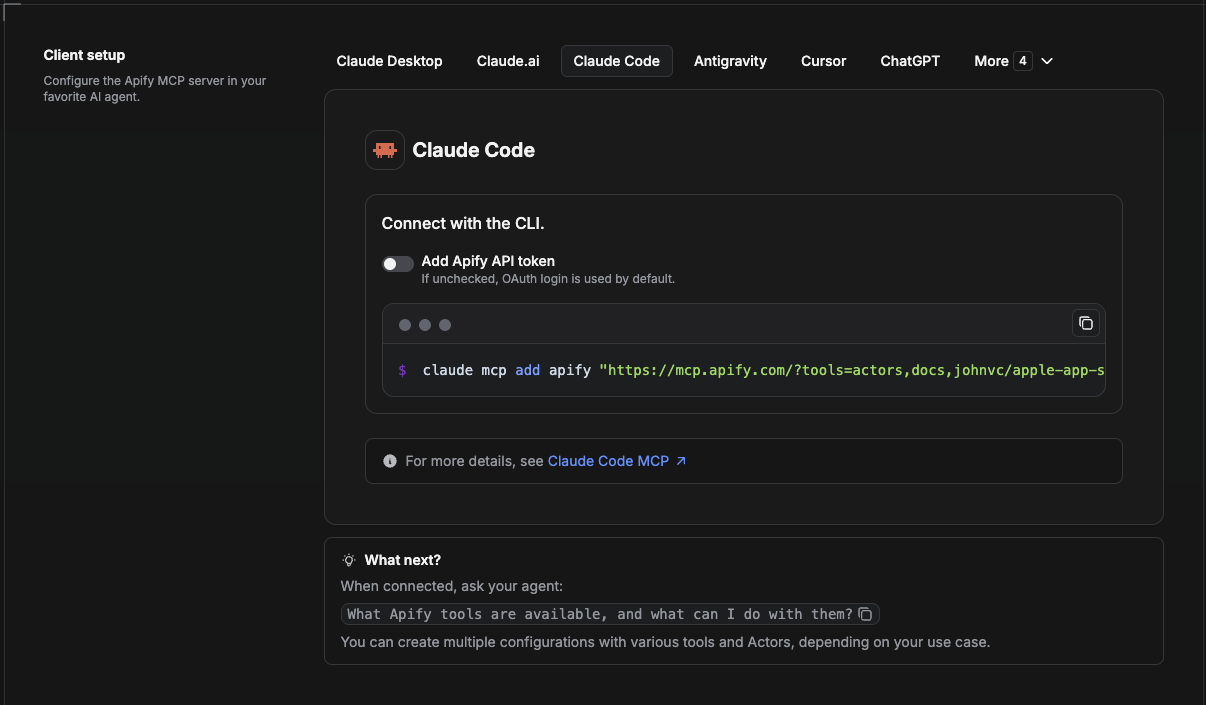
Claude Code is the command-line tool. Add the Actor's MCP server with one command:
claude mcp add --transport http apify \
  "https://mcp.apify.com/?tools=actors,docs,johnvc/naver-ai-overview-api"
To use a token instead of browser OAuth:
claude mcp add --transport http apify \
  "https://mcp.apify.com/?tools=actors,docs,johnvc/naver-ai-overview-api" \
  --header "Authorization: Bearer YOUR_APIFY_TOKEN"
Then verify with claude mcp list, or run /mcp inside a session. Ask Claude Code to call the Naver AI Overview API.
Try Claude Code free: https://claude.ai/referral/uIlpa7nPLg Claude Code MCP docs: https://code.claude.com/docs/en/mcp
한국어: Claude Code는 명령줄 도구입니다. 위 명령 한 줄로 Actor의 MCP 서버를 추가하세요. 브라우저 OAuth 대신 토큰을 쓰려면
--header로Authorization: Bearer YOUR_APIFY_TOKEN을 추가합니다. 이후claude mcp list로 확인하거나 세션 안에서/mcp를 실행한 뒤, Claude Code에 네이버 AI 브리핑 API 호출을 요청하세요.Claude Code를 무료로 사용해 보세요: https://claude.ai/referral/uIlpa7nPLg
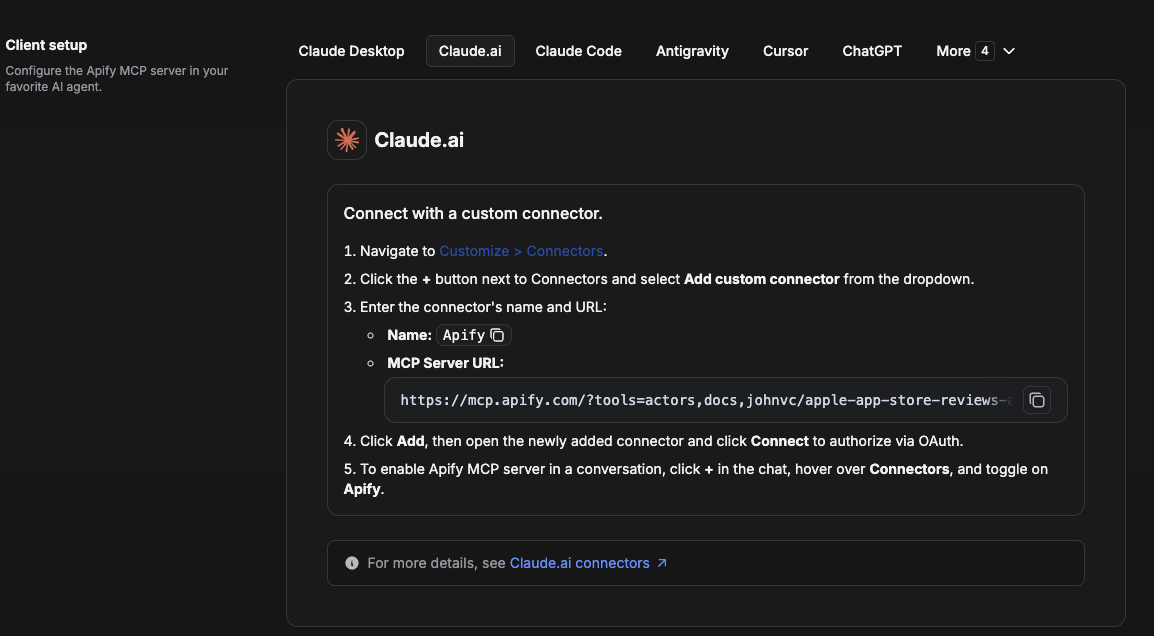
On claude.ai you add Apify as a connector, then enable just this Actor's tool.
- Go to Settings → Connectors → Browse connectors and search for Apify MCP server. Install it (enable or update if prompted).
- When connecting, authenticate with your Apify API token, and enable the tool
johnvc/naver-ai-overview-api. - In any chat, open + → Connectors and turn on Apify.
- Alternatively, choose Add custom connector and paste the full MCP URL
https://mcp.apify.com/?tools=actors,docs,johnvc/naver-ai-overview-api, using OAuth when prompted. - Ask Claude to run the Naver AI Overview API.
Open Claude on the web: https://claude.ai
한국어: claude.ai에서는 Apify를 커넥터로 추가한 뒤 이 Actor의 도구만 활성화합니다.
- Settings → Connectors → Browse connectors로 이동해 Apify MCP server를 검색하고 설치합니다.
- 연결할 때 Apify API 토큰으로 인증하고
johnvc/naver-ai-overview-api도구를 활성화합니다.- 아무 채팅에서 + → Connectors를 열고 Apify를 켭니다.
- 또는 Add custom connector를 선택해 전체 MCP URL
https://mcp.apify.com/?tools=actors,docs,johnvc/naver-ai-overview-api를 붙여넣고 OAuth로 인증합니다.- Claude에 네이버 AI 브리핑 API 실행을 요청하세요.
웹에서 Claude 열기: https://claude.ai
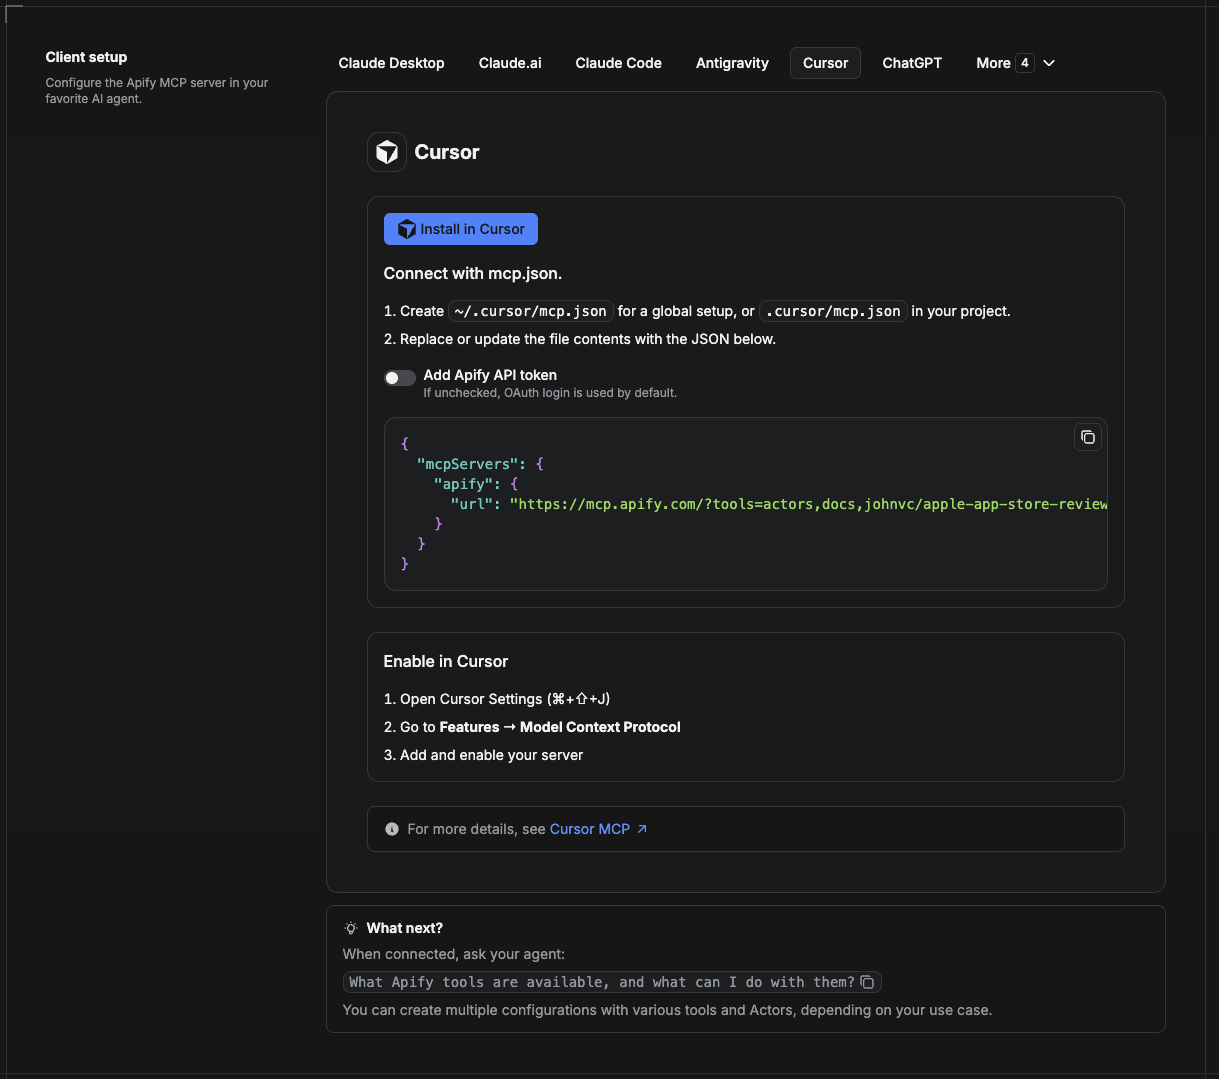
Cursor reads MCP servers from a project file at .cursor/mcp.json.
- In your project, create
.cursor/mcp.json:
{
  "mcpServers": {
    "apify": {
      "url": "https://mcp.apify.com/?tools=actors,docs,johnvc/naver-ai-overview-api"
    }
  }
}- If you prefer token auth over browser OAuth, add a header:
{
  "mcpServers": {
    "apify": {
      "url": "https://mcp.apify.com/?tools=actors,docs,johnvc/naver-ai-overview-api",
      "headers": { "Authorization": "Bearer YOUR_APIFY_TOKEN" }
    }
  }
}- Open Cursor → Settings → MCP and confirm the apify server is connected (green dot).
- In Composer or Chat, ask Cursor to call the Naver AI Overview API.
New to Cursor? Get it here: https://cursor.com/referral?code=XQP4VBLI3NNX
한국어: Cursor는 프로젝트 파일
.cursor/mcp.json에서 MCP 서버를 읽습니다.
- 프로젝트에 위 JSON 내용으로
.cursor/mcp.json을 생성합니다.- 브라우저 OAuth 대신 토큰 인증을 원하면
headers에Authorization: Bearer YOUR_APIFY_TOKEN을 추가합니다.- Cursor → Settings → MCP를 열고 apify 서버가 연결되었는지(초록 점) 확인합니다.
- Composer 또는 Chat에서 Cursor에 네이버 AI 브리핑 API 호출을 요청하세요.
Cursor가 처음이신가요? 여기에서 받으세요: https://cursor.com/referral?code=XQP4VBLI3NNX
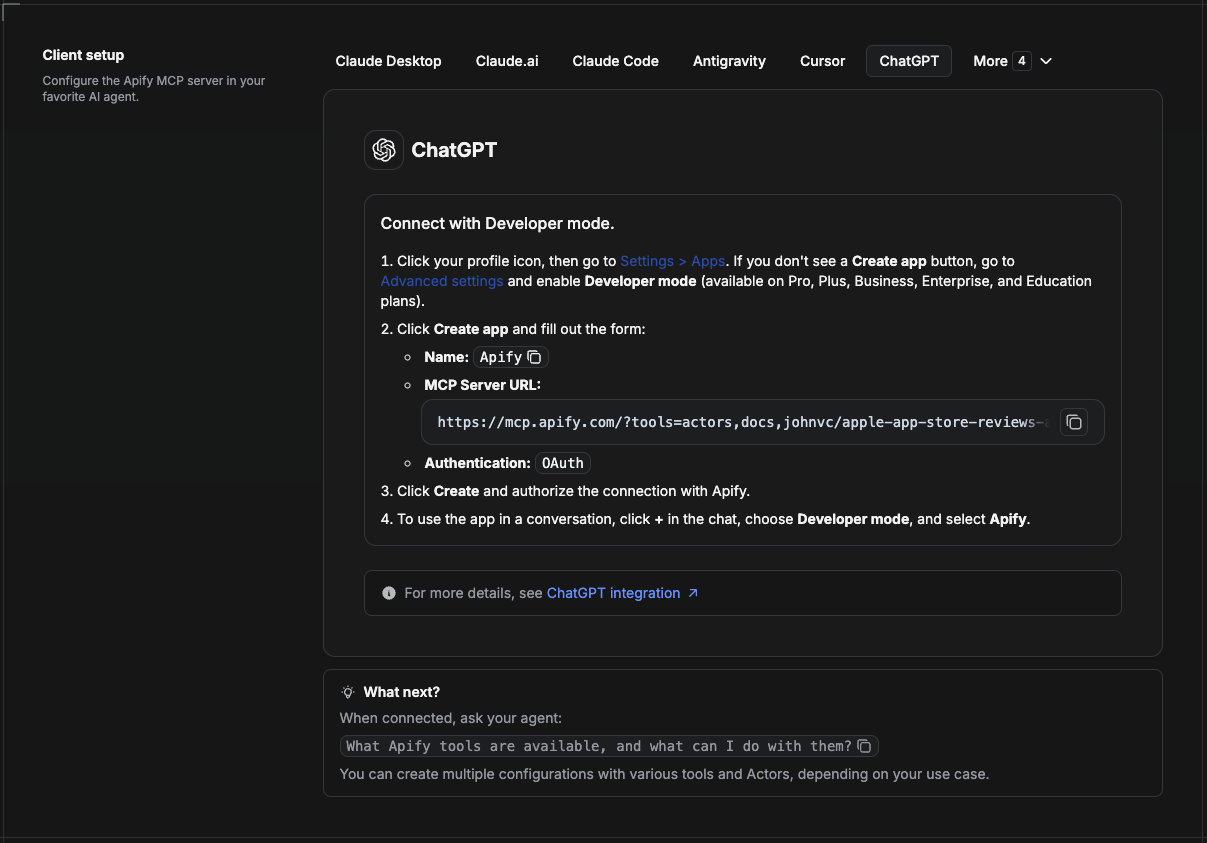
ChatGPT connects to the Apify MCP server through Developer mode (available on ChatGPT Pro, Plus, Business, Enterprise, and Education plans).
- Click your profile icon, then go to Settings > Apps. If you do not see a Create app button, open Advanced settings and enable Developer mode.
- Click Create app and fill out the form:
- Name: Apify
- MCP Server URL:
https://mcp.apify.com/?tools=actors,docs,johnvc/naver-ai-overview-api - Authentication: OAuth
- Click Create and authorize the connection with Apify.
- To use the app in a conversation, click + in the chat, choose Developer mode, and select Apify.
More help: https://docs.apify.com/platform/integrations/mcp
한국어: ChatGPT는 개발자 모드(ChatGPT Pro, Plus, Business, Enterprise, Education 플랜에서 사용 가능)를 통해 Apify MCP 서버에 연결합니다.
- 프로필 아이콘을 클릭한 뒤 Settings > Apps로 이동합니다. Create app 버튼이 보이지 않으면 Advanced settings에서 Developer mode를 켭니다.
- Create app을 클릭하고 양식을 작성합니다. 이름은 Apify, MCP 서버 URL은
https://mcp.apify.com/?tools=actors,docs,johnvc/naver-ai-overview-api, 인증은 OAuth로 설정합니다.- Create를 클릭하고 Apify 연결을 승인합니다.
- 대화에서 사용하려면 채팅의 **+**를 클릭하고 Developer mode를 선택한 뒤 Apify를 고릅니다.
Use the Naver AI Overview API to monitor your brand's visibility in Korean AI search.
네이버 AI 브리핑 API로 한국 AI 검색에서 내 브랜드의 노출 상태를 모니터링하세요.
Last Updated: 2026.06.24