This lab exercise focuses on performing credentialed vulnerability scans against Windows 10 Host Virtual Machine on Microsoft Azure Cloud platform using Nessus Vulnerability Scanner. It involves conducting the Vulnerability Assessments with Nessus and remediating the vulnerabilities.
- Install Nessus Essentials:https://www.tenable.com/products/nessus/nessus-essentials
- Microsoft Azure Cloud Service (To Deploy Windows 10 VM):https://azure.microsoft.com/en-us/free/
Note: Get Activation Code from your email after signing up for Nessus Essentials. Save the personalized url link for Nessus along with your username and password securely.
Windows 10 Pro (Standard D2s v3; 2vcpus, 8GiB memory)
First Step involves signing up for a Microsoft Azure cloud account to deploy Windows 10 VM: https://azure.microsoft.com/en-us/free/
Click on the 'Virtual Machine' option and then select 'Create' with the option Azure Virtual machine.
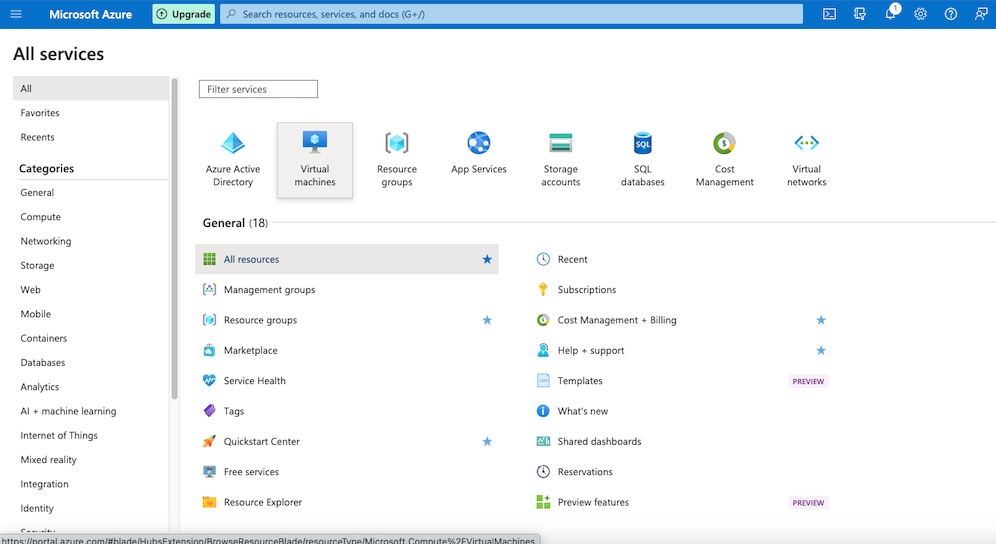
Figure 1. How to deploy Virtual Machine on Azure cloud
On the 'Create a virtual machine' page,
- for the Basics section, fill out details to deploy a new VM with configuration of your choice. I used Windows 10 Pro (Standard D2s v3; 2vcpus, 8GiB memory) for my configuration. For
- For the Networking section, make note to change the NIC network security group from Basic to Advanced to set custom Inbound Security Rules. Include Source host to be your own IP with any port and Any Destination IP with any port. Set a security id in increment of 100 from 100-1000. Lower the number higher the priority of rule. Set the rule to Allow.
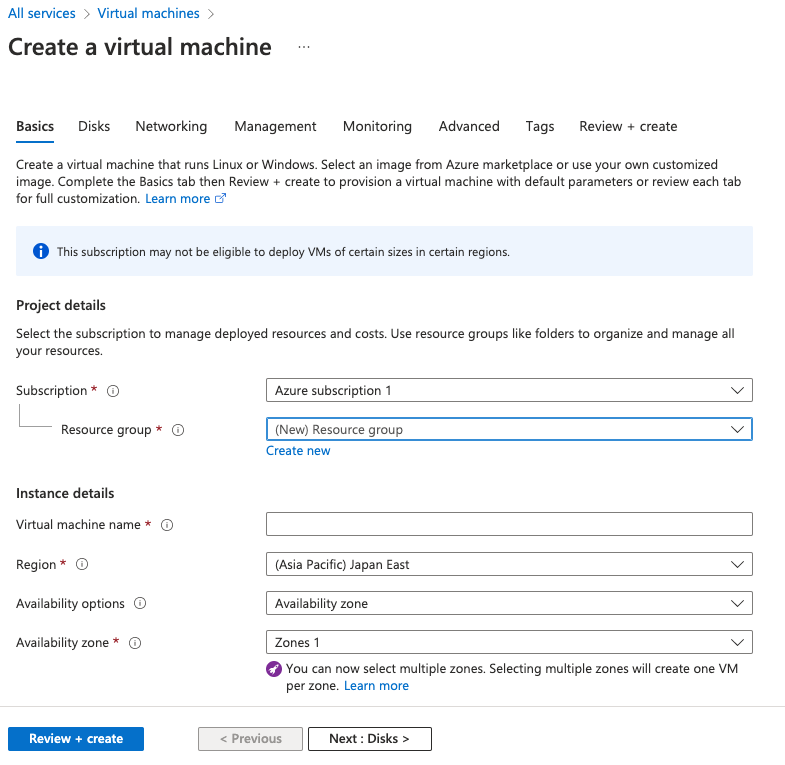
Figure 2. Specifying the details to deploy Virtual Machine on Azure cloud
After success deployment of Windows 10 VM on Azure cloud, try RDP login from local machine to the Windows 10 VM with the provided public IP address in the details of the deployed VM on the Azure cloud. Use the username and password that you provided while creating a virtual machine in Basics section on Azure cloud.
After successful RDP login, you can graphically interact with the remote desktop of the Windows 10 VM.
Now check the network connection between VM and local machine by sending ping from local machine to VM. Use the following command in your local terminal to check if the connection is up: ping If the connection is up, the request won't time out. If the connection is down, the request will time out. In that case, turn off the Firewall (Domain, Public, private) in your VM by typing wf.msc in search menu to locate the options for turning the Firewall off. Now try the same command as above in terminal to check if the connection is up.
Second utility to install is Nessus essentials, which is a Vulnerability Scanner, helpful in performing different type of scans based on user's needs. The custom reports can be generated with the findings to conduct Vulnerability Assessments and remediate Vulnerabilities. Installation link for Nessus: https://www.tenable.com/products/nessus/nessus-essentials
After the installation is completed, the url with username and password need to be saved securely for future logins. Now, the New Scan option to explore the variety of different scanners that Nessus offers to help in conducting Vulnerability Assessments. First step should typically involve conducting Basic Network Scan. In Settings, you need to provide the Name and Target machine's IP (Public IP of VM in our case). We will do non-credentialed scan first to check if the scanner is able to scan the target machine successfully and give us Vulnerability report. If this part is successful, then it ensures that the scanners is functioning to look out for vulnerabilities in the provided target IP. Here is the one of the page to the generated report after running non-credentialed Basic Network Scan:
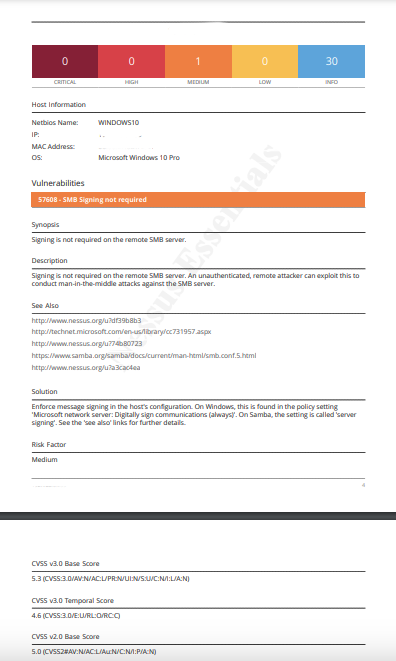
Figure 3. Non-credentialed Nessus Scan Report
It can be noticed that vulnerabilities is categorized into different level of severity: Critical, High, Medium and Low. This is decided based on the CVSS v3.0 scoring system ranging from 0-10. CVSS stands for Common Vulnerability Scoring System that is used on the basis of three metric groups: Base, Temporal, and Environmental.
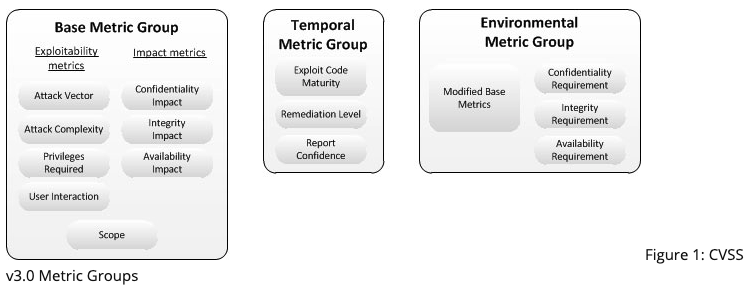
Figure 4. CVSS v3.0 Metric groups (Reference #2)
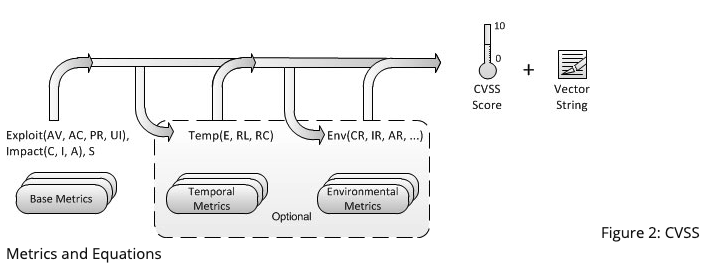
Figure 5. CVSS Metrics and Equations (Reference #2)
Now we will configure our VM to be ready for performing credentialed scans. First, enable the Remote Registry by going to the Services in your VM. Then, enable your File and Printer Sharing option. Further, change the the user account control to 'Never notify' by going to the User Account Control settings. Next, we will go to Registory Editor to add a key to further disable user account control for future remote account scans that we will use. Restart the VM. Fill out the credential details (Windows option) on Nessus for Windows 10 VM. Run the scan again. Now you can notice the huge increase in the number of vulnerabilities found by the scanner because of the credentialed scan this time.
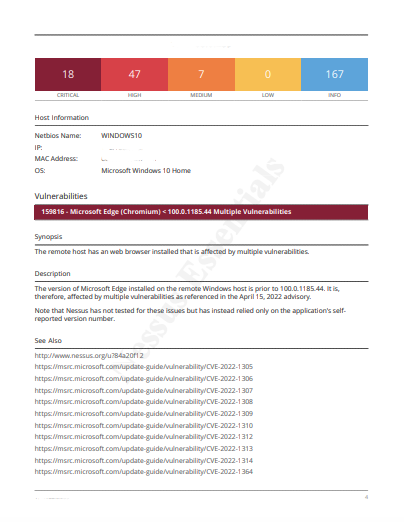
Figure 6. Credentialed Nessus Scan Report (Page 1)
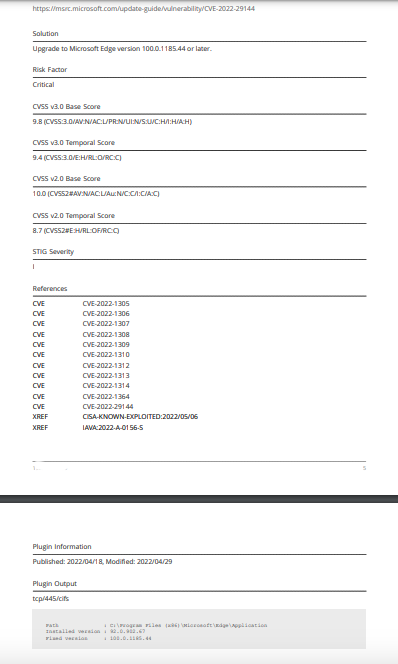
Figure 7. Credentialed Nessus Scan Report (Page 2)
Now let's download an older version of Firefox browser on your VM and try running scanner to how the results change this time. We notice the vulnerabilities increased toward more criticals and highs as compared to before. This shows that older version (deprecated) of Firefox browser is another vulnerability that can be remediated.
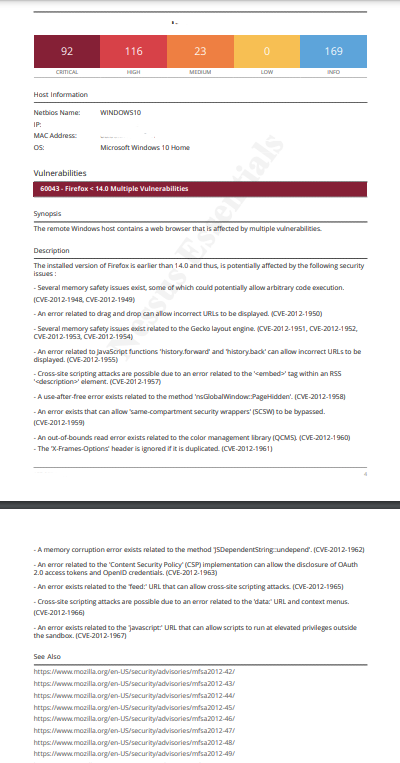
Figure 8. Report after installing deprecated Firefox on VM (Page 1)

Figure 9. Report after installing deprecated Firefox on VM (Page 2)
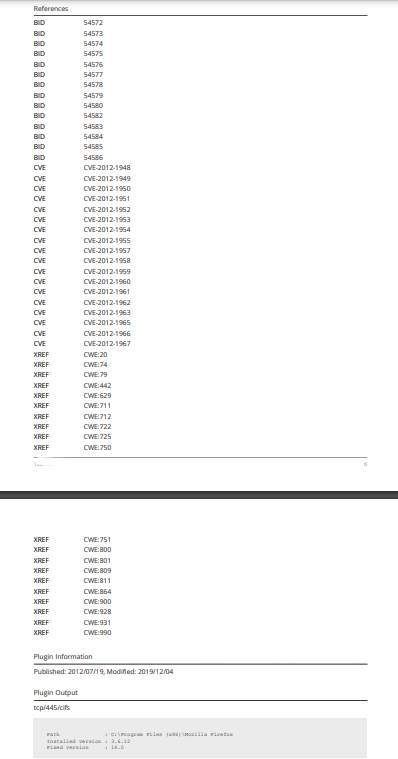
Figure 10. Report after installing deprecated Firefox on VM (Page 3)
Lets remediate the vulnerability by upgrading the Mozilla Firefox version to latest one. Run the scan again. We can notice the decrease in the criticals and highs by remediating the vulnerability.
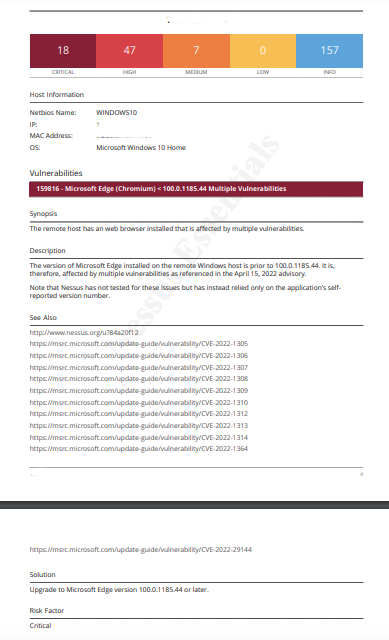
Figure 11. Report after upgrading deprecated Firefox version on VM (Page 1)
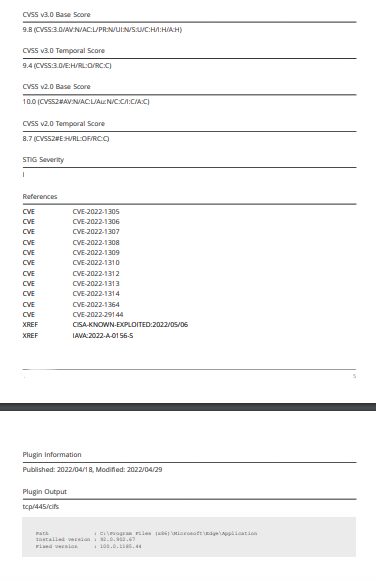
Figure 12. Report after upgrading deprecated Firefox version on VM (Page 2)
- Madakor J. (2021), Nessus Tutorial for Beginners: Vulnerability Management www.youtube.com. Accessed February 28, 2023. https://www.youtube.com/watch?v=lT6Px9zJM3s
- Common Vulnerability Scoring System v3.0: Specification Document. Accessed February 28, 2023. https://www.first.org/cvss/v3.0/specification-document
Josh Madakor, Instructor, Software, Content Creator - Youtuber