English | 日本語 | 简体中文 | 繁體中文 | 한국어 | Tiếng Việt | ไทย | Bahasa Indonesia | Deutsch | Français | Español | Português | العربية | עברית
tsreport-editor is a browser-based report designer and report server that uses tsreport-core as its layout and rendering engine.
It's not just a screen for designing reports. A single server provides .report template and asset management, preview using real data, PDF import, an OAuth 2.0 print API for external systems, MCP for AI agents, an asynchronous report queue, and print audit trails.
- Report designer — edit bands, text, shapes, images, SVGs, tables, subreports, barcodes, formulas, and more in the browser.
- Consistency between preview and PDF — the Editor, print preview, and PDF output all use the same
tsreport-corelayout results and rendering implementation. - Multilingual and font operations — per-account font management, embedded fonts, outlines, PDF-imported fonts, and typesetting for Japanese, Chinese, Korean, Arabic script, and more.
- Report API server — asynchronously prints templates pinned by published tags via OAuth 2.0 Client Credentials.
- MCP server — lets AI read, edit, and validate templates, check layout, render PNG/PDF, import original PDFs, and diff-compare results.
- Operations and audit trail — API print jobs are queued, and PDF output from the Editor, API, and MCP is recorded in per-account print history.
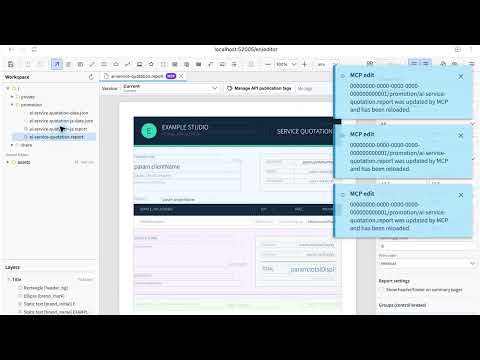
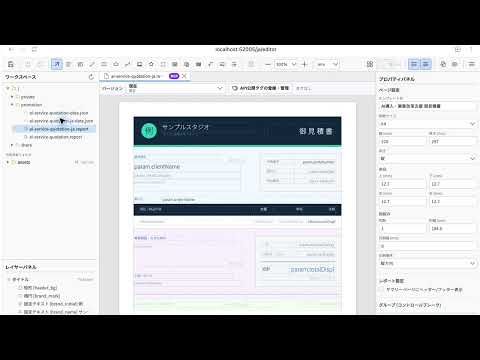
These videos show AI designing a report through MCP and opening the completed preview. The English demo also demonstrates multilingual report support.
| English demo — multilingual report support | Japanese demo |
|---|---|
 |
 |
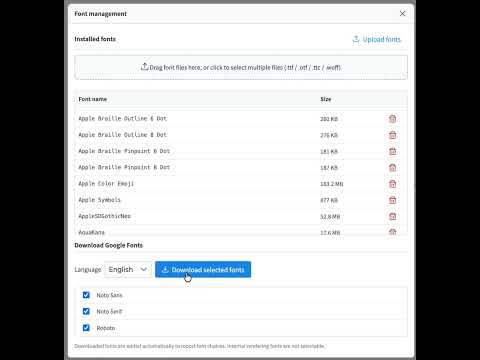
The font manager supports downloading Google Fonts and uploading your own font files.
flowchart LR
    browser["Browser report designer"]
    system["Business system / tsreport-sdk"]
    agent["MCP client / AI agent"]
    editor["tsreport-editor\nNext.js API, auth, workspace"]
    queue["Report queue / print history"]
    core["tsreport-core\nLayout, Canvas, SVG, PDF"]
    db[("PostgreSQL")]
    nfs[("Workspaces, fonts, PDFs")]

    browser --> editor
    system -->|"OAuth 2.0 print/preview API"| editor
    agent -->|"MCP"| editor
    editor --> queue
    editor --> core
    editor --> db
    editor --> nfs
    queue --> core
    core --> nfs
tsreport-core is a pure TypeScript report engine with zero runtime dependencies. tsreport-editor builds Next.js, PostgreSQL, authentication, file management, queuing, and an admin screen on top of it. Because the Editor side uses Argon2id for password hashing and sharp for MCP PNG generation, the Editor server as a whole is not positioned as having "zero native dependencies."
- Bands such as Title, Page Header, Column Header, Detail, Group Header/Footer, Summary, Page Footer, Last Page Footer, Background, and No Data
- Fixed text, expression fields, lines, rectangles, ellipses, vector paths, images, SVGs, frames, tables, subreports, barcodes, formulas, and page breaks
- Drawing attributes including RGB, CMYK, spot colors, gradients, transparency, clipping, and soft masks
- Visual and JSON editing of
.reportfiles, multiple tabs, undo/redo, layers, zoom, and print preview - Verification of fields, parameters, expressions, and repeating detail rows using JSON test data
- High-fidelity import of PDF pages. Converts text, vectors, images, and embedded fonts into editable report elements or retained drawings
- Published tags for templates, separating content being edited from the pinned version used by external APIs
- Docker and Docker Compose
The published tsreport-core and tsreport-react packages are installed from npm by the Editor's lockfile. Sibling repository checkouts are not used by development, tests, or production builds.
Host-side npm commands in src/ are supported for ordinary development and verification. Docker remains isolated: dependencies are installed from the lockfile when the Node.js image is built, container startup never runs npm install or npm ci, and Compose Watch synchronizes source files while excluding the host's node_modules.
cd ../tsreport-editor/server
docker compose up --build --watch
To start the containers in the background without source synchronization:
cd ../tsreport-editor/server
docker compose up -d --build
docker compose ps
docker compose logs -f tsreport_editor_node
Run docker compose watch --no-up in another terminal when detached containers also need source synchronization.
The development server/compose.yaml pins the Compose project name to tsreport-editor-dev, keeping containers and networks isolated from other products on the same host and from the production tsreport-editor project.
To stop:
cd ../tsreport-editor/server
docker compose down
For normal operation where you stop while keeping data, do not run down -v or delete the NFS/DB directories.
| Service | Role | Host side |
|---|---|---|
tsreport_editor_node |
Next.js Editor / REST API | http://localhost:52005 |
tsreport_editor_node |
Dedicated MCP listener | http://localhost:52006 |
tsreport_editor_node |
Workspace update notifications | 52007 |
tsreport_editor_db |
PostgreSQL | localhost:52437 |
tsreport_editor_cron |
Triggers the report queue every 10 seconds | Internal only |
tsreport_editor_nginx |
HTTP / HTTPS reverse proxy | 52085 / 52448 |
Open http://localhost:52005 in your browser, or https://localhost:52448, which uses a self-signed certificate.
On first startup, the application creates schema initial data, accounts, workspaces, and regression templates exactly once under a DB lock.
| Purpose | Login ID | Initial password | Permission |
|---|---|---|---|
| Initial administrator | admin |
pass |
Administrator |
| Regression testing | test |
pass |
Regular user |
Important: the initial passwords are publicly known initialization credentials. Be sure to change them before going into production. The current UI does not automatically force a change on first login, so the operator must confirm the change has been completed.
After first login, do the following from the hamburger menu.
- Change the initial password for
adminvia "Change Password." - Delete
testin environments where it's not used for regression testing. If you keep it, be sure to change its password. - Regenerate the MCP key in "MCP Settings" for any initial account you keep.
- Delete the regression API client
test-report-client, or reconfigure its Client Secret and access permissions. - Change the DB credentials and
REPORT_BATCH_TOKENinserver/node/.envand the production.envfrom their defaults. - Before exposing the service externally, replace nginx's self-signed certificate with a proper certificate, and verify the exposed ports and firewall.
Local account passwords are hashed with Argon2id before being stored in the DB. At least one account must remain an administrator, including admin.
- Log in and open your account's workspace.
- Register the fonts needed for your reports under "Font Management."
- Create a new
.report, or open an existing.reportor PDF. - Place bands and elements, and specify test data JSON as needed.
- Check multiple pages, detail overflow, and the last page in the Editor view and print preview.
- Output a PDF. The output is recorded in your own account's print history.
- If using it from an external system, create a published tag and configure an API client and access permissions.
A normal save updates the edited file in the workspace. A published tag pins the template JSON as of that point in time, so a subsequent normal save does not change the API print result of an existing tag. To publish changes externally, create a new tag or explicitly update the target tag.
A published tag is not simply a flag that switches the .report being edited to an externally published state. It is a mechanism that saves report template content as a version, and lets that version be referenced by name from an external API.
For example, even after publishing the current content of an invoice template as v1, you can continue editing invoice.report in the workspace. Changes from normal saves are not automatically reflected in v1. If you publish the updated content as v2, external systems can explicitly choose which version to use in the API URL.
invoice.report (working copy being edited)
  ├─ v1 (published template JSON)
  └─ v2 (template JSON published after the changes)

POST /api/report/print/{workspaceKey}/invoice.report/v1
POST /api/report/print/{workspaceKey}/invoice.report/v2
This separation enables the following operations:
- The business system continues using the existing
v1while a new report layout is being edited and verified - Callers switch from
v1tov2on their own schedule - Multiple versions coexist, with different partners using different versions
- If a problem is found, the API reference can be rolled back to a previous tag without writing back the template file
Creating a new tag saves the template JSON as of that point. You can also explicitly update the same tag, but doing so changes the content referenced by the same API URL. For operations that prioritize reproducibility or staged migration, create new tags such as v1, v2, or 2026-07 rather than overwriting an existing tag.
What a published tag pins is the template JSON. The rows and parameters in an API call are not part of the version and are specified per print request. Also, "published" here does not mean publicly exposed to the internet anonymously. To actually use it from the API, the OAuth 2.0 scopes, the API client's access permissions, and the owning user's workspace permissions must all be satisfied.
- Each account has one workspace.
- A workspace is identified by an immutable UUID
workspaceKey. - Administrators can create users, manage display names, login IDs, permissions, MCP availability, and passwords, and configure system settings.
- Even administrators cannot unconditionally view another account's workspace. Report data is tenant-isolated.
- Deleting a user is a physical delete. Related data including the workspace, fonts, shares, API clients, tokens, and print history is deleted and cannot be restored.
Rather than sharing an entire workspace, you can share only the folders you need with another account.
- The share target is specified by the other account's
workspaceKey. - Read and write can be permitted separately.
- Read sharing allows referencing templates and assets; write sharing allows collaborative editing.
- The recipient can revoke a share they've received.
- The same effective access scope applies to the API and MCP as well.
When the Editor or MCP updates a workspace, an update event is notified to other Editor tabs. If there are no unsaved changes, it reloads; if there are unsaved changes, it protects local edits and warns instead.
Sharing, API permissions, and published tags serve different purposes.
| Concept | Scope | Role |
|---|---|---|
| Folder sharing | Between accounts | Grants read/write to a human's Editor operations and to MCP acting as that account |
| API access permission | API client | Restricts which workspaceKey and folders an external system can reference |
| Published tag | .report version |
Pins the template content used for API printing |
Adding only an API access permission is not usable unless the owning user themselves has access to the target folder. Conversely, folder sharing alone does not expose anything to the external API.
"Font Management" in the hamburger menu is available to all users. Fonts are stored per account under /var/nfs/fonts/{accountId}/ and are not visible to other accounts.
- Open "Font Management."
- Add fonts via file selection, or by drag and drop.
- Select the font ID shown in the list in a text element's
fontFamily.
Supported formats are TTF, OTF, TTC, OTC, WOFF, and WOFF2. The application limit for a single file is 256MiB. You can select and register multiple system fonts at once, such as from macOS's /System/Library/Fonts. Fonts on the host OS are never implicitly read, and fonts are never installed onto the OS.
Duplicates are judged as follows:
- Same font ID, identical binary: treated as a success, as a retry of a bulk upload
- Same font ID, different binary: rejected as an ID collision
- Different font ID, identical binary: rejected as a duplicate, indicating the existing ID
- Only metadata such as the family name or PostScript name matches: registerable as an independent font if the binary differs
Content matching is determined not just by metadata or a hash, but by a full byte comparison after confirming the file sizes match.
"Download Google Fonts" lets you choose a language and download candidates into the account's storage area. This assumes external network connectivity is available.
PDF import registers reusable embedded fonts as application fonts within the account. If there is no font program, it matches candidates against account fonts by name and style, and displays candidates and warnings.
The external API uses an OAuth 2.0 Client Credentials Bearer Token rather than the screen login cookie. You need the following three things to get started:
- Published tag — create a pinned version of the
.reportto use via the API. - API client — create a Client ID, Client Secret, and scopes under "API Clients" in the hamburger menu.
- Access permission — register the
workspaceKeyand folders the client can use.
The available scopes are report:print, report:status, report:download, and report:preview. The effective scope of an API client is the intersection of "the client's access permissions" and "the workspaces/shared folders the owning user themselves can access."
POST /api/oauth/token
  grant_type=client_credentials
  -> access_token

POST /api/report/print/{workspaceKey}/{templatePath}/{tag}
  -> { key }

GET /api/report/status/{key}
  -> queued | processing | completed | error

GET /api/report/download/{key}
  -> application/pdf
Example:
BASE_URL=http://localhost:52005
CLIENT_ID=test-report-client
CLIENT_SECRET=test-report-secret

TOKEN=$(curl -sS -u "$CLIENT_ID:$CLIENT_SECRET" \
  -d grant_type=client_credentials \
  -d 'scope=report:print report:status report:download' \
  "$BASE_URL/api/oauth/token" | jq -r .access_token)

curl -sS \
  -H "Authorization: Bearer $TOKEN" \
  -H 'Content-Type: application/json' \
  -d '{"rows":[{"item":"seed"}],"parameters":{}}' \
  "$BASE_URL/api/report/print/00000000-0000-0000-0000-000000000002/invoice.report/v1"
Even if templatePath contains a /, the last segment after it is resolved as the tag. Status and download can only be referenced by the same API client that created the print request.
Using tsreport-sdk, you can handle token acquisition, queuing, polling, and PDF retrieval through a single TypeScript API.
import { TsreportClient } from 'tsreport-sdk'

const client = new TsreportClient({
    baseUrl: 'https://reports.example.com',
    clientId: process.env.REPORT_CLIENT_ID!,
    clientSecret: process.env.REPORT_CLIENT_SECRET!
})

const pdf = await client.printAndDownload(
    '00000000-0000-0000-0000-000000000002',
    'orders/invoice.report',
    'v1',
    { rows: [{ orderId: 42 }], parameters: {} }
)
Do not embed the Client Secret in a browser. When using this from a browser app, route it through your own authenticated backend. createPreviewEndpoint in tsreport-sdk/server can be used to safely relay the preview asset API.
Print requests from the API are registered in the DB's PrintRequest as queued. tsreport_editor_cron triggers an authenticated batch endpoint every 10 seconds, transitioning state from queued → processing → completed or error. Concurrent execution is serialized via DB locking.
Generated PDFs are stored under /var/nfs/report-pdf. On the print history screen, you can check the following for your own account:
- Execution date/time
- Execution path:
editor/api/mcp - Workspace, template, and format
- Completed/error status and error reason
- Re-download of completed PDFs
PDFs generated in the Editor are recorded to the history API from the browser. MCP's render_report(format="pdf") is also recorded in the history. History is account-isolated; even administrators cannot view another account's history.
In operation, back up the DB and server/nfs as the same recovery point. Restoring only history rows, or only PDF files, will leave the audit trail and the actual output out of sync. Retention period and disk monitoring appropriate to output volume should also be decided by operations.
MCP is independent of the OAuth client used for the external print API. It authenticates with each user's login ID and MCP key, and operates with the same workspace/sharing permissions as that user.
- Open "MCP Settings" from the hamburger menu.
- Turn on MCP for your own account.
- Copy the MCP key. Regenerate the initial key before going into production.
- Administrators can configure MCP on/off overall and the dedicated port on the same screen.
Normally you use http://localhost:52005/api/mcp, the same as Next.js. In the development environment, the dedicated listener http://localhost:52006 is also available. Configure the MCP client with the Streamable HTTP URL and one of the following authentication methods:
x-mcp-account: <login ID>andx-mcp-key: <MCP key>Authorization: Bearer <login ID>:<MCP key>
The setup guide can be retrieved without authentication.
curl http://localhost:52005/api/mcpExample of checking the tool list:
curl -sS http://localhost:52005/api/mcp \
  -H 'Content-Type: application/json' \
  -H 'x-mcp-account: admin' \
  -H 'x-mcp-key: <regenerated MCP key>' \
-d '{"jsonrpc":"2.0","id":1,"method":"tools/list","params":{}}'| Category | Tools |
|---|---|
| Introduction | get_started |
| Discovery | list_workspaces, list_templates, list_workspace_files, list_fonts |
| Templates | get_template, get_template_schema, validate_template, save_template, update_template_elements |
| Assets | save_workspace_file, delete_workspace_file |
| Validation/output | layout_report, render_report, compare_reports |
| Original import | import_pdf |
The recommended work loop is as follows:
- Read
get_startedandget_template_schema. - Check available resources with
list_workspaces,list_templates,list_workspace_files, andlist_fonts. - Generate a template, or retrieve one with
get_template. - Validate the structure and expressions with
validate_template. - Numerically confirm absolute coordinates, page count, and out-of-bounds elements with
layout_report. - Visually confirm with
render_report(format="png"). - Save with
save_templateorupdate_template_elements. - Compare before and after the change with
compare_reportsto confirm there is no unintended movement.
If an original PDF exists, proceed in the order save_workspace_file → import_pdf → adjusting expressions and bands → layout_report / render_report, rather than recreating it visually.
The Editor UI can be switched between Japanese, English, Simplified Chinese, Korean, Traditional Chinese, Vietnamese, Thai, Indonesian, German, French, Spanish, Portuguese, Arabic, and Hebrew. For Arabic and Hebrew, the UI also becomes RTL. This does not restrict which scripts can be used within a report itself.
Administrators can configure external Google/Microsoft login. If external login is not enabled, the system can be operated using only local accounts protected by Argon2id.
To use AI assistance features, register an API key and model in the DB's system settings. No valid external API key is included by default. Do not store secret values in source, .report files, workspaces, or the README.
On first startup, the following are created:
adminandtestaccounts, and fixedworkspaceKeyvalues- A regression API client
test-report-clientowned bytest invoice.report,sub.report, andassets/logo.pngin thetestworkspace- The published tag
v1forinvoice.report - A read/write share of the
assetsfolder fromtesttoadmin
Fixed keys:
admin:00000000-0000-0000-0000-000000000001test:00000000-0000-0000-0000-000000000002
These are used for real-server regression testing of tsreport-editor, tsreport-sdk, and tsreport-react. In production, be sure to change or delete the initial credentials described above.
To fully recreate PostgreSQL in the development environment, stop the containers, delete server/db/pgdata/data, and restart.
cd ../tsreport-editor/server
docker compose down
rm -rf db/pgdata/data
docker compose up --build --watch
On restart, PostgreSQL's DDL is applied, and initial DB data such as initial accounts, API clients, and published tags is recreated when the application starts. Regression workspace files are only replenished if missing. Do not delete pgdata while the DB container is running.
This operation only resets PostgreSQL. Workspaces, fonts, generated PDFs, and other data stored in server/nfs are not deleted. If you need to reset both the DB and NFS to their initial state, use "Factory Reset" in the administrator menu.
"Factory Reset" deletes all DB tables, workspaces, and report output, and recreates the first-run state. This cannot be undone. Fonts, certificates, and dotfiles such as .gitignore are not deleted.
| Data | Inside container | Development host side |
|---|---|---|
| PostgreSQL | /var/pgdata/data |
server/db/pgdata |
| Workspaces | /var/nfs/workspaces/{workspaceKey} |
server/nfs/workspaces |
| Account fonts | /var/nfs/fonts/{accountId} |
server/nfs/fonts |
| Generated PDFs | /var/nfs/report-pdf |
server/nfs/report-pdf |
| nginx logs | /var/log/nginx |
logs/nginx |
Application data export/import can be run from the administrator menu. For whole-environment disaster recovery, do not rely on this feature alone — also maintain consistent backups of PostgreSQL and NFS.
Production build and startup also assume Docker Compose. build.sh, build_boot.sh, boot.sh, boot_db.sh, boot_web.sh, and build_boot_web.sh are thin wrappers that invoke Docker Compose. They are not a procedure for installing Node.js dependencies on the host and running server.js directly as a resident process.
tsreport-core and tsreport-react are restored from npm at the versions pinned by src/package-lock.json.
cd ../tsreport-editor/serverEdit the production configuration.
boot/web/.env: DB connection information andREPORT_BATCH_TOKENboot/compose.yaml: PostgreSQL settings for the single-server configurationboot/db/compose.yaml: PostgreSQL settings for the DB/Web-separated configurationnginx/cert: proper TLS certificatenginx/conf: public hostname, forwarding destination, and required access control
Make sure DB_PASS in boot/web/.env matches DB_PASS in the Compose file for the configuration you adopt. The Web and cron services use the same REPORT_BATCH_TOKEN from boot/web/.env. The values in the repository are for local startup; always change them in production.
cd ../tsreport-editor/server
./build.sh
build.sh does not restore Node.js dependencies on the host. It syncs src to server/build/src, runs the Next.js production build in an isolated Docker build environment, and places the standalone output as follows:
server/boot/web/dist/standalone/
  ├─ server.js
  ├─ .next/
  ├─ node_modules/
  ├─ public/
  └─ seed/
The build includes TypeScript checking and Next.js production compilation. Confirm the command exits successfully and that boot/web/dist/standalone/server.js exists before starting the server.
If ./build.sh has already succeeded and boot/web/dist/standalone/server.js exists, you can start the production server without repeating the Next.js production build.
To run DB and Web on the same server:
cd ../tsreport-editor/server
./boot.sh
To separate the DB server and the Web server, run the respective commands on the DB host and the Web host.
# DB host
cd ../tsreport-editor/server
./boot_db.sh

# Web host
cd ../tsreport-editor/server
./boot_web.sh
boot.sh and boot_web.sh mount the existing boot/web/dist/standalone into the Node.js container and start it with PM2. Compose may update the Docker runtime image as needed, but it does not run the Next.js production build. To reflect source changes, first re-run ./build.sh.
A configuration where DB, Node.js, the report queue cron, and nginx all run on the same server instance. From build to resident startup, run the following single command.
cd ../tsreport-editor/server
./build_boot.sh
If already built and you only need to start it, run ./boot.sh. boot.sh uses boot/compose.yaml and starts all of the following services in the background as the tsreport-editor project, which does not conflict with other products' Compose projects:
| Service | Role | Published port |
|---|---|---|
tsreport_editor_db |
PostgreSQL | 52437 |
tsreport_editor_node |
Built Next.js standalone, MCP, update notifications | 52005, 52006, 52007 |
tsreport_editor_cron |
Triggers the asynchronous report queue every 10 seconds | None |
tsreport_editor_nginx |
HTTP/HTTPS reverse proxy | 52085, 52448 |
The Web container mounts only boot/web/dist/standalone, not the source tree, into /var/node, and runs server.js in PM2 cluster mode. Changes to src while running are not reflected in the production server. To reflect changes, run ./build.sh again and then restart the Web service.
Confirm startup:
docker compose --project-name tsreport-editor -f boot/compose.yaml ps
docker compose --project-name tsreport-editor -f boot/compose.yaml logs -f tsreport_editor_node
Stop:
docker compose --project-name tsreport-editor -f boot/compose.yaml downA configuration where PostgreSQL runs on a dedicated DB server, and Node.js, the report queue cron, and nginx run on a Web server. Place this repository on both hosts, and run one command on each of the DB host and the Web host.
On the DB host, start only boot/db/compose.yaml.
cd ../tsreport-editor/server
./boot_db.sh
Change boot/web/.env on the Web host to point to the DB host's private DNS name or IP address and the port the DB host exposes.
DB_HOST=db.internal.example
DB_PORT=52437
DB_NAME=TSREPORT_EDITOR_DB
DB_USER=postgres
DB_PASS=production DB password
REPORT_BATCH_TOKEN=shared secret for production
On the Web host, run the production build and start the Web-side services in a resident state with a single command.
cd ../tsreport-editor/server
./build_boot_web.sh
If already built and you only need to start the Web side, run ./boot_web.sh. The Web side's boot/web/compose.yaml starts only Node.js, cron, and nginx, and does not create a PostgreSQL container.
Confirm startup for the separated configuration:
# DB host
docker compose --project-name tsreport-editor-db -f boot/db/compose.yaml ps
docker compose --project-name tsreport-editor-db -f boot/db/compose.yaml logs -f tsreport_editor_db

# Web host
docker compose --project-name tsreport-editor-web -f boot/web/compose.yaml ps
docker compose --project-name tsreport-editor-web -f boot/web/compose.yaml logs -f tsreport_editor_node
Stopping the separated configuration:
# Web host
docker compose --project-name tsreport-editor-web -f boot/web/compose.yaml down

# DB host
docker compose --project-name tsreport-editor-db -f boot/db/compose.yaml down
Do not expose the DB's 52437 directly to the internet — allow it only within a private network reachable from the Web host. The DB_PASS in boot/db/compose.yaml on the DB host side and the DB_PASS in boot/web/.env on the Web side must be the same value. Workspaces, fonts, and generated PDFs are stored in server/nfs on the Web host side; no shared filesystem with the DB host is required.
Open https://<Web host>:52448 or http://<Web host>:52005 in a browser. If you use the external print API, also confirm that tsreport_editor_cron is Up.
For a normal stop/restart, server/db/pgdata and server/nfs on the Web host are preserved. Only when a DB reset is needed, follow the initialization procedure described above and delete db/pgdata/data after stopping the DB service.
Before going into production, confirm at least the following:
- The initial users, MCP keys, and regression API client have been changed or deleted
- The DB password and
REPORT_BATCH_TOKENhave been changed - A proper TLS certificate has been configured
/api/report/batch/processis not exposed externally without authentication- There is backup and capacity monitoring for the DB, workspaces, fonts, and generated PDFs
- The required fonts and published tags are registered for the target accounts
- The Editor, preview, and API printing have been verified with a multi-page report comparable to real data
Application settings are placed in server/node/.env for development, and server/boot/web/.env for production.
| Variable | Description | Development default |
|---|---|---|
DB_HOST |
PostgreSQL host | 172.31.0.30 |
DB_PORT |
PostgreSQL port | 15432 |
DB_NAME |
DB name | TSREPORT_EDITOR_DB |
DB_USER |
DB user | postgres |
DB_PASS |
DB password | postgres1234 |
REPORT_BATCH_TOKEN |
Shared secret for triggering the batch | tsreport-report-batch-local |
WORKSPACES_ROOT |
Workspace root | /var/nfs/workspaces |
NEXT_TELEMETRY_DISABLED |
Disables Next.js telemetry | 1 |
The overall MCP enabled state and dedicated port are managed as DB system settings from the admin screen. OAuth settings for external login and optional AI assistance settings are also managed via the admin screen/SystemProperty — do not write secret values into the README or source.
Host-side npm commands are independent of Docker and can be used normally:
cd ../tsreport-editor/src
npm ci
npx tsc --noEmit
npm test
npm run build
The Docker development server uses the dependencies captured in its image. Rebuild the image after changing package.json or package-lock.json; Compose Watch performs that rebuild automatically while the following command is running.
cd ../tsreport-editor

docker compose -f server/compose.yaml exec tsreport_editor_node npx tsc --noEmit
docker compose -f server/compose.yaml exec tsreport_editor_node npm test
docker compose -f server/compose.yaml exec \
  -e TSREPORT_EDITOR_LIVE_BASE=http://localhost:3000 \
  tsreport_editor_node npm run test:live

cd server
./build.sh
Development, tests, and production builds restore both tsreport-core and tsreport-react from npm. No sibling repository checkout is required.
| Path | Contents |
|---|---|
src/ |
Next.js Editor, REST API, MCP, server logic |
tests/ |
Unit, integration, and real-server regression tests |
server/ |
Docker development, build, and production startup configuration |
cli/ |
Auxiliary scripts |
Related repositories:
| Repository | Contents |
|---|---|
tsreport-core |
A pure TypeScript report layout, rendering, PDF, and font engine |
tsreport-editor |
This browser-based report designer and report server |
tsreport-sdk |
A zero-dependency TypeScript SDK for the print/preview API |
tsreport-react |
A React preview UI that uses tsreport-core |
tsreport-editor is available under either the MIT License or the Apache License 2.0, at the user's option (SPDX: MIT OR Apache-2.0).