We present below the framework for synthetic data collection that is efficient in terms of time taken to collect and annotate data, which makes use of free and open source software tools and 3D assets. Our approach provides a large number of systematic variations in synthetic image generation parameters. The approach is highly effective, resulting in a deep learning model with a top-1 accuracy of 72% on the ObjectNet data, which is a new state-of-the-art result. A sample dataset for 10 classes in the ObjectNet can be downloaded from https://ieee-dataport.org/documents/hybrid-synthetic-data-outperforms-real-data-objectnet. To flexibly generate data for any class, the steps below can be followed.
Install dependencies for AirSim and build AirSim for Windows for the "Blocks" environment in Unreal Engine, from https://microsoft.github.io/AirSim/build_windows/
Supplementary files for generating a dataset to test on a subset of the dataset "ObjectNet" [1] can be found below. The files belong to the following 10 classes. Mug, Drill, Umbrella, TV, Cell Phone, Chair, Bicycle, Tennis Racket, Stuffed Animal and Vase. There are two zip files, one for the 3d models and the other for the backgrounds/floors.
The procedure below can be used to generate a synthetic dataset for image classification. 3d models for those classes have to be downloaded for that.
-
Script to generate the objects and their backgrounds/floors in the Blocks environment is generate_objects_and_floors.py
-
This script has to be placed inside your content folder in Blocks project. Example: D:\Unreal\Environments\Blocks
-
Downloaded 3d models for the object classes have to placed somewhere inside the ..\Blocks\Content folder with one folder for each object class. Both Free and paid 3d models can be sourced from 3d market places in many popular formats such as .fbx or in the native Unreal engine asset format .uasset. The 3d model files in other formats such as fbx have to drag and dropped inside the Contents\Your-models-folder inside Unreal Engine explorer. That way, the model files will be converted accordingly.
-
Download the background/floor textures from the link provided in background_textures.zip. Or create your own floor textures from image files.
-
In generate_objects_and_floors.py, the following sys.args have to be passed .
- Path to the 3d models D:\AirSim\UE4.24_v4\AirSim\Unreal\Environments\Blocks\Content\Imports\ExportedFBX_trial
- Path to the background textures Note: /Game/ folder in this script is relative to unreal python environment= ...\Blocks\Content\ in windows explorer. Which means '\Blocks\Content\Imports\Models' maps to , '/Game/Imports/Content/Models' ingenerate_objects_and_floors.py ( Unreal python script)
- 3rd argument is the number of 3d models. (For the example case, there are 65 models)
-
Then inside Unreal's OutputLog section, (bottom left switch Python instead of Cmd as shown below)
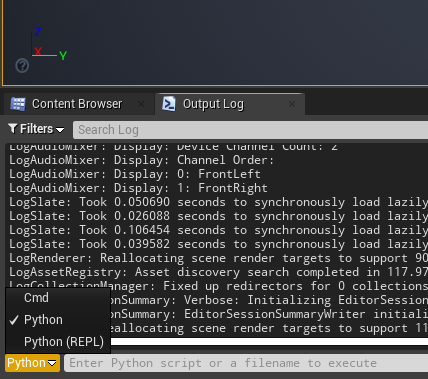
Run the following commands in the Unreal's Python terminal Python import sys import generate_objects_and_floors #Our script generate_objects_and_floors.main()
-
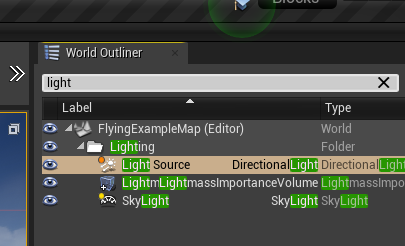
Search for light source in the "World Outliner" on top right corner of Unreal Engine interface as shown below
-
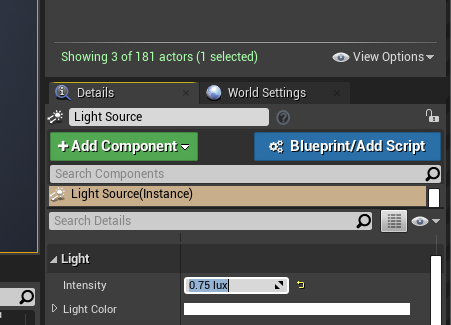
Change light source intensity to 0.75 lux in the details
-
Change the AirSim playerstart location to 0,0,0
-
Run script capture_images.py from system cmd prompt (where AirSim was built) It takes two arguments
- Number of images completed. At the start, run with 0, Ex. > python generate_objects_and_floors.py 0 65 (0 is the number of images already done. The script outputs in terminal, number of images completed. So if image capture terminates before end, say 860).
Run command again with 200 as arg Ex. python generate_objects_and_floors.py 200 65
- Similar to previous script, the total number of 3d models for all object classes combined. (Default value is 65 for the sample case)
-
Replace settings.json (Usually in Documents folder) , with settings.json file in link, to reflect the 1024x1024 resolution. The image resolution, field of view, and other camera and image parameters can be modified in settings.json. This will capture images and put it in folder specified in capture_images.py
-
The final step is to use categorise_objects.py script to categorize all the captured images into their respective classes, and 'train' , 'val' directories with a 90:10 split correspondingly.
[1] - Barbu, A., Mayo, D., Alverio, J., Luo, W., Wang, C., Gutfreund, D., Tenenbaum, J.B., & Katz, B. (2019). ObjectNet: A large-scale bias-controlled dataset for pushing the limits of object recognition models. NeurIPS.