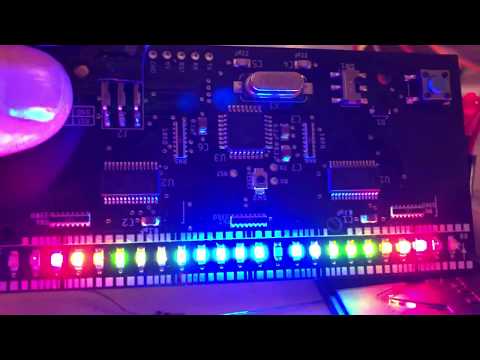
One dimensional pong board & source code (made using Autodesk EAGLE 9.2)
This handheld version of One D pong was inspired by One D pong that a friend built for a Hackaday event ages ago. The source code here (new) supports both one-player and two-player versions. The files were designed in EAGLE. To get the firmware programmed:
-
Plug in your OTS Arduino Uno and setup as a programmer by loading the Arduino as ISP project and programming it.
-
Next up, install a library to support programming ATMEGA 328P (there are MANY)...A few I use are:
FWIW, that second option is magical. It uses Optiboot and is super user-friendly. Follow the instructions on their website and you can't go wrong.
-
Once you have that package installed, you can select the ATMEGA328 as the target and connect the Arduino's SPI (ISP) connections to the board's right-angle programming header...The pins are called out in the silkscreen on the board.
-
You'll first need to load the Arduino bootloader and you do this from the Arduino IDE using Tools->Burn Bootloader
-
With the bootloader flashed, you can then program any arduino sketch onto the board though since this is purpose-built for One-D pong, I would of course suggest using the One-D pong .ino file in this repo.
A few things to note:
-
The LED driver ICs can sink more than they source. They can only source about 10mA but they can sink something like 25mA. This is why the LED cathodes are wired into those driver ICs and not to GND.
-
These boards were designed to be hand assembled and since I'm profoundly lazy, I chose to use Resistor Arrays and not individual resistors. These little devices are small but they can definitely be hand soldered, probably far more easily than the TSSOP packages that the LED drivers use.
-
I made my own stencils using Kapton using the Glowforge Pro. You can cut 5mil Dupont Kapton (non-adhesive) which you can get from Amazon using the following settings:
- Speed: 650
- Power: 90%
- Passes: 3
- Lines Per Inch: 225
- Focus Height: 0.005in.
This worked like a charm but took some cleanup afterwards. The benefit of a stencil is of course repeatability. If you have difficulty cutting Kapton, buy Mylar in 4mil sheets (again, Amazon) and cut that. 4mil Mylar will also take several passes to cut thru but I used settings very similar to the Kapton and that worked good.
Working version: