BreachPoint is a cloud-native security scanner hosted on Azure. It allows administrators to audit target domains, identify open network ports, and map discovered services to public CVE databases. Featuring an intuitive web dashboard and non-intrusive scanning, BreachPoint simplifies attack surface management and network vulnerability mapping.
- Unit: ICT-171 Final Project
- Student: Zaynaldin Ahmed Abdelfattah Attia
- ID: 35997081
- Domain: https://breachpoint.ddns.net/
- Public IP: 20.89.20.174
- SSH Username:
breachpoint
- Port Discovery: Scans common network ports on a target domain to identify exposed services.
- CVE Mapping: Automatically cross-references open ports with known vulnerabilities.
- Web Dashboard: A clean web interface to easily run scans and view logs.
This guide is designed to take you from a local application to a fully live, secure cloud-hosted web server on Microsoft Azure. Whether you are deploying an API, a portfolio site, or a custom cybersecurity tool like BreachPoint, these foundational steps apply to almost any web technology stack.
Before you begin, ensure you have the following ready:
- A Cloud Account: An active Microsoft Azure account (such as a Free Tier or Student Account).
- Local Terminal: A terminal or command-line interface (Terminal on macOS/Linux, or PowerShell/Git Bash on Windows).
- Application Code: A web application code structure ready in a local folder or pushed to a GitHub repository.
- Basic CLI Comfort: Familiarity with running basic commands (navigating directories, connecting to remote systems).
The first step is setting up your virtual hardware in the cloud.
-
Create an Azure Virtual Machine:
- Log into the Azure Portal and search for Virtual Machines.
- Click Create → Azure Virtual Machine.
- Select a lightweight, cost-effective Linux image (e.g., Ubuntu Server 22.04 LTS).
-
Configure Administrator Account:
- Under Administrator account, select Password as your authentication type.
- Set your administrator username (e.g.,
breachpoint). - Enter a strong, secure password of your choice. Keep this safe, as you will need it to log into the system!
💡 Tip: You can choose to set up SSH keys here instead, but password authentication is often much more straightforward and beginner-friendly when you are deploying your very first cloud server.
-
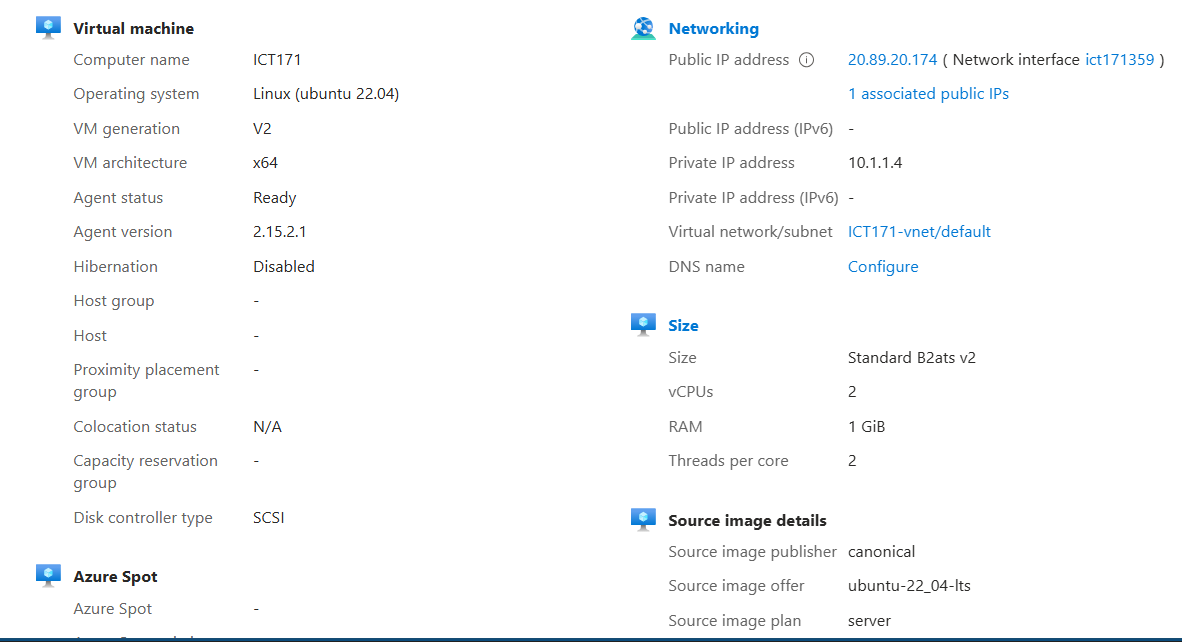
Verify Your VM Properties (Visual Check): Once your VM deployment is complete, navigate to your resource. Your Azure Virtual Machine dashboard configuration should resemble the following layout:
+---------------------------------------+---------------------------------------+
| 💻 VIRTUAL MACHINE PROPERTIES         | 🌐 NETWORKING DETAILS                 |
+---------------------------------------+---------------------------------------+
| Computer name:      ICT171            | Public IP address:    20.89.20.174    |
| Operating system:   Linux (ubuntu 22.04) | Private IP address:   10.1.1.4        |
| VM architecture:    x64               | Virtual network:      ICT171-vnet     |
| Agent status:       Ready             |                                       |
+---------------------------------------+---------------------------------------+
| 🎛️ HARDWARE SPECIFICATIONS             | 💿 STORAGE & SOURCE DETAILS           |
+---------------------------------------+---------------------------------------+
| VM Size:            Standard B2ats v2 | OS Disk Name:         ICT171_OsDisk   |
| vCPUs:              2                 | Source Publisher:     canonical       |
| RAM Memory:         1 GiB             | Source Plan:          server          |
+---------------------------------------+---------------------------------------+
it should look like that:
Before you can connect to your newly created Virtual Machine or host your website, you must configure the firewall (Network Security Group) in Azure to allow traffic through specific ports.
Without this step, you will not be able to SSH into your server, and your web pages will be blocked from the public internet.
- Navigate to your newly created Virtual Machine dashboard in the Azure Portal.
- On the left-hand sidebar, scroll down to the Settings category and click on Networking (or Network settings).
- Click on the Add inbound port rule button to open the configuration panel.
- Add the following three rules to allow essential traffic:
| Service | Port Range | Protocol | Action | Description |
|---|---|---|---|---|
| SSH | 22 |
TCP | Allow | Allows secure terminal connection to manage your Linux VM. |
| HTTP | 80 |
TCP | Allow | Allows standard unencrypted web traffic (needed for Apache and Certbot validation). |
| HTTPS | 443 |
TCP | Allow | Allows secure, encrypted web traffic once your SSL certificate is installed. |
⚠️ Security Tip: Ensure that the Action for all three rules is set to Allow and that you click Add/Save to apply the changes. It may take a minute for Azure to update the Network Security Group.
With your cloud server officially online, the next step is securely logging in via the Command Line Interface (CLI) and setting up essential defensive baselines.
Open your local terminal (Terminal on macOS/Linux, or PowerShell/Git Bash on Windows) and execute the SSH command below:
ssh yourname@publicip
(e.g., 'ssh breachpoint@20.89.20.174')-
The First-Time Connection Warning: You will see a prompt saying:
The authenticity of host... can't be established. Are you sure you want to continue connecting (yes/no/[fingerprint])?Type
yesand press Enter. -
Entering Your Password: The terminal will ask for your administrator password.
⚠️ Linux Security Note: When you type your password in the terminal, no characters, dots, or asterisks will appear on the screen. This is a standard security feature to prevent "shoulder-surfing" (people looking over your shoulder to steal your password). Just type your password blindly and hit Enter.
Before hosting any applications online, update your package manager and patch any outdated system libraries to ensure everything is secure:
sudo apt update && sudo apt upgrade -yWith a secure operating system environment running, we will now deploy the Apache HTTP Web Server to host and serve our application files to the public.
Run the following command to install the Apache web server package on your virtual machine:
sudo apt install apache2 -yUse the system service manager (systemctl) to ensure Apache starts up immediately and launches automatically whenever your server reboots:
# Start the web server
sudo systemctl start apache2

# Enable the service to launch on boot
sudo systemctl enable apache2

# Check the status to verify it is active and running
sudo systemctl status apache2Once the service is active, you can verify your web server is successfully receiving traffic:
-
Open a web browser on your computer.
-
Enter your VM's public IP address in the address bar:
http://your-public-IP
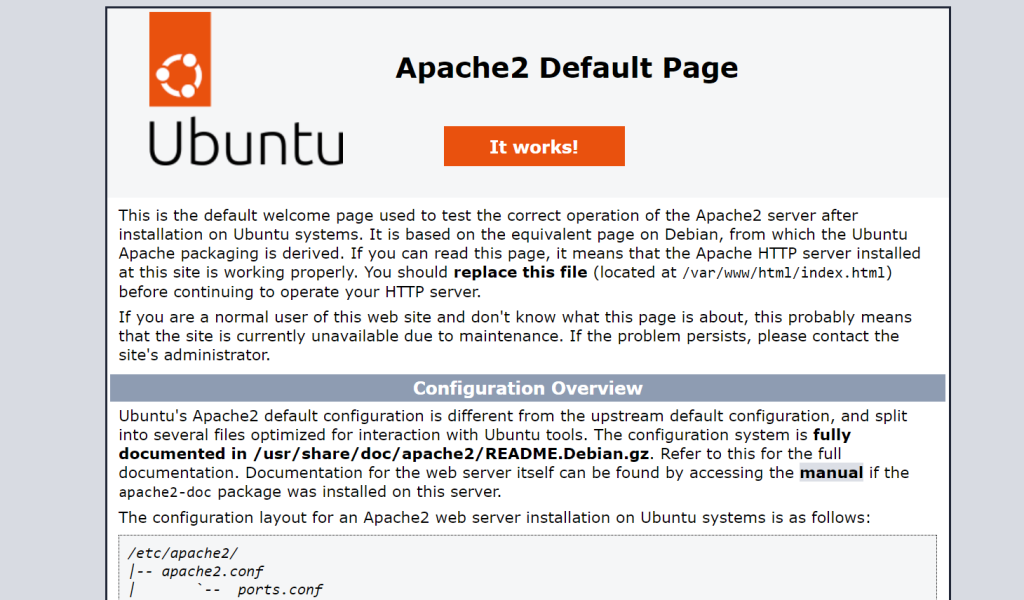
If everything is configured correctly, you will be greeted by the default Apache2 Ubuntu Default Page! This confirms your cloud virtual machine is fully serving web traffic to the public internet:
While you can write code directly inside the Linux terminal using editors like nano, it is much easier to design your HTML, CSS, and JavaScript files locally on your own computer and upload them using a graphical SFTP (Secure File Transfer Protocol) client like FileZilla.
If you do not have one installed, download a free file transfer tool:
- Windows & macOS: Download FileZilla Client or WinSCP (Windows only)
- Open FileZilla (or WinSCP).
- Look for the Quickconnect bar at the top (or open the Site Manager):
- Host:
sftp://your-public-IP(Make sure to typesftp://before your IP!) - Username:
your-username - Password: (Your VM administrator password)
- Port:
22
- Host:
- Click Quickconnect. If a popup warns you about an "Unknown host key", check the box to trust it and click OK.
You will see your local computer files on the left panel and your Azure Linux server files on the right panel!
By default, Apache's web folder is located at /var/www/html/. Because this is a system folder owned by the root user, your standard Linux user won't have permission to upload files to it yet.
To fix this, go back to your SSH Terminal and run this command to grant your specific user ownership of the web directory (replace your-username with your actual VM login name):
sudo chown -R your-username:your-username /var/www/html- In the right panel (remote server) of FileZilla, navigate to the folder:
/var/www/html/ - You will see a default file named
index.html(this is the Ubuntu welcome page we saw earlier). You can safely delete it or rename it. - In the left panel (your computer), locate your local project folder.
- Simply drag-and-drop your custom
index.html,style.css, and other web assets from the left panel straight into the/var/www/html/folder on the right panel!
Once the transfer is complete, refresh your public IP address in your web browser to see your custom website live on the internet!
Remembering a raw IP address like 20.89.20.174 is difficult for users. Setting up a Domain Name System (DNS) maps your public IP address to a memorable name (like breachpoint.ddns.net).
Depending on your budget and project requirements, you can configure this using a free dynamic DNS provider or a paid custom domain registrar.
If you want a free domain name for testing or an academic project, No-IP is an excellent, beginner-friendly choice.
- Create a Free Account:
- Go to No-IP.com and register for a free account.
- Create Your Hostname:
- In your dashboard, click Quick Add or Create Hostname.
- Choose a unique hostname (e.g.,
yourprojectname). - Choose a free domain extension from the dropdown (such as
.ddns.net).
- Map Your Azure Public IP:
- Set the Record Type to A (Host).
- Paste your Azure VM's Public IP address (e.g.,
your-public-IP) into the IP Address field. - Click Create Hostname / Save.
If you are deploying a production-ready application and want your own custom extension (like .com, .net, or .org), you can purchase a domain through a registrar like GoDaddy.
- Purchase Your Domain:
- Search for and buy your preferred domain on GoDaddy.com.
- Access DNS Management:
- Log into your GoDaddy dashboard, navigate to My Products, find your domain, and click on DNS or Manage DNS.
- Add an 'A' Record:
- Look at your existing DNS records. You will want to edit or add a record with the following configurations:
- Type:
A - Name:
@(This represents your root domain, e.g.,yourdomain.com) - Value / Points to:
your-public-IP(Your Azure VM's Public IP address) - TTL:
1 Hour(orDefault)
- Type:
- (Optional) To make sure
www.yourdomain.comworks as well, add a CNAME record:- Type:
CNAME - Name:
www - Value:
@
- Type:
- Look at your existing DNS records. You will want to edit or add a record with the following configurations:
- Save Changes:
- Save your configuration. Note that GoDaddy DNS updates can take anywhere from a few minutes to a few hours to propagate globally.
Once configured, test that your domain successfully resolves to your Azure VM:
- Open your terminal and run a ping command:
ping your-domain.ddns.net
# or
ping yourdomain.com
Currently, your website is running over HTTP, meaning all data sent between the browser and your server is unencrypted. To secure your site and get the padlock icon (HTTPS) in the address bar, we will install a free SSL/TLS certificate from Let's Encrypt using the Certbot utility.
Before requesting a certificate, make sure your Azure Virtual Machine is configured to allow HTTPS traffic on Port 443.
- Go to your Azure Portal -> Virtual Machines -> Networking.
- Ensure there is an inbound security rule allowing HTTPS (Port 443) alongside your existing HTTP (Port 80) and SSH (Port 22) rules.
SSH into your VM and run the following command to install Certbot and its Apache plugin:
sudo apt install certbot python3-certbot-apache -yThis step just installs the packages — it runs non-interactively and won't prompt you for anything.
Run Certbot's automated script for Apache. Replace your-domain with your actual domain name:
sudo certbot --apache -d your-domain✍️ This is where Certbot will prompt you for the following:
- Enter an email address — used for urgent renewal and security notices.
- Agree to the Terms of Service — type
Aand press Enter.- Share your email (optional) — choose
Y(yes) orN(no).- Configure redirects — Certbot will ask if you want to automatically redirect all HTTP traffic to HTTPS. It's highly recommended to select the redirect option (usually option
2) so all traffic is forced onto the secure connection.
Once finished, Certbot will update your Apache configuration automatically and print a success message.
Let's Encrypt certificates are valid for 90 days. Certbot automatically sets up a background system timer to renew them before they expire. You can run a "dry run" test to verify that the auto-renewal mechanism is working perfectly:
sudo certbot renew --dry-run- Open your web browser.
- Navigate to your website using
https://(e.g.,https://your-domain). - Look at your address bar—you will now see the padlock icon 🔒, verifying that all traffic to and from your web application is fully encrypted!
Congratulations! You have successfully built, deployed, and secured a cloud-hosted web server from scratch. By completing this guide, you have established a solid foundation in modern cloud infrastructure and system administration:
- Virtualization & Cloud Management: Provisioning and configuring an active Linux Virtual Machine in Microsoft Azure.
- Web Server Administration: Deploying and managing Apache2 to serve web traffic.
- Secure File Operations: Implementing safe directory permissions and managing server files graphically via SFTP.
- Network Security & Cryptography: Opening secure communication channels (Ports 80/443) and implementing automated TLS/SSL encryption with Let's Encrypt to guard against interception attacks.
This robust environment is now ready to host your web application securely under a custom domain name!
BreachPoint processes targets through a robust three-stage pipeline:
- Ingestion: Validates the target domain or IP to ensure it is reachable, preventing wasted resources on invalid inputs.
- Port Reconnaissance: Scans for common ports (e.g., 80, 443, 22, 21) to identify active services and capture service banners (e.g.,
Apache/2.4.41,OpenSSH 8.2). - CVE Cross-Referencing: Matches identified service versions against the National Vulnerability Database (NVD). It flags known vulnerabilities, turning raw port data into prioritized security intelligence.
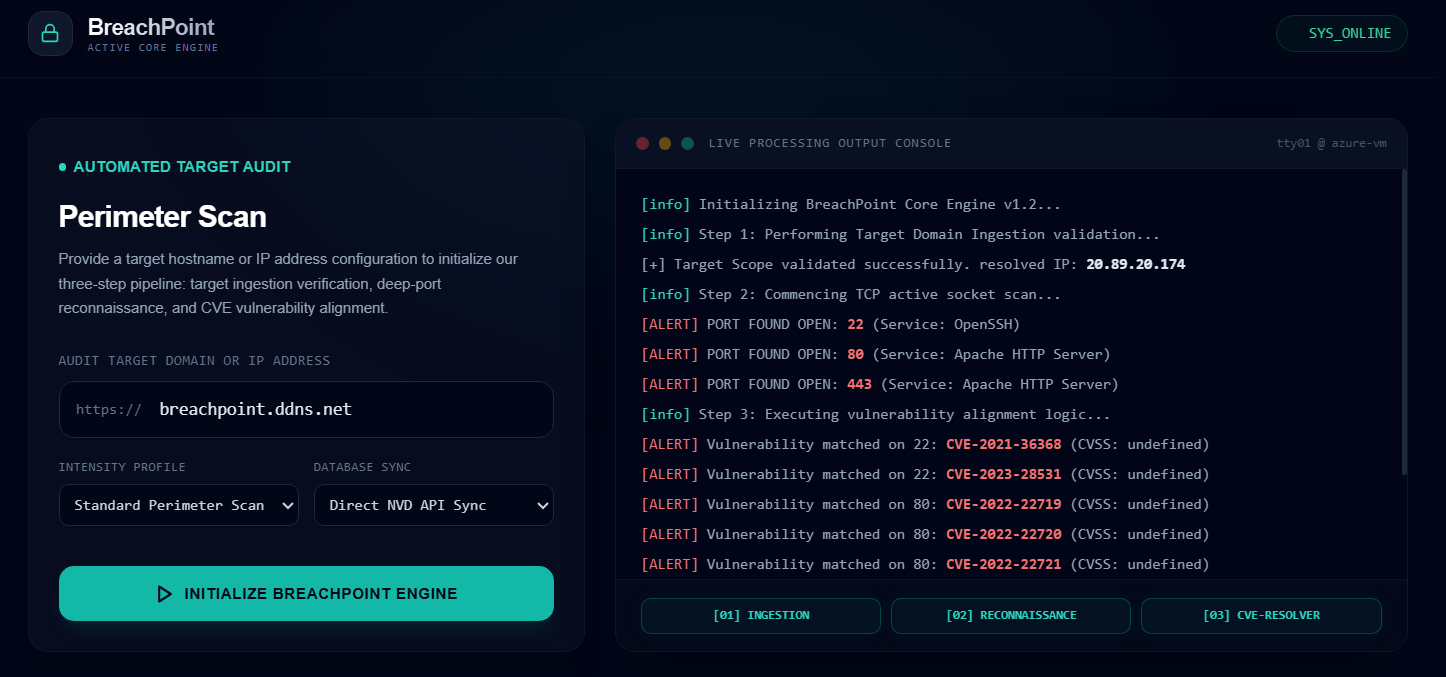
The BreachPoint dashboard provides a comprehensive view of your target's security posture:
- Perimeter Score: A quick-reference score out of 100.
- Port Inventory: A detailed table of open ports categorized by risk level.
- Live CVE Feed: Real-time alerts for matched vulnerabilities.

BreachPoint is currently in a beta development phase. While the tool is stable and performing well for its current feature set, it is not yet optimized for heavy or deep scanning operations.
I have a clear long-term vision for this project and am actively developing new features to ensure it becomes a reliable resource for professional penetration testers. Because the backend architecture is quite complex, I am taking a phased approach to its growth. As I release updates, I will also be working to keep the codebase clean, modular, and easy for everyone to understand.
Thank you for following the progress of BreachPoint. I am fully committed to keeping this project active and evolving it into a robust tool you can rely on. Please note: I uploaded the index.html file which is the frontend of this tool, the backend (which is python) is still confidential until I offically release the tool (becaue it's in beta)
- Zaynaldin Ahmed Abdelfattah Attia (Student ID:
35997081) - Cybersecurity Student
This project is licensed under the MIT License - see the LICENSE file for details.